Stamping Sue -
INK IT! STAMP IT! USE IT!
All things stamped from me to you. Remember there are no mistakes in stamping just Happy Accidents! Stamping is an adventure to be experienced so have a cup of tea and relax while visiting. All comments are welcome and appreciated.
This week for #Altenewchallengelive with Jen Rzasa the theme is Pastel perfection.
The pastel perfection on all these cards/tag are Pebbles pearlescent chalks in the background. Basically what I did was burnish the chalks with cotton balls on white cardstock.
2. Blend colors between the masked section. For the above card I did the colors in three sections. When done blending colors the first time, go over it again to smooth out the colors.
3. remove the masks. Stamp image with black ink on the card leaving some of the image over the blended colors.
stamps used: Unity stamp co. Coffee Doodle Doo, Scallop/rectangle dies, Stencil by Tim Holtz Splatters
Basic instructions:
1. Use deckle edge ruler to create ripped looking edges on copy paper. Place the ripped copy pieces on the card.
2. Repeat step 2 from above.
3. Leave masks on card. Place stencil over masked section and stencil colors over stencil.
4. Remove stencil and masks.
5. Stamp Doodle doo bird, and saying with black ink.
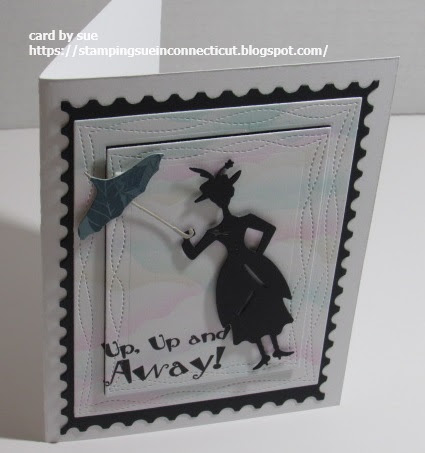
Actually in my card Mary Poppins is sliding away on my ribbon slider card.
stamps/supplies: MFP saying Up, up..., Sizzix TH The Park die set
I'm call this character Mary Poppins but, I guess, legally you can't name these dies because she is licensed by Disney. The die set is called The Park but she does make you think of Mary Poppins. Anyways I made an old favorite moving card that is a Ribbon Slider card.
Instructions:
1. Make any size card that works for you with a layer for the sliding character.
2. Cut 2 parallel lines 1/4" to 1/2" apart for the moving mechanism on the layer that will have the character. Make
the length of cut to accommodate your card.
3. Cut ribbon twice the size of your card. Cut strip of cardstock to wrap,
and tape ribbon that will slide back & forth on your card. The ribbon gets tape to the sliding strip only. Make 2
more strip wraps, and tape each one on ends of parallel lines with ribbon
threaded through but do not tape ribbon to strips. These will be end
stoppers.
4. Tape cardstock with sliding mechanism that you stamped scene to base
card. On this card I cut out a cloud template to create the background.
5. Use mounting tape to attach your image on movable strip which will go
around parallel lines.
6. Pull your ribbon and see what happens!
Here's a short video I did a few years ago showing how the ribbon slider works.
I'm here today to show you a fun supply called wobbles that you add to the back of an image to make it wobble on your card. I do like to create interactive cards, and this is an easy one. The hat was embossed with white embossing powder on red cardstock. Butterfly trail stencil was done in a light blue ink for background.
Check out this short video to see the wobble in action.
As you can see I created tags and a card.
Here's a photo showing Santa's hat in motion on my tag.
Penny spinners are fun to create and to make spin.
basic instructions:
1. base card - 5 1/2" x 8 1/2" fold in half at 4 1/4" to create card base.
2. Emboss 4" x 5 1/4" layer with spider web embossing folder. This is an old one, sorry don't know the brand...but use any you have.
3. Cut out opening with Lawn Fawn slide on over dies or again any you might have in your stash.
4. Place 1 penny behind opening, add foam dot (mounting tape)to penny. Adhere second penny over the penny with the foam dot.
5. Add image (monster) to penny with another foam dot.
6. Add foam mounting tape all around the back of the layer with the monster on the pennies in the opening. Adhere this layer to base card.
VIOLIA done! Now turn the card back and forth to make the monster slide and spin on the card. See another penny spinner here with a video. Just type in penner spinner in search bar to find lots more of this style card way back to 2013.
Stamp an image or two on the back of an envelope to go with the card.
I couldn't help myself!!! A few nights ago a thunderstorm blew down my tall gladiolus ... so ... when that happens do Duoprinting w/chlorophyll technique! If you scroll down you can watch video or go to my you tube channel to see this video, and more.
stamps used: Stampin' Up
If you look at the card on the left up in the corner ... that is a gladiolus flower. It looks like a big blob of colors, but I like it.
I have more to make into cards, but didn't have time ... so will do them soon. More cards and tags
As you can see by all these cards, and tags I was in a sea creatures mood. Hope you like them as much as I do.
For my change can be...card I blended three colors on a white card for a simple background.
stamps used: Unity stamp co. Moments of Bliss, Time to Refresh
For my second card I did a grid technique. Another name for this technique is Retiform. You can check out video here in this post or at my you tube channel for more on grid techniques.
All I can say is that this technique is ADDICTIVE!
stamps used: Rogue Redhead Designs
With this bunch of duoprinting w/chlorophyll prints I cut them down into small tags. Added ribbon or brads to attach a white tag behind the printed tags.
See my video here:
stamps used: Stampin' Up
Above are large tag cards. Simple to make, just cut out two large tags one from the chlorophyll print, and one from white cardstock. On the white big tag score along the top at 1/4". Add liquid glue above the score line then place the chlorophyll tag print on top. When it's dry the tag will open just like a card.
Repeat the same steps to create a small tag card as with the big tags.
This time I ran some of the chlorophyll prints through an embossing folder. This added some dimension to the card. The hello card is a die cut. I have lots more prints but I won't show any more, because they are basically the same as what has been shown in all my latest posts. Just type chlorophyll in search bar to see all the posts again.
Thanks for stopping by. Come back again soon. Comments are always welcomed.
I tell you once you start making prints with this technique, you can't stop! Or maybe it's just me that can't stop! I did this technique back in 2017 ... that's six years ago. Scroll down to see video in this post or go duoprinting w/chlorophyll video on my you tube channel.
stamps used: MFP stamp co. for the sayings
The main thing is take a walk to pick leaves off trees, and ferns. Even herbs will print. If you look at the cards in the second pic ... those blotches of green are dill.
basic instructions:
1. fold a piece of copy paper in half - open it up.
2. cut two pieces of cardstock (I did 4 1/4" x 5 1/2") - place one of them inside the copy paper.
3. place your leaves or herbs or any combination on cardstock.
4. place another piece of cardstock on top of leaves/herbs.
5. fold the copy paper over the two pieces of cardstock with the leaves/herbs sandwiched inside them.
6. run them through Big Kick (whatever machine you own).
7. peel the two pieces of cardstock apart and VIOLA! beautiful nature cards.
Thanks for stopping by. Come back again soon, and if you try this technique show me your cards.
Here are some samples I made with other prints I made before this video. This technique can be addicting.
Above are postcards as you can see from the picture.
Here are stacks of prints I made including a bunch of envelopes.
Above are a couple of slimline cards. To see cards, tags, and postcards I have already created just type chlorophyll or duoprinting w/chlorophyll in search bar. There will be more cards samples coming soon.
stamps used: Altenew white swan echinacea stamp set
This a beautiful paint-a-flower stamp set, which just means there are no dies for this stamp set. The white swan echinacea is a cone flower.
basic instructions for tags:
First I die cut a small scallop rectangle out of kraft cardstock. Colored in the flowers with prisma color pencils. I do like how color pencils pop on kraft cardstock, and color pencils are my choice of mediums for coloring. I adhered the kraft card to a die cut banner, that was cut out of black cardstock.
basic instruction for cards:
Again I cut out small scallop rectangle, but with white cardstock this time. I colored the flowers with Altenew watercolor set. Now my favorite coloring medium but, I'm trying to expand my coloring mediums. Layered the colored flower card onto a bright orange card, then onto a 4" x 5 1/4" die cut scallop card, that I adhered a background piece. The background piece is the shaving cream technique, that you can see in this post from 2016, or more recently in this post. Oh, yes in both the links you can see an old video I made showing the shaving cream technique in action. You can also visit my you tube channel to see it, and more.
Had a lot of fun getting my hands full of ink, and shaving cream. There is a short video I did years ago at the end of this post.
SU stamp sets
Shaving cream backgrounds are easy to create, but can be a bit messy.
Instructions:
1. Squirt out some foam (cheap-dollar store shaving cream) shaving cream onto any surface. I used wax paper ... you could use a plastic coated paper plate, or pallet paper, too. Level out the shaving cream into a spot big enough for a quarter sheet of cardstock. At least that is the size I like to work with.
2. Drop 1 to 3 different colors of dye ink re-inkers onto the shaving cream.
3. Use a wooden dowel or toothpick. Whatever you can use to make swirls into the ink on the shaving cream.
4. Lay a piece of cardstock on top of the swirled shaving cream.
5. Take the cardstock by one corner, and pull it out of the shaving cream.
6. With an old credit card, or even a piece of cardboard, and scrap off all the excess shaving cream from cardstock. Next wipe down the cardstock with a sheet of paper towel.
Viola!!! See the fun background you created!
Hope you try this fun technique, and when you do show me your cards.