My stamping adventures

Showing posts with label Stampin' Up stamps. Show all posts

Thursday, December 19, 2024

Double diamond cards

 Double diamond card

stamps/supplies used:  SU Lighthouse stamp set & DSP

This is a fun fold card that is fun to create.

Here is a close up card of the double diamond card.
basic instructions:
base card:  4 1/4" x 11" score at 2 1/4", 4 1/2" & 7 3/4" - mtn./valley fold.
side view
DSP (pattern paper):  3 x 4, 2 x 4 & 1 x 4
base squares: 3" x 3"
white squares:  2 3/4" x 2 3/4"

I will be making more of these fun folds soon.
Thanks for stopping by.  Come back soon.


Saturday, August 10, 2024

Card swap cards

 Card swap cards

I am behind in showing my local card swap cards so here are a couple of them from a couple of months past.

The fruit card is what I call collage stamping, or some call it random stamping.  I used old wood mounted stamps, so the companies are out of business now.  It's good to go old school once in a while just to remember how I started in stamping.

stamps used:  various stamp companies 

The cupcake card was done with a sketch design...I know I'm not one to use sketches, but sometimes you just have to go out of your comfort zone.  Sketches are way out of my comfort zone.

stamps used:  Stampin' Up

Thank you for stopping by.  Come back soon.


Saturday, April 20, 2024

Missing Middle panel card

 Missing Middle panel card


This card is also called Split panel card, so just pick the name you like for this card. 

stamp/dies used:  Stampin' Up Cup of tea stamp/die set

I'm sure you can see why it is called Missing Middle panel card ... because the middle is missing.  The front of the card is held together with the stamped layer.  


Measurements/Instructions:

base - 4 1/4" x 11"  score at 5 1/2".  Cut 1 1/4" from the bottom of card.  Cut 6 3/4" from top...or you can cut 1 1/2" from bottom.  Cut 7" from top.  Make layers to fit size you choose.


You can make this card basically any size you choose...bigger or smaller panels.

Thanks for stopping by.  Come back soon.

Tuesday, February 6, 2024

Back fold Milkshakes

 Back fold Milkshakes

stamps/dies used:  Stampin' Up Share a milkshake

I have been having fun with this stamp set for months.  It makes good birthday, Valentine, or just because cards.

This card is called a Back Fold card.

In above picture you can see the card open, and closed. 
Measurements

base card: 5 1/2" x 7 1/4"  scored at 1 1/4" & 4 1/4"

Layers: pattern paper front 2 3/4" x 5 1/4" (front)

2 3/4" x 5 1/4" (inside left side)

1" x 5 1/4" (back fold-right side)

Use mounting tape to mount image on back fold (right side) of the card.  BUT only put mounting tape on right side of image otherwise you will tape the card closed ... and you don't want that.  teeheeheee

Thank you for stopping by.  Come back again soon.

***not affiliated with company just satisfied customer***


Tuesday, August 8, 2023

Video - Duoprinting w/chlorophyll...yes, one more time!

 Duoprinting w/chlorophyll...yes, one more time!

I couldn't help myself!!!  A few nights ago a thunderstorm blew down my tall gladiolus ... so ... when that happens do Duoprinting w/chlorophyll technique! If you scroll down you can watch video or go to my you tube channel to see this video, and more.

stamps used:  Stampin' Up

If you look at the card on the left up in the corner ... that is a gladiolus flower.  It looks like a big blob of colors, but I like it.


I have more to make into cards, but didn't have time ... so will do them soon.


More cards and tags


As you can see by all these cards, and tags I was in a sea creatures mood.  Hope you like them as much as I do.

Thanks for stopping by, and come back again soon.


Wednesday, July 5, 2023

Big Backgrounds

 Big Backgrounds

Sometimes I just like to play with big background images.  

stamps used:  Unity stamp co. big background spilled paint, Sakura

For Sakura card, I stamped the spilled paint background on white card with pink ink.  Next I stamped over the spilled paint paint background with the Sakura image with black ink.  Did a little simple watercoloring on the Sakura flower.  Die cut the colored image with Unity stamp co. mini scallop rectangle die set.  Layered all onto a pink A2 (4 1/4" x 5 1/2") note card.

stamps used: Unity stamp co. big background Obsessed with Floral, SU Darling Donkeys

Stamped big background Obsessed with floral onto white card with red ink.  Die cut it out with wonky die set.  Stamped donkey with rose on white card, and colored her in with prisma color pencils. Cut her out with smaller wonky die.  Edged the cards with a little red ink just to make them stand out since all are done on white cards.

Thanks for stopping by.  Come back again soon.

Monday, June 19, 2023

Poppies

Poppies

It is always fun to bring back an old technique, and that is what I did with this card.

stamps used:  Stampin' Up painted poppies stamp set, sayings by MFP stamps

This technique is called random stamping, or what I like to call stamp collage.  See more on this technique in this 2009 post, and in this post.  Type collage stamping in search bar to see more.

basic instructions:

Stamp images randomly on white card with black ink.  Around the poppies stamp splatter images with light blue and yellowish inks.  Die cut stamp card with stitched edge die.  Layer onto mini die cut scallop black card, then onto yellowish color A2 (5 1/2" x 4 1/4") card.  Add some self sticking gems to finish card.

Thanks for stopping by.  Come back again soon.


Wednesday, May 17, 2023

Milkshake gate fold

 Milkshake gate fold cards

stamps used:  SU Shake a Milkshake bundle

There are lots of variation on the gate fold card, and this is just one of them.

Measurements:

base card: 4 1/4" x 11"  score at 2 3/4" and 8 1/4"

DSP (designer series paper/pattern paper): cut 2 at 2 1/2" x 4"

Front layers:  mini scallop and stitched rectangle


Inside layer:  mini scallop (lime milkshake), 

stitched rectangle (chocolate milkshake)

You will be seeing more cards using this stamp/die set in the future.  If you type gate fold in my search box, you will see lots more samples of this style card going back over 10 years.

Thanks for stopping by.  Come back again soon.


Monday, May 8, 2023

Everything coming up carrots

Everything coming up carrots

card #1
stamps/dies used:  SU Thanks a Bunch 

For these cards I used up things I had done already, like shaving cream backgrounds, and die cuts.  Yes, I have a baggie full of die cuts ready to be used on my cards.

Card #1 measurements:

A2 card: 4 1/4" x 11" 

pop up strip: folded to create a box

card #2

Card #2 Double pop up measurements:

A2 card: 8 1/2" x 5 1/2"

inside layer: 8 1/4" x 5 1/4"  folded in half. With card folded in half, cut on folded edge to create pop ups.


Card #3 Explosion fold measurements:
A2 card: 8 1/2" x 5 1/2"
inside explosion fold: 7" square 


Card #4 Tag pop up card
See measurements for card #2
Check out this pop up post for more pictures and instructions on how to make pop up cards.
Let me know in the comments if you have made pop up or explosion fold cards.
Thanks for stopping by.  Come back again soon.
***not affiliated with above company just happy customer***

Tuesday, April 11, 2023

Painted poppies

 Painted poppies

Had a left over piece of white cardstock ... so what do you do?  STAMP IT!  

SU Painted poppies stamp set

I stamped the outline poppies several times on the white card.  Next I stamped the splatter stamps from the same stamp set in the light blue, and yellow/orange inks.  Then die cut the stamped piece, and black card with Unity stamp co. rectangle scallop/stitched dies.  The light blue cardstock was just cut on guillotine cutter.  Stamped the edges of the top folded card with the same splatter images.  Adhered the stamped layered card to front of card.  Added a thinking of you die for the saying.

You will be seeing more cards with this stamp set.  It's not a new one just haven't been giving it any love lately.

Thanks for stopping by.  come back again soon.

Monday, March 27, 2023

Thanks Accordion z-fold card

 Accordion z-fold card

SU Thanks a bunch stamp set

Having fun with this accordion fun fold card.

Measurements:

Base: 4 1/4" x 11"  score at 2 3/4" and 5 1/2". This creates the z-fold of the card. Just accordion fold it...mountain fold, valley fold.


DSP: 2 1/2" x 4 piece for top of card

Cut orange and black layers for card.  Cut a white piece a little smaller to stamp images, and add fussy cut carrot if needed.

Inside white layer: 4" x 5 1/4"  stamp as you like.

Adhere strip of DSP to bottom of stamped white inside layer.

Thanks for stopping by.  Come back again soon.  Leave a comment and let me know what you think.

Thursday, January 26, 2023

Inlaid frame card

 Inlaid frame card

                                                           stamps used:  Stampin' Up

I tried my hand at an inlaid card, at least what I am calling an inlaid frame card.

basic instructions:

1.  stamped images on card.

2. die cut out a frame (any shape)

3. mounted the border frame with foam mounting tape.

4. inlaid the skinny scallop frame with glue.

5. mounted the stamped image with foam mounting tape.


Hopefully I will get better at this style card.  I plan on doing some more soon.

Thanks for stopping by.  Come back soon.

Thursday, January 5, 2023

Platform flap cards

 Platform flap cards

stamps used:  Stampin' Up

stamps used:  Stampin' Up

This is a variation of a card I called Platform cards, which you can see in this 2018 post, 2019 post, and 2020 post. These are just a few posts, if you would like to see more, type platform in my search box on the side bar.

Basic instructions:

base card (quarter card): 4 1/4" x 5 1/2"

layer: 4" x 5 1/4"

DSP flap layer: 3" x 6"  score at 1/2"

Score so the DSP (designer series paper or any pattern paper) matches up at the bottom of the 4" x 5 1/2" layer. Fold and score the DSP, and adhere 1/2" flap to back of 4" x 5 1/4" layer.  Stamp saying under flap on white layer so it is not visible when card is closed.  Adhere layer with flap to base, add embellishments to finish card.  

Envelope:  adhere same DSP to flap for decoration.

stamps used: Stampin' Up
stamps used:  Owl by Stampin' Up, Puffin by Catherine Pooler stamp/die set

Thanks for stopping by.  Come back soon.

***not affiliated with any of the above companies, just a satisfied customer***


Monday, December 5, 2022

Jelly fish

 Jelly fish

stamps used:  Stampin' Up Whale done stamp set
November is a sketch card for my local card swap group.
This is as close as I have ever got to copying a sketch idea.  Sketches are not my thing ... if you follow me here you know that because... I have mentioned it a few times.  😏😐😀
Thank you for stopping by.  Come back again soon.


Sunday, December 4, 2022

Stand up friend

 Stand up friend Pop up acetate card

for the month of October

                                        stamps used:  Stampin' Up The gang's all meer stamp set

I did these cards for my local card swap group. This is a fun pop up card I saw at Lisa's stamp studio a while back.

Basic measurements:

base: cut two at 5 1/4" x 5 1/2"  score at 1" on the 5 1/4" side of both cards.

outside layers:  4" x 5 1/4" 

pattern paper 3 3/4" x 5"

basic inside layers: 4" x 5 1/4", 3 3/4" x 5"

window sheet strips (for pop up images): cut three at 1" x 3 3/4" trim down to fit inside card with images. You don't want any of the floating images showing outside the card, when it is closed.

You can go look at this post to see more samples, and instructions.

Thank you for stopping by.  Come back soon.


Tuesday, November 29, 2022

Magnolia

Magnolia 

stamps used:  Stampin' Up
Did some simple cards, at least I think they are simple.  Used up some "scrap" pieces of my DSP from Stampin' Up.  Maybe I should call them off cuts instead of scraps, because they are a good size.  Basically what I did was adhere the off cut DSP to the front of an A2 card.  Cut strips of metallic papers I have had for years!  Always thought they were too pretty to use, BUT I am trying to use papers I have been hoarding for years up!!!  Back to the cards, as I mentioned I cut strips of the metallic papers and glued them to the edges of the DSP.  Looks like there is a full piece of metallic paper behind the DSP but there isn't.  Next I stamped the big magnolia flower, and just sponged on some color.  I foam mounted the flower to the card, stamped the saying, and done!  easy peasy, right?!?
Thanks for stopping by, and come back soon.


Monday, November 21, 2022

Perched in a tree

Perched in a tree

stamps used: SU Perched in a tree stamp/die set, Unity Greatest Part of Christmas (saying inside) stamp set and rectangle die set
stencil used: Altenew Geometric roulette
Basic instructions:
Made this card in a monotone color style card.  Blended three red inks on white card with stencil, then stamped branch and saying with black ink.  Stamped and die cut bird, then blended with same inks. Foam mounted the bird onto the card, layered onto black card, and red side folding A2 card.  Die cut all the layers with rectangle die set.
stencil used:  Altenew Skylight

Follow basic instructions from first card with exceptions: different stencil, and this is a top folding A2 card.
This is the start of my Christmas cards ... two down and ... who knows how many more?!?!  Not me. I make as many as I like, and send them to family, and friends.
That's it for now.  Thanks for stopping by.  Come back again soon.
 

Monday, June 20, 2022

Pop Up acetate cards

 Pop up acetate cards

stamps used:  Stampin' Up Whale done

I know I have said this before with other card designs, but I really mean it with this one:  It is just FUN!  
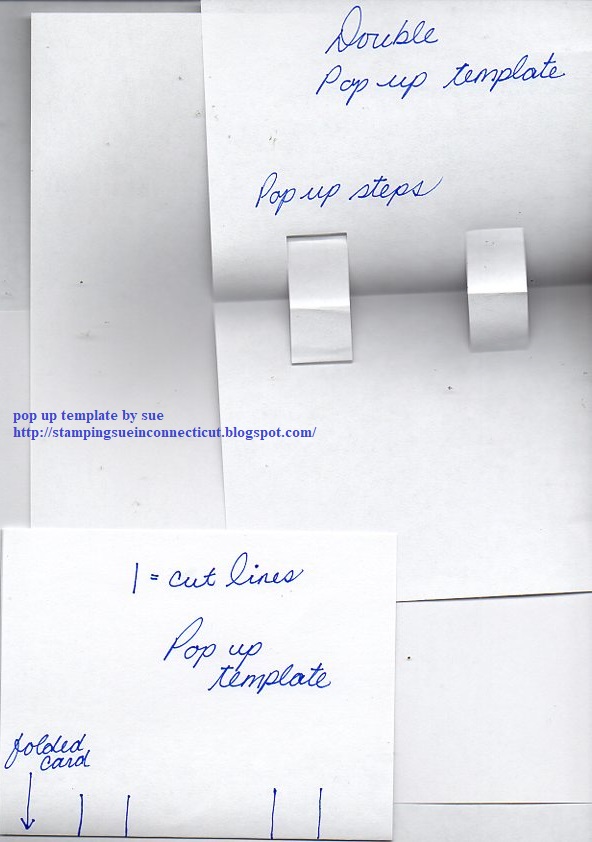
Measurments:

base: cut two at 5 1/4" x 5 1/2"  score at 1" on the 5 1/4" side of both cards.

outside layers:  4" x 5 1/4" 

pattern paper 3 3/4" x 5"

basic inside layers: 4" x 5 1/4", 3 3/4" x 5"

window sheet strips (for pop up images): cut three at 1" x 3 3/4" trim down to fit inside card with images. You don't want any of the floating images showing outside the card, when it is closed.


Assemble card:

On one of the scored section ... tape window sheet strips equally apart.  Next add more tape or glue and press both scored cards together.  This will create the card.  


Stamp and die cut or punch circle and ovals to tape to window sheet strips that seem to float in the air when you open the card. 


Look close (click on photo to enlarge) at the photos and you can see the floating images on the window sheet strips.
Thanks for stopping by.  Come back again soon.


Monday, June 13, 2022

Retiform birthday card

 Retiform birthday card

When I first learned how to make this card back in the year 1999 or 2000, we just called them grid cards.  A couple of years later the name was changed to Retiform. The meaning of RETIFORM is composed of crossing lines and interstices.

stamps used:  Stampin' Up Whale done

For this style card you can use any stamp images, whether they are solid or line images.  It doesn't even matter if the images don't normally go together.  

For my cards, though, all the images are from one stamp set.  No, I'm wrong the saying is from a company that has unfortunately gone out of business.  
The simplest way I can describe how to do this technique is block off section with post it notes, then sponge on color, just at the edge of the post it note.  Remove the post it note to reveal the section.  
I have a couple of old videos on this technique that you can look back on at Sue's YouTube from years ago.  I think I will do a new video on this technique soon.  Subscribe and hit the bell on my you tube channel so you get notified when I make a new video.
Thanks for stopping by.  Come back again soon.