My stamping adventures

Showing posts with label distress inks. Show all posts

Saturday, August 10, 2019

Oranges

stamps used:  Unity stamp co.

Took one stamp set and did three completely different tag/cards.
What I did first was color a piece of white cardstock with a few colors of distress inks.  Only reason I used my distress inks is because they were handy and most of the time that is the reason for all I do.  I stamped the orange image onto the colored cardstock the got out my circle dies to find one about the same size .... next cut out the oranges.  So each orange is a little different in color depending on where it was stamped on the colored cardstock also all the oranges (no matter what size) have Wink of Stella shine on them.  Oh yes, in this stamp set there are full slices and half slices of oranges so you will see each on these cards and tag.

Tag:
1.  adhere a doily on the edge of the tag and cut off any excess.
2.  adhere one of the half oranges onto the doily.
3.  stamp the saying onto a strip of white cardstock with one of the orange distress inks and adhere to tag.
4.  stamp small saying (think positive) around the edge of the tag with same orange ink.  
*wasn't happy with the way that looked so I got out a stencil and add some fun to the tag.*
5.  distressed around the tag with the same ink then tied on ribbon to finish the tag.

Bubble card:
1.  stenciled the bubble on a white card with three distress inks.  Moving the stencil just a little with each color.
2.  layer two of the oranges together onto a black circle then adhered to bubble background.
3.  stamp saying with black ink onto bubbled background under the orange slices.
4.  adhere completely stenciled bubble card to white note card.
5.  add a self sticking gem to the center of the orange slice.

Pendulum card:
*saw this on Dawn's stamping thoughts *
1.  on an orange note card layer a piece of black card then a slightly smaller mustard gold card that was stamped with the half orange with orange ink.
2.  on 3" x 3 1/4" black card punch out window punch (SU paper punch).  The punched out piece is going to be the pendulum for the card.
3.  take the punched out window punch piece and hold it behind the center of the black card with about an inch showing out the top of the card.  punch a small hole then add a small brad through the hole.  now test it to make sure it slides back and forth easily.  you have now created the pendulum.
4.  mount smaller white card that is randomly stamped with half orange image with same orange ink onto the black card with pendulum using pop dots in the four corners.
5.  mount pendulum piece onto layered note card.
6.  adhere full orange slice to pendulum piece.  add self sticking gem to center of orange slice.
7.  on the pendulum sticking out of the pendulum piece on the note card add two small pot dots or a small piece of foam mounting tape to the top of the pendulum.  add the small saying that has been die cut with circles.  The circle saying should now swing back and forth like a pendulum.


Monday, February 11, 2019

Resist and sponge it

The title says it all -  first did resist technique then sponged on color.
stamps used:  Unity stamp co. smak kit Truest Life

Let's see first I stamped the big butterfly all over a white card with Colorbox black pigment ink then embossed with clear embossing powder.  Next step I sponged on my new Catherine Pooler inks.  They are a juicy dye ink that blend wonderfully together in fact as good as Ranger distress inks , but that is only my opinion.  You will have to try for yourself to see what you think and when you do please leave me a comment to let me know.  The saying was white embossed onto a piece of black cardstock then adhered to stamped card .... then layered onto a black note card.  An old technique but a good one.  
thanks for stopping by and please do return soon.

Sunday, October 14, 2018

Halloween tags!

Today I'm showing some Halloween tags!


stamps used:  Unity stamp co.
inks:  Ranger distress oxide inks, VersaFine Clair Nocturne (black)


Background instructions:
1.  press distress oxide ink pads onto craft mat and spritz with water.
2.  tap tag into wet ink.  dry layer then repeat as desired.
3.  stamp images with black ink.
For the double tags I layered with black cardstock.
Added some ribbon and done.
The owl, hat and broom images are colored in with Prisma color pencils.
Hope you like these Halloween tags.
come back again soon.

Thursday, October 11, 2018

Witchy tags

stamps used:  Unity stamp co.
I'm really slow in getting Halloween cards made this year which is surprising for me ... because Halloween is my favorite time to make cards!  I guess I will blame it on things happening in life.
Here are two tags I stamped using distress oxide inks for the backgrounds .... the small tag is a manila tag and the bigger one is a black tag.  check out the fun effects of the oxide inks of course I used different colors on each tag.  I stamped a swirly image from the Unity stamp set Keep Wild and Esmeralda Girl.  I even did some easy water coloring with the same distress oxide inks I had out for Esmeralda then fussy cut her and mounted her on the tags.  
Hope you like these two tags.
come back again soon.

Sunday, August 5, 2018

More acrylic block stamping

 stamps used:  Unity stamp co.
Still having fun with acrylic block stamping.  I did this years ago and forgot how much fun it is to be so free with a background.  I used Ranger distress ink and oxide inks on these samples.  On the bowls and dragonfly cards (on white cards) I used a mix of regular distress ink and oxide ink pads.  You can't really see it in the photo but the oxides pop on the black cardstock.  The bottom photo with the feathers uses just the distress inks.
See more on acrylic block stamping on this post with a video or on Sue's you-tube channel along with other videos I have done.
thanks for stopping by and come back soon.

Wednesday, August 1, 2018

MIUCB August challenge with video

The challenge for August is anything goes/acrylic block stamping.
I choice to do acrylic block stamping and a video showing how I created my samples.
acrylic block stamping on different cards.
stamps used:  Unity stamp co.
inks used:  Ranger distress and distress oxide inks
Get out all your different size acrylic blocks and go crazy making lots of backgrounds on different cardstocks and watercolor paper.
basic instructions:
1.  tap inks onto acrylic block.
2.  spritz with water.
3.  press onto cardstock
4.  lift off and see the shapes of ink
5.  over stamp with images and create cards and postcards.
watch video here in this post or at Sue's you tube channel.
thank you for visiting.  come back again soon.

Sunday, July 29, 2018

classic black and white

stamps used:  Unity stamp co.
inks used:  Ranger distress black soot and hickory smoke
Did acrylic block stamping then just stamped images over block stamping.
see video on acrylic block stamping at Sue's you tube channel
thanks for visiting.  come back soon

Saturday, July 7, 2018

mixed media tag

stamps used:  Unity stamp co. , Stampin'Up
This tag is going to a friend for her birthday this month...it was sent so she should already have received it.
Just had some fun with this tag.  blended distress inks with blending tool, used a stencil, stamped feathers and hey friend from a Unity stamp set and the fussy cut lady is a SU stamp.  More about the background ... texture paste through a stencil - both white (top) paste and clear (bottom) paste.  not sure you can see it in photo but I added some glitter to clear paste while it was still wet.
stamps used:  Unity stamp set
only thing different with this tag is I stuck some washi tape on the edge.
Thanks for stopping by.  come back soon.  comments welcome.

Wednesday, June 27, 2018

watercolor fun part #2

stamps used:  Unity stamp co.
inks used:  distress ink pads 
I call this post watercolor part #2 because on a previous post here I showed what I did with the die circle cut out piece (see above) using it as a mask.  So this is what I would call the waste product but when I looked at it I said ..... no way am I throwing these pieces out!  here are the results of the cards I used with the cut out pieces.  I do like layers so I die cut out a lavender piece of cardstock with the circle die.  adhered it to watercolor piece and added it to a white note card.
hope you like my wastes and have fun with your waste or left over pieces.
come back again soon.

Monday, June 25, 2018

watercolor fun

inks used:  distress tumbled glass, salty ocean, wilted violet - VersaFine Clair Nocturne (black)
This started out as a one layer card but knowing me as I do ... I just couldn't leave it that way. Just seemed not finished so I made it into what I call Platform cards.  you can see details for Platform cards here.  
Back to these two cards:
platform base - 4 1/4" x 5 1/2" 
card base - 8" x 5 1/4" folded in half
To create the watercolor background I die cut a circle ... saving the die cut circle for another project.  we will be using the reverse mask.
1.  On a craft sheet press the three colors of distress ink onto it then spritz with water.  
2.  place the reverse mask on the front of the folded card then press into the watered distress inks.
3.  remove mask to see what I like to call a watercolor splat.  allow to air dry or heat with heat tool.
4.  stamp image over watercolor splat with black ink.  
5.  stamp sentiment in the bottom corner of card.
6.  adhere folded card to platform base.
let me know what you think of this watercolor splat technique.  if you try it come back and show me what you create.
come back again soon.  comments always welcomed.

Saturday, May 19, 2018

Platypus Two-way flap card


Two-way Flap card
stamps used:  Unity stamp co. Cuddlebug Platypus stamp set
inks:  Distress for water coloring, VersaFine onyx black for stamping
Measurements:
base card - 4 1/4 x 5 1/2  quarter sheet of cardstock
flap card - 3 x 11  score at 5 1/2"
front pattern paper - 3 x 5 1/2
back pattern paper - 3 1/2 x 5 1/2
cardstock strip - 1 x 5 1/2
pattern strip - 3/4 x 4 1/4 
***remember all these measurements can be adjusted for any size card***

Basic instructions:
1.  adhere pattern (3 1/2 x 5 1/2) paper to base card.
2.  stamp inside of flap card then adhere to base card with pattern paper.
3.  adhere pattern (3 x 5 1/2) paper to flap card.
4.  cut a banner into the strip of cardstock and pattern strip.
5.  score and fold about an inch of the banner strip.  adhere scored section to the back of base card with the longest part "flapping" on top of the card.
6.  stamp and water color the image with distress inks on white cardstock.  
7.  die cut the image and another circle die to fit behind the die cut circle image.
8.  put some double stick tape on the banner then adhere the die cut circle image to the banner.

Saturday, May 12, 2018

Platypus peek-a-boo slot card

Peek-a-boo slot card

 stamp used:  Unity stamp co. Cuddlebug Platypus 
stencil by TH
distress inks

Measurements:
base - A2 note card  8 1/2" x 5 1/2"  folded in half to create note card
Directions:
1.  Place stencil on front of note card and sponge color over it to create splat background.

2.  punch hole in front of card with SU punch.  If you don't have a punch you can use a die or go old school with a craft knife and metal ruler.
3.  stamp and color image (platypus) on separate white cardstock and cut out with die cut circle.
4.  fold image in half.  add a piece of double stick tape to back of piece where it is folded.  
5.  close the card and place the folded image with tape in the punched out section.  this will adhere the image to the inside of the card.
6.  lay the image flat on the front of the card then when you open the card the image ... in this case the platypus will be on the inside of the card!
thank you for visiting.  come back again soon.  leave a comment to let me know what you think.

Monday, May 7, 2018

Impossible Dragon

Impossible Dragon card

 stamps used:  Unity stamp co.


I know I've said this before but it deserves repeating ..... this is a fun card!  and easier than you would think to create.  I read that it is called an Impossible card because it is a take of a magician's trick.  This works out to a regular A2 size card but it is not a folded card ..... it's a quarter of a sheet of cardstock which is 5 1/2" x 4 1/4".  The thing with my card is I added the dragon image that sticks up off the card a little so I will have to use a medium size envelope when I send it out in the mail.  Now for the cute baby dragons, I stamped him on a piece of white cardstock, then just blended different Distress inks over the stamped image.  After that I fussy cut him out and adhered to the center section of the card that stands up.  Oh yes, this card mails flat then when it is taken out of envelope the center piece automatically pops up.  You can see in my second photo there is a template that shows where you cut out the card.  The trick to this card .... the magic illusion is when you flip one of the bottom sections back on itself.    I think I first saw this idea at Dawn's stamping thoughts  but I'm sure if you go to you-tube and search Impossible card you will find lots of videos.

Wednesday, May 2, 2018

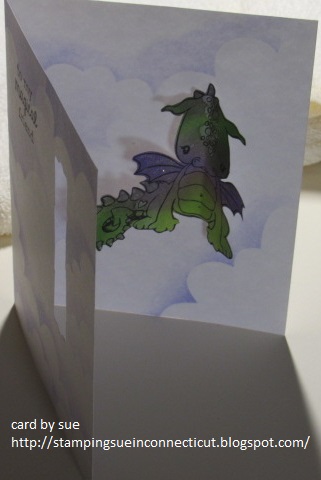
Magical dragon

POP OUT Dragon card


 stamps used:  Unity stamp co.
supplies used:  All Night Media cloud stencil, SU punch, stickles (on wings), Nuvo glitter pen (on tail)
distress inks
Measurements:
base - A2 note card  8 1/2" x 5 1/2"  folded in half to create note card
Directions:
1.  Place stencil on front of note card and sponge color over it to create cloud background.
2.  stamp saying with black ink.
3.  punch hole in front of card with SU punch.  If you don't have a punch you can use a die or go old school with a craft knife and metal ruler.
4.  stamp and color image (dragon) on separate white cardstock and fussy cut it out.
5.  fold image in half.  add a piece of double stick tape to back of piece where it is folded.  
6.  close the card and place the folded image with tape in the punched out section.  this will adhere the image to the inside of the card.
7.  lay the image flat on the front of the card then when you open the card the image ... in this case the dragon will magically be on the inside of the card!
thank you for visiting.  come back again soon.  leave a comment to let me know what you think.

Tuesday, November 7, 2017

Art Journal wk #36 Wing It and #37 Trash to treasure

week #36 (left side) Wing It
stamps used:  Joggles bird, MFP wings/sayings
week #37 (right side) Trash to treasure
I have been very bad with sharing my art journal pages from the weekly challenge I am participating in for the year.  So it is time to start playing catch up here.
wk #36 Wing It page
first I stamped the wings with grey ink a few times on the page.  blended some color with distress inks on separate piece of cardstock and over stamp the wings on it.  fussy cut the wings and adhered to the page.  stamped bird on separate piece of cardstock, added some color with blending tool and distress inks.  stamped the bird a second time on some pattern paper and did some paper piecing.  set her (the bird) aside stamped bigger wings on some of the left over cardstock I blended distress ink on to and fussy cut the big wings out and adhered to page.  adhered bird over the big wings.  stamped a couple of the sayings on the page and called it a day for this page.
wk #37 Trash to treasure
Now for this page I did all die cuts I had left over from other projects.  simple but to the point.
I have a small plastic container on my table with left over pieces ... whether they are die cuts, stamped images or whatever....and I have them in front of me so if I need it I have it.

Wednesday, August 16, 2017

Art journal wk#31 Mandala

week #31 - Mandala
Here is my take on the mandala prompt.  I have a Stencil Girl mandala stencils so I wanted to try out the distress oxide inks on black so ....... I painted my page with dylusions black paint and let it dry overnight.  I placed the stencil on the painted black page and went to town with distress oxides: antique linen, twisted citron and spiced marmalade.  it looks much better in real life.  will be playing more with oxides on black.  on the top corners I stamped MFP medallion with white pigment ink and just hand wrote mandala and date with dylusions white paint pen.  

Sunday, July 30, 2017

Art journal wk# 28 - wonder

week #28 - Wonder
stamps used:  moon rose, limited edition, 
Wonder, wonder, wonder, who or what?  isn't there a song lyric with that phrase in it?  someone out there help me remember.
Oh well, back at the art journal ..... I stamped a couple of old images ( I say old because they have been in my collection for probably 20 years) for this page with black ink.  added a little color on the rose with my prisma color pencils to make it pop and it is yellow because my favorite flower colors are yellow or white.  background color is just distress inks here and there.  so go out there and wonder about whatever you like.

Wednesday, July 26, 2017

Tag fun

stamps used:  Stampers Anonymous
A couple of tags with lots of bright colors ... and for me that is hard because I'm more the vintage or muted color gal.  I went bright because I was thinking fun birthday tags.  for the background I used lots of distress inks ... regular and oxide then I spritzed a stencil with water ... placed the watered side down on the inked tag ... let it hang out for a minute or two ... then removed to get the faint water resist effect.  next I stamped the ostrich image onto kraft cardstock and colored with my Prisma color pencils as anyone who knows me that is my favorite coloring medium.  I fussy cut the ostrich (don't own the die) and mounted her on the tag with foam mounting tape.  the balloon on the right was stamped onto some backgrounds I had out on my table but the one on the left was colored with Prisma color pencils.  now the balloon I do have the die so I die cut them and again used foam mounting tape to pop them onto the tag.  the string on the left is stamped and die cut but the string on the right is actual string.  I stamped the words from the same stamp set with the ostrich.  Oooops, forgot about the party hat they were also stamped onto the background paper then die cut and taped to the ostrich's head.  these tags will be saved until I need to send out a birthday to one of my friends.

Thursday, June 15, 2017

Art journal wk#23 - color graduation

wk# 23 - color graduation
stamps used: Ranger  dylusions
inks: Ranger distress inks
Now if you know me and I'm told to do color graduations.....what color do you think I am going to pick?????  yeah, easy one.....green!!!  that's a given.  Again, I kept it simple and let the color shine.  Just stamped a couple of images for fun and of course the date.....added a few Nuvo drops just because I could.

Friday, May 26, 2017

fun with tags

stamps used: Unity stamps
inks: Ranger distress inks
Decided to make a couple of tags doing the an oldie but goodie technique.....embossed resist.  the smaller tag is a white one I cut and the other is a manila bigger size tag so the resist on the smaller tag is more pronounced.  for both tags,  I stamped the "wish" flower for texture around the edge of the tag.  o.k. it's not really a wish flower that is my name because when I was a child, my dad used to call the dandelions that went to seed wish flowers.  he told us to make a wish then blow them to the wind.  the smaller tag I used two distress inks to blend spot colors and on the bigger tag I blended the amber ink all over the tag.  used a stencil to add raspberry spots on the poppy gal then amber and orange dots around the rest of the tag.  just had fun making a couple tags.