Geometric genius
This week Jen Rzasa from Altenew Tuesday #Altenewchallengelive is Geometric genius.
I used Altenew Modern circles circles for my geometrics. I made an easy set of four cards.

Thanks for stopping by. Come back soon.

Stamping Sue - INK IT! STAMP IT! USE IT! All things stamped from me to you. Remember there are no mistakes in stamping just Happy Accidents! Stamping is an adventure to be experienced so have a cup of tea and relax while visiting. All comments are welcome and appreciated.
Geometric genius
This week Jen Rzasa from Altenew Tuesday #Altenewchallengelive is Geometric genius.
I used Altenew Modern circles circles for my geometrics. I made an easy set of four cards.
Thanks for stopping by. Come back soon.
Lots of texture
It's time for Jen Rzasa Tuesday Texture take over #altenewchallengelive . For my card I used Altenew Woodland path bundle which is an embossing folder and stencil set. Embossing folders add texture all on their own, but with set it has a stencil set to add color. Besides color there is stickles glitter glue, and ribbon for more texture...along with foam tape on the back of the panel for more added texture. Also on this card there is a strip of cardstock with enamel dots, and a saying that is also popped up with foam tape.


Crafting with dice
This week #altenewchallengelive with Jen Rzasa the theme is crafting dice roll. Anotherwords Jen asked us to roll a dice then do the technique from the list of 6 ideas.


Thanks for stopping by. Come back soon.
Tags, tags, and more tags
I started making tags years ago, and have never gotten tired of making them. I like to make tags in all sizes, and shapes.

The tag in the center has a stencil from Altenew called Castle motifs along with Ice-cream dies from Stampin' Up.
The last tag has a stencil again from Altenew called Bubble wrap along with Milk Shake from Stampin' Up.
Thanks for stopping by. Come back soon.
Rainbows with stencils
Believe it or not I am having fun with rainbow colors! Yes, me ... the one who said she didn't do rainbow colors. Continuing with Jen Rzasa's Altenew Tuesday #altenewchallengelive Radiant Rainbows.

Cut strips of Altenew masking paper - 1/4" and 1/8". ***You can use any masking paper you have in your stash.*** Layer a stencil over the panel with the masking paper strips. Blend the color of the rainbow over the stencil. Remove the stencil. Before removing the masking paper strips... with the same colors blend color over the stenciled areas. Remove the strips to reveal the fun. Layer the stencil panel to dark panel then onto base card.
I couldn't stop there sooooooooo I did one more card doing the technique I call Joseph's Coat with a stencil twist.

Thanks for stopping by. Come back soon.
Faux postage cards


Leaves and butterflies
I am having fun with Altenew challenge live. This is challenge #2. Need flying insect and leaves on card/project.
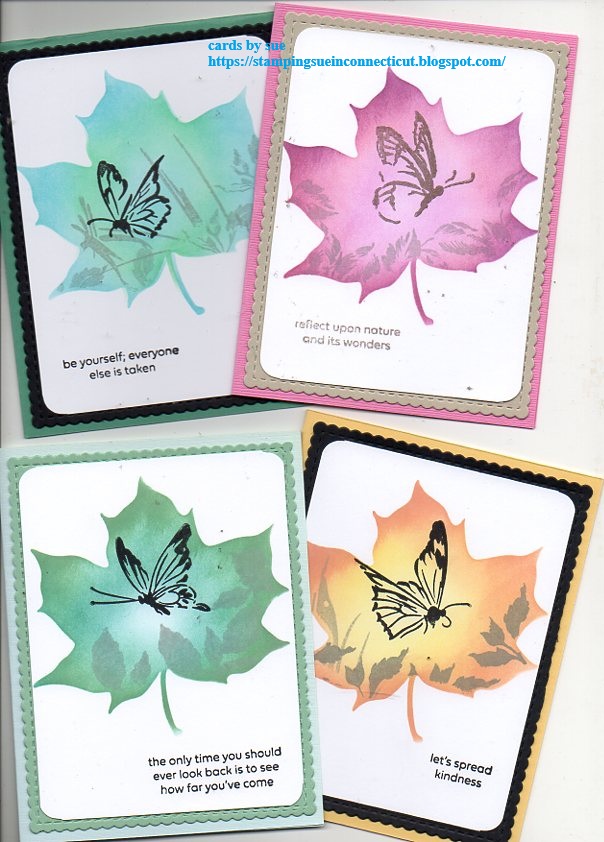
I placed Unity leaf stencil on a white panel, then blended color in it. Then I stamped the leaves from Altenew Remember This stamp set, then butterfly from Altenew Meadow Reflections stamp set.


Thanks for stopping by. Come back soon.
(not affiliated with any of the above companies)
Flowers
Flowers are on the agenda for this post along with making envelopes. This my January card for my local card swapping group that meets once a month. Theme was flowers.

What I like about this Altenew set is ... everything! It has a stamp, coloring stencil, and what I call an all in one die. I call the die that because it is one big die that cuts out all the flowers at one time. The coloring stencils makes it easy to do all one color or multiple colors for the multiple poppies. I mounted the poppies with foam tape onto a kraft card layer, then a light olive card layer. Layered all the layers onto a 5" x 7" kraft card. Now if you know me I don't do big cards, but I just couldn't resist making a 5" x 7" card, so I could fit all the poppies, and leaves on a card. By making a big 5" x 7" card I had to make an envelope to fit the card, so this meant dusting off an old tool.......the envelope maker. Took me a couple of seconds to remember how to use it ... but after I did ... it was EASY to make the right size envelope. Don't forget to use those old tools you bought in the past.
Thanks for stopping by. come back soon.
Zinnias
I am still having fun using GinaK Zinnia stencil set.

I was at Snowflake crop which myself, and several other friends attend in Massachusetts ... that is where I played with this Zinnia stencil to make 8 cards. The fun thing is I didn't have any sayings with me but my friend, did. It's a stamp set from Simon Says named So Talkative, that has a lot of wonderful sayings.

Basically I just placed the zinnia stencil on white card layer. No specific placing ... just laid it down and added color. Then I die cut the white layers with whatever dies I had with me. I used CP inks I brought with me.
Thanks for stopping by. come back soon.
Bird sympathy

My local card swapping group decided to do sympathy for one of our monthly themes. The above picture is the first card I did but for my group I simplified the card a little.

In this picture you can see I switched out the embossing folder for a stencil. Other than that I used the same ink which is from my favorite company, Catherine Pooler stamp co. I do like their foam ink pad and all the fun colors...that is not to say other companies don't have very good ink pads, it's just for me it's CP inks lately. Back to my cards ... I die cut the birds and adhered them to a circle die that I blended some ink on. Stamped the saying with black ink, and puts a few self sticking gems to finish off the cards.
Thanks for stopping by. Come back soon.
***not affiliated with any of the above companies just a happy customer***
Happy Halloween!
It's the last day of October so we all know what that means ... All Hallows Eve or Halloween! This is the night when all the witches, and goblins come out to play.

I started out making these into 5" x 7" cards but decided to just keep them as big postcards. There is what I call collage stamping on these two postcards. Collage stamping is basically stamping over other images or adding a stencil with a lighter color. You can see more collage stamping in this post with links to other posts. I used a lot of my Catherine Pooler inks, which if you follow my blog, you know they are my favorite ink pads.

The company Art Foamies is a small family owned business that makes big foam style stamps. The owner, Kae Pea is a lovely person who I met in person when I was working at GASS (stamp store that closed there doors years ago) when she taught there in person. Back then she was with Rubber Moon stamps.
Thanks for stopping by. Come back soon.
***not affiliated with any of the above companies just happy customer***
Fun Faux layers with a twist


basic instructions:
1. Mask off section on card with post it notes, or any masking paper.
2. Blend colors between the masked off section. For the above card I did the colors in three sections. When done blending colors the first time, go over it again to smooth out the colors.
3. Before removing masks I place a stencil down. Colored the stencil with a shade darker ink colors to add more dimension to the faux layer.
4. Remove the stencil, and masks. Stamp image, and saying with black ink on the card leaving some of the image over the blended colors.
5. Add stamped layer to a black card then A2 (4 1/4" x 5 1/2") folded card.
6. Add some self sticking gems for that finishing touch.

I Brake For Stamps - https://ibrakeforstamps.com/
The Blank Page Muse- https://blankpagemuse.
FB Fan Page- https://www.facebook.
Instagram Shop- https://www.instagram.
Instagram Blog- https://www.instagram.
Twitter- https://twitter.com/
Pinterest- https://www.
Flowers and Butterflies
Sometimes it's good to go back to the basics, and that is what I'm doing today.


I Brake For Stamps - https://ibrakeforstamps.com/
The Blank Page Muse- https://blankpagemuse.
FB Fan Page- https://www.facebook.
Instagram Shop- https://www.instagram.
Instagram Blog- https://www.instagram.
Twitter- https://twitter.com/
Pinterest- https://www.
4 Corners
I call this technique 4 corners. You might know a better name ... if so please leave a comment, and let me know.

This is a fun technique where you cut a full sheet of 8 1/2 x 11 cardstock into 4 equal pieces. I have lots of pictures to show you today.


Thanks for stopping by. Come back soon.
Zinnia
When making cards I have found that stencils are good tools, as you can see in the pictures.
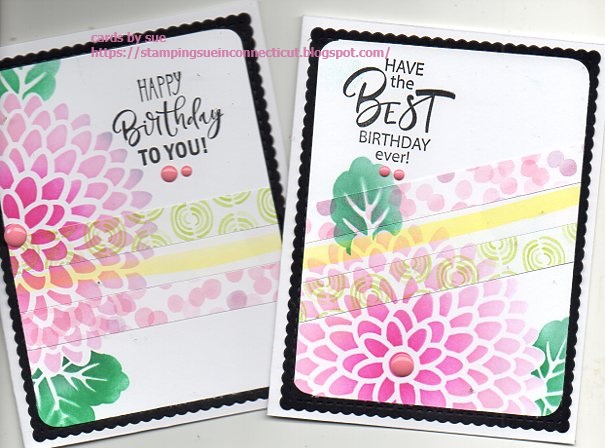
I first adhered three strips of pattern papers onto a layer of white cardstock. Next I decided to see what it would look like, if I stenciled over the strips. And I liked it! So I did a few cards doing this technique. I'm sure someone else has done this before, but it was a new thing for me. I think in the future when I do this I will use bolder pattern papers so they don't get lost in the design.

Thank you for stopping by. Come back soon.
***not affiliated with companies just a satisfied customer***
Winter blessings
Happy New Year's Eve!

Basic instructions:
1. Blended colors for the background.
2. used mountain/trees stencil.
3. Stamped snowman, large tree and saying. Colored in the snowman with some color pencils.

Each card will look a bit different with the blending of the colors.
Thanks for stopping by. Come back again soon.
Wobbles

Check out this short video to see the wobble in action.
As you can see I created tags and a card.


Thank you for stopping by. Come back again soon.
Pumpkin trio
.jpg)
.jpg)
.jpg)
.jpg)
.jpg)
