My stamping adventures

Showing posts with label instructions. Show all posts

Sunday, August 17, 2025

Neon sign

 Neon sign

We had two weeks to do Jen Rzasa Use special effect techniques #altenewchallengelive this time.  It has taken me almost the whole two weeks for me to this week. 

Here are the effect techniques that we had to choose from for the challenge:  1. Neon Sign  2. X-ray  3. Blurr   4. Glitch

This time I decided to try the Neon sign technique.

stamps used:  Altenew you are beautiful stamp set
Basic instructions (what I did)
1.  stamp image with white ink.
2.  color over white image with Marvy Metallics blue marker.  repeat to thicken the lines.
3.  with white Posca marker pen draw lines inside colored lines of the image. repeat to deepen the white lines.
4.  add color pencil around white lines inside colored lines of the image.  again repeat to intensify the color.
5.  add color pencil shading outside the image.  this creates the glow effect.  smooth out the pencil lines with a blending stump.
6.  add white pencil around the glow.
A little involved but a good technique.
Thanks for stopping by.  Come back soon.

Thursday, June 12, 2025

Double accordion gatefold

 Double accordion gatefold

June is all about fun folds in my local swap card group. I do love a good fun fold, and this one does not disappoint. 

                            stamps/supplies used:  Altenew Magnolia die set, SU dsp

The above pic is the card closed.  

                    double accordion gatefold card open (scanned flat), inside saying by Altenew

My old Canon camera doesn't want to play nice right now, so that is why I scanned the card open ... flat.  I learned this card from Stamp from Tami...go here to see a sample.

measurements:

base - 9 1/2" x 5 1/2"  score long side at 1/2" and 2 5/8" on either end.

inside base - 10 5/8" x 3"  score long side at 2 1/8" and 4 1/4" on either end.

layers - (four) 5 3/8" x 2", (four) 2 7/8" x 2", (one) 5 3/8" x 4 1/8"

pattern papers - (four) 5 1/4" x 1 7/8", (four) 2 3/4" x 1 7/8", (one) 5 1/4" x 4

This template is from Stamp with tami

instructions:

1. score the card bases.

2.  cut the layers. 

3.  stamp saying on white layer inside card.

4.  attach layers to card base and inside base.

5.  put glue on tabs on end of base card.  

6.  lay inside layer flay on base card onto tabs with glue.

7.  add die cut magnolia flower to front panel of inside layer.

Thanks for stopping by.  Come back soon.


Saturday, May 3, 2025

M is for Magnolia

 M is for Magnolia

The challenge from Jen at Altenew this week is ABC.  Another words pick a letter to use for your theme on card or project. I picked the letter M.  I used Magnolia flower dies, Moths from Meadow Reflections, Mango and Marigold color cardstock, and papers.  I also used mini blending brush to add color to the magnolia flower dies.


stamps/supplies used:  Altenew Delicate Magnolia die set, Meadow Reflections (moths) and mini blending brush, SU mango color papers/cardstock

This is called a Fan card.

basic instructions:

base - 7" x 10"  score at 5"

layer - 4 3/4" x 6 3/4"

1.  Use same color as the base card for 4" x 6" layer, and cut in half diagonally.

2.  Color layer cardstock 3 1/2" x 5 1/2".  Cut in half diagonally.

3.  Pattern paper 3" x 5".  Cut in half diagonally.

4.  Layer all layers from line #1 thru #3.  This will form bigger of the triangles that will be assembled on card.

5.  On 7" x 10" card score at 5".  On the 10" side of card measure 2", and cut diagonally to the bottom of card.  Fold at 5" score to form base card.

6.  On 4 3/4" x 6 3/4" card measure in 2 3/4" then cut diagonally down to bottom of card.  Cut off 1/4" of this triangle.

7.  On 4 1/2" x 6 1/2" card measure in 2 1/2" then cut diagonally down to bottom of card.  Cut off 1/2" of this triangle.

8.  Layer all of these layers from line #6 and #7.  

9.  Assemble card with all the layers.  Add Magnolia flower on the bottom point of triangles.  Moths can be adhered on the top and bottom of card.  This makes a 5" x 7" card.
I will be entering this card in the #Altenewchallengelive.
Thanks for stopping by.  Come back again soon.


Thursday, January 2, 2025

Faux postage

Faux Postage

I do like to make faux postage style cards.  I have been making them off, and on for years.  You can see here in 2012 post  but if you type faux postage in search bar you will see more.

Today we have dies to make the faux postage style cards.

stamps/dies/stencils used:  Waffle Flower snowman postage stencil set

basic instuctions:

1.  die cut the faux postage die.  It die cuts with all the perforated holes.

2.  this stencil set has 2 layers, which makes for an easy card.  place down first stencil, which is the background.  add color with any blending tool handy.  remove 1st stencil.  place second stencil down and add details for snowflake, and snowmen. 

3.  Layer faux postage onto card, and you are done.

Here is the same snowman stencil, but this time I cut the faux postage card into single faux postages.

Here is a Christmas one. Waffle Flower co. has different faux postage stencils. Needless to say I will be making more of these cards soon. 

Thanks for stopping by.  Come back soon.

***not affiliated with company just happy customer***


Monday, December 30, 2024

Accordion Flap card

 Accordion Flap card

stamps/supplies used:  MFP popcorn stamp set, SU DSP

If you follow my blog, and know me ... then you know I love a good fun fold card.  This Accordion flap card is a WINNER!

measurements/instructions:

base card:  11" x 4 1/4"  score at 2 1/2", 3 3/4", 6 3/4" & 8 1/4"

square layers:  4" x 4", 4" x 3 1/2", 4" x 2 1/4"  fold mtn/valley/mtn/valley


DSP layers:  3 3/4" x 3 3/4", 3 3/4" x 3 1/4" & 3 3/4" x 2"

white layers:  3 1/4" x 1 1/2", 3" x 2 3/8"

Adhere all layers together.  Adhere the panels to the scored card base.  BUT only put adhesive on left side of panel.  If you put adhesive on full panel the card will NOT open.  Also keep in mind your layers may differ from mine depending what you stamp.

Thanks for stopping by.  Come back soon.

Monday, December 23, 2024

Diamond easel card

 Diamond easel card

stamp/supplies used:  SU cake stamp set & DSP

This is a different take on the regular easel card called a Diamond easel card.

basic instructions:

base card:  6" x 6" and 6" x 6 1/2" or 12" x 6" score on the long side at 1/2" & 3 1/2"  Mark each end (4" sides) at 3".  Line up the marks and cut into a point on either end. 

side view

front square: 4 1/4" x 4 1/4"

DSP layer:  4" x 4" (2)

white or stamped layer: 3 3/4" x 3 3/4"

rectangle white layer: 5 3/4" x 2 3/4" 

rectangle DSP layer: 5 1/2" x 2 1/2"

closed card

Adhere squares turned so it is diagonal.  Mount the saying with foam mounting so it will hold the diamond up.  This card can be made into any size you want.

Thanks for stopping by.  Come back soon.


Thursday, December 19, 2024

Double diamond cards

 Double diamond card

stamps/supplies used:  SU Lighthouse stamp set & DSP

This is a fun fold card that is fun to create.

Here is a close up card of the double diamond card.
basic instructions:
base card:  4 1/4" x 11" score at 2 1/4", 4 1/2" & 7 3/4" - mtn./valley fold.
side view
DSP (pattern paper):  3 x 4, 2 x 4 & 1 x 4
base squares: 3" x 3"
white squares:  2 3/4" x 2 3/4"

I will be making more of these fun folds soon.
Thanks for stopping by.  Come back soon.


Saturday, November 2, 2024

Bird sympathy

 Bird sympathy

stamp/dies/embossing folder used:  Altenew stamp co. birds, embossing folder.  MFP saying

My local card swapping group decided to do sympathy for one of our monthly themes.  The above picture is the first card I did but for my group I simplified the card a little.

stamps/dies/stencils used: Altenew stamp co. bird dies, stencil.  MFP saying

In this picture you can see I switched out the embossing folder for a stencil.  Other than that I used the same ink which is from my favorite company, Catherine Pooler stamp co.  I do like their foam ink pad and all the fun colors...that is not to say other companies don't have very good ink pads, it's just for me it's CP inks lately.  Back to my cards ... I die cut the birds and adhered them to a circle die that I blended some ink on.  Stamped the saying with black ink, and puts a few self sticking gems to finish off the cards.

Thanks for stopping by.  Come back soon.

***not affiliated with any of the above companies just a happy customer*** 


Wednesday, October 9, 2024

Fun Slider - pull up card

 Fun Slider - pull up card

stamp/supplies used:  Unity Doodle bird, Stampin' Up DSP, Prisma color pencils

This is a slider or some call it a pull up card ... whatever you call it ... it's FUN, and easy to create.

Slider Pull up card


stamp/supples used: Unity stamp co. Doodle bird, Stampin’ Up (pattern papers) DSP

measurements:

base card: 5 ½” x 8 ½” scored at 4" & 8"

white (inside slider card) cs: 3 ¾” x 5”

outside slider can be any size or shape

mechanism strips – ¾” x 3”

Front DSP (pattern paper) - 3 ¾” x 5 ¼”

Basic instructions:


With ½” fold on left hand side in trimmer, line it up at 1 ½” in trimmer. Cut from 1” to 4 ½”. This creates slit for the slider. Add tear & tape to ½” section.

Add foam tape on one end of mechanism strip. Flip strip over and add tear & tape on end of mechanism strip. Slide strip through slit with tear & tape inside card, foam tape showing through front of card. Punch half circle thumb hole on top of front of card.

Slide strip to bottom of card. Adhere 3 ¾” x 5” (inside white panel) to slider strip with tear & tape on it that will be on the inside of the card. Peel off backing of tear & tape and close card.

Add stamped layer to front of card on the mechanism strip with foam tape. See photo above.

Thanks for stopping by.  Come back soon.


Friday, July 12, 2024

Calming Koi

Calming Koi 

I've moved on (for right now) from Jelly fish to Koi fish.

stamps/dies used:  Altenew Calming Koi stamp/die set
These koi fish are a die set with a small complimentary stamp set.  The small Koi stamp set has spots for the fish, and several little sayings.  Background pieces on both cards is done with waxed paper.  Basically what you do is scrunch up a piece of wax paper, dab it on an ink pad then tap, tap, tap on a white card.  I used 3 colors for my background ... a couple of orange, and one pink.

Card #1
For card #1 I cut the background into a rectangle, adhered it to the front of an A2 (5 1/2" x 4 1/4") card.  Added a couple strips of pink cardstock to the top, and bottom of the background piece.  Glued the koi fish onto the background piece.  Stamped the saying above the background piece.  Added some tea party enamel dots to finish off the card.
Card #2
For card #2 I embossed a white panel with one of my favorite Altenew embossing folders called Organic Linen.  This folder goes with everything. I die cut a circle from salmon color cardstock, and die cut a circle out of the wax paper scrunch background.  Both circles were adhered to the right side of the embossed linen card, and cut off just a small end.  The embossed card is adhered to a salmon color A2 card.  Add the koi fish around the circle dies.  Next stamp, cut out the saying, and adhere to card. 

Altenew challenge.
I am entering this card into Altenew challenge here.

Thanks for stopping by.  Come back soon.
***not affiliated with above company just happy customer***


Tuesday, June 25, 2024

Fun seagulls

Fun seagulls

stamps/dies used: Waffle Flower seagulls stamp/die set

I saw these sample cards on the Waffle Flower site, but I don't have all the same products ... so my cards turned out a little different.  But that is a good thing.  For example I don't have their "wave" dies, so I just cut out copy paper to have "waves".  Blended on a couple of blue inks for water.  I have no idea how they made the seafoam, so I did it my way.  First I added clear embossing ink with a cosmetic sponge, sprinkled on white embossing powder.  Heat set it.  The seafoam was too solid looking for me.  For the other rows of seafoam I added clear embossing ink with a crumbled up piece of paper towel, sprinkled on white embossing powder ... and I liked that!  For the saying I blocked off part of it with scotch tape, inked up the image, remove the scotch tape, and stamped it.  Sometimes it is just fun to change things up a little.  I added black self sticking gems for eys.

Again I saw sample cards on Waffle flower site and recreated them my way. 
card #1 
I used Altenew stamp co. water builder stencil.  What a fun stencil...you will be seeing more with this stencil soon.  I ripped kraft cardstock for the sand, and blended some brown inks around the edges of this piece.  Used the speckled stamp from seagull set for sand on the kraft cardstock.  For the saying I blocked off birthday with scotch tape, inked the image with black ink, remove the scotch tape, then stamped it.  Layered everything onto a kraft A2 size card.
card #2
This card came out almost exactly as the one I saw on the website.  I just added some white gel pen accents to the beaks, and eyes.

Thanks for stopping by.  Come back soon.
***not affiliated with any of the above companies just happy customer***


Friday, June 21, 2024

Faux Layers with a twist or two with video

 Faux layers with a twist or two

stamps/dies used:  Unity stamp co. Seraphim Wings, Arches dies, Scallop/rectangle dies

Scroll down to watch video.

Basic instructions:  

1.  Mask off section on card with copy paper.

2.  Blend colors between the masked section.  For the above card I did the colors in three sections.  When done blending colors the first time, go over it again to smooth out the colors.

3.  remove the masks.  Stamp image with black ink on the card leaving some of the image over the blended colors.

stamps used:  Unity stamp co. Coffee Doodle Doo, Scallop/rectangle dies, Stencil by Tim Holtz Splatters

Basic instructions:

1.  Use deckle edge ruler to create ripped looking edges on copy paper. Place the ripped copy pieces on the card.

2.  Repeat step 2 from above.

3.  Leave masks on card.  Place stencil over masked section and stencil colors over stencil.

4.  Remove stencil and masks.

5.  Stamp Doodle doo bird, and saying with black ink.

4. Layer all layers on A2 card (4 1/4" x 5 1/2").

Watch video for more information and tips.


You can see more of my videos at Sue's YouTube.  

Thanks for stopping by.  Come back soon.


Thursday, June 13, 2024

Another accordion fun fold card

 Another accordion fun fold card

There are lots of variations on an accordion fold, and this one is simple but very effective.

stamps/papers/dies used:  Unity stamp co.

I also am using Unity coffee-doodle-doo stamp set again.  I do like this frazzled looking coffee bird, but for me she will always be a tea-totaler to me.

You can see more accordion fun folds here, and here.  To see even more just type accordion fold in search box, and more of my posts will pop up.

I colored her by getting out my blending brushes, and just brushing on some color.  Not even staying in the lines, so to speak.  After that I added more color with my prisma color pencils.
measurements:
base card:  4 1/4" x 5 1/2"
layer on base card:  4" x 5 1/4" pattern paper
accordion fold card:  3 1/4" x 11"  scored at 4" and 8"
layer for front of accordion fold card:  3 1/4" x 4 1/8"
stamped layer:  die cut
layer for inside accordion fold card:  
pattern paper - 3 3/4" x 3"
To assemble the card:
Adhere the bigger section of the accordion fold to base card.  Fold the accordion card flat, and adhere 3 1/4" x 4 1/8" card on the shortest fold.  Next adhere the pattern paper, and stamped card.  Add some self-sticking gems to finish it.  Just keep in mind you can make the accordion fold card a little bigger, or smaller to change up the card.  
Thanks for stopping by.  Come back soon.
***not affiliated with company just happy customer***


Sunday, April 28, 2024

Two different tags

 Two different tags

Here are two very different tags.

This tag is a different style of image for me. I stamped the child with butterfly wings first, then I stamped part of the Hummingbird border on the child's head.  Colored it all in with my Prisma color pencils.


Flower tag has a fussy cut out flower that I did easy watercoloring.  The base of the tag is a background I had in my stash.  From what I remember I did some color blending on it, then used a stencil to create the trees.

stamps and products used:
Blank Page Muse child w/butterfly wings rubber stamp
Blank Page Muse Butterfly Breezes clear stamp set
I Brake for Stamps (sister stamp co.) Hummingbird border stamp
Altenew stamp co. Pine Forest stencil


Thanks for stopping by.  Come back again soon.


Saturday, April 20, 2024

Missing Middle panel card

 Missing Middle panel card


This card is also called Split panel card, so just pick the name you like for this card. 

stamp/dies used:  Stampin' Up Cup of tea stamp/die set

I'm sure you can see why it is called Missing Middle panel card ... because the middle is missing.  The front of the card is held together with the stamped layer.  


Measurements/Instructions:

base - 4 1/4" x 11"  score at 5 1/2".  Cut 1 1/4" from the bottom of card.  Cut 6 3/4" from top...or you can cut 1 1/2" from bottom.  Cut 7" from top.  Make layers to fit size you choose.


You can make this card basically any size you choose...bigger or smaller panels.

Thanks for stopping by.  Come back soon.

Tuesday, April 16, 2024

Rocker cards w/video

 Rocker cards

Rocker cards are fun, and easy to create.  All you need are circle dies, or if you don't have dies you can just cut out circles.

Here's a short video show how I put together these rocker cards.

Basic instructions:
Cut out circle and fold in half.  Adhere any pattern paper for decoration. 

Best thing I can tell you is only put double stick tape, or glue to bottom half of stamp image. 

Then adhere to folded circle card ... that creates the rocker card.

stamps/products used:
Blank Page Muse Special day Birthday clear stamp set by Pam Bray
Blank Page Muse World Map Global view rubber stamp
Blank Page Muse Cyan Corsortium paper pack by Pam Bray
Blank Page Muse Tattered & Worn paper pack by Pam Bray

Visit our social media sites for more stamping fun!
I Brake For Stamps -https://ibrakeforstamps.com/ 

Thanks for stopping by.  Come back again soon.


Thursday, April 4, 2024

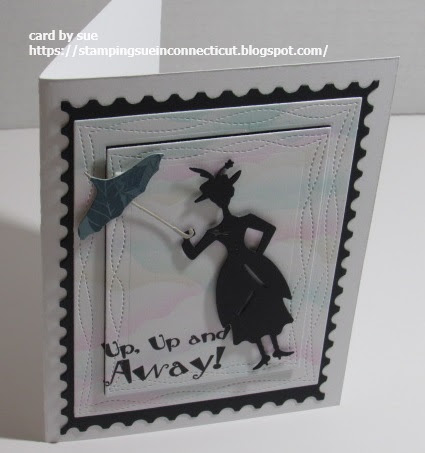
Fly away with Mary Poppins/video

 Fly away with Mary Poppins

Actually in my card Mary Poppins is sliding away on my ribbon slider card.

stamps/supplies:  MFP saying Up, up..., Sizzix TH The Park die set

I'm call this character Mary Poppins but, I guess, legally you can't name these dies because she is licensed by Disney.  The die set is called The Park but she does make you think of Mary Poppins.  Anyways I made an old favorite moving card that is a Ribbon Slider card.  

Instructions:

 1.  Make any size card that works for you with a layer for the sliding character.

2. Cut 2 parallel lines 1/4" to 1/2" apart for the moving mechanism on the layer that will have the character. Make
the length of cut to accommodate your card.
3. Cut ribbon twice the size of your card. Cut strip of cardstock to wrap,
and tape ribbon that will slide back & forth on your card.  The ribbon gets tape to the sliding strip only. Make 2
more strip wraps, and tape each one on ends of parallel lines with ribbon
threaded through but do not tape ribbon to strips. These will be end
stoppers.

4. Tape cardstock with sliding mechanism that you stamped scene to base
card.  On this card I cut out a cloud template to create the background.
5. Use mounting tape to attach your image on movable strip which will go
around parallel lines. 
6. Pull your ribbon and see what happens!
Here's a short video I did a few years ago showing how the ribbon slider works.
Another basic card with same The Park die set.

Thanks for stopping by.  Come back again soon.