My stamping adventures

Showing posts with label Sizzix. Show all posts

Friday, November 21, 2025

Wreath cards

 Wreath cards

I was at Interlaken Inn, Lakeville, CT for Making Memories at Lakeside crop on Friday Nov. 7 - 9, 2025.  I was there with a few friends to have a nice weekend away. 

I made a bunch of cards using dies from Altenew stamp co.  and Sizzix. Basically I penciled a half circle, then adhered leaf dies to it.  These are only a few of them that I created at the crop.  Interlaken Inn is out of the way ... in a lovely setting.

I also made some Christamas cards that I will show at a future time.

Thanks for stopping by.  Come back soon
 

Wednesday, October 1, 2025

Booooooooo

 Booooooooo

These Halloween cards are a little different for me ... I say that because of the color scheme.

dies used:  TH Sizzix Fright Night and Gothic Protraits


I had the backgrounds done and laying out on my table, along with a bunch of dies I had die cut ... so ... why not use them together.  And that is how these cards came about.  Also when I stenciled these backgrounds ... guess what ... you guessed it ... those color ink pads were out on my table, so there you have it.  You could say I was being creative or just lazy.  what do you think creative? or lazy?  Either way I like them with all their quirks of color and theme.

Thanks for stopping by.  Come back soon.

Thursday, April 4, 2024

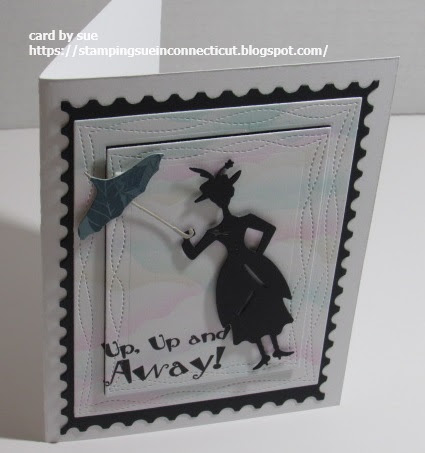
Fly away with Mary Poppins/video

 Fly away with Mary Poppins

Actually in my card Mary Poppins is sliding away on my ribbon slider card.

stamps/supplies:  MFP saying Up, up..., Sizzix TH The Park die set

I'm call this character Mary Poppins but, I guess, legally you can't name these dies because she is licensed by Disney.  The die set is called The Park but she does make you think of Mary Poppins.  Anyways I made an old favorite moving card that is a Ribbon Slider card.  

Instructions:

 1.  Make any size card that works for you with a layer for the sliding character.

2. Cut 2 parallel lines 1/4" to 1/2" apart for the moving mechanism on the layer that will have the character. Make
the length of cut to accommodate your card.
3. Cut ribbon twice the size of your card. Cut strip of cardstock to wrap,
and tape ribbon that will slide back & forth on your card.  The ribbon gets tape to the sliding strip only. Make 2
more strip wraps, and tape each one on ends of parallel lines with ribbon
threaded through but do not tape ribbon to strips. These will be end
stoppers.

4. Tape cardstock with sliding mechanism that you stamped scene to base
card.  On this card I cut out a cloud template to create the background.
5. Use mounting tape to attach your image on movable strip which will go
around parallel lines. 
6. Pull your ribbon and see what happens!
Here's a short video I did a few years ago showing how the ribbon slider works.
Another basic card with same The Park die set.

Thanks for stopping by.  Come back again soon.


Wednesday, December 20, 2023

Joyful cards

 Joyful cards

 Don't look if you are on my mailing list, and want to be surprised. teeheeehee  If you know me, I like to make multiple designs for my Holiday cards.  This year is no different.  Only difference is I did a JOY theme this year on most of my cards.

stamps/supplies:  GinaKdesigns tapestrey stamp set, Altenew stamp co. Joy die/stamps-embossing folder, Sizzix lamp post die

I used gold and white inks on some of them.  Also used embossing folder and embossing powder.  Yes, embossing powder!  If you know me I used embossing powders seldomly.  Anyway hope you like.

Thanks for stopping by.  Come back again soon.


Sunday, December 25, 2022

Embossed Holidays

Merry Christmas!
Embossed Holidays
stamps used:  Altenew sayings and Poinsettia embossing folder, Sizzix trees embossing folder

Embossing folders are a great tool for making creative cards.  

Basic instructions:

1. Masked off section of card with post it note tape.

2.  Blended color inside the masked area.

3.  Remove the post it note tape to reveal the colored section.

4.  Run card panel through Big Kick (any machine will work) with embossing folder.

tip:  spritz the back of the card panel with a little water. this prevents the card from cracking with 3D embossing folders.

5.  Adhere embossed card panel to card layer a little bigger, then to base card.

6.  Add saying and self sticking gems.

7.  Run the flap of envelope through Big Kick with embossing folder.

Thanks for stopping by.  Come back again soon.
 

Wednesday, December 7, 2016

Basic easel card with video

basic easel card
stamps - Unity stamp co.
Sizzix carved ornaments die
Ranger distress inks
DSP by SU
measurements:
base - 4 1/4 x 11
score and fold at 5 1/2 & 2 3/4
front and inside layer - 4 1/4 x 5 1/2
The easel card has been around for years, and has stood the test of time.  This is a card that is just a little more than an ordinary card.  A couple of folds adds that extra touch to make this an extra ordinary card.
watch my video at the end of this post or at Sue Wisniewski - YouTube 
like and share this video with your friends.  you can also give it a thumbs up if you like it.  
thanks,  see you next time.

Wednesday, February 17, 2016

Hearts away!

last three heart cards I created.  I think my favorite is the ones where I turned the heart die cuts into balloons.  I even used the negative heart cut outs for a card and then had another one left so used that one as a stencil.
card details:
Sizzix hearts die
Just For FunCraft Supplies, Rubber Stamps, Paper Crafts, & Scrapbooking Home - happy valentines day and Rose


Thursday, January 7, 2016

snowy scene tag

This is tag #3 for challenge on OneLittleTag challenge on facebook.  the background is blended distress inks, used a stencil with texture paste, added die cut fence, stamped sled with two colors...cut it out and mounted over fence on tag.  stamped saying and punched out then attached with mini brads.....stamped bird and balsam branch over paste, added ribbon and string to finish.
stamps by Just For Fun
fence die by Sizzix

Friday, December 25, 2015

Blue Christmas!

and it really is a blue Christmas because it has been basically raining all week here.  Enjoy the holidays anyway whether you are having a white Christmas or a blue Christmas!

card details:
stamps by Just For Fun pine forest, balsam branch, happy holidays, joy to the world
little snowflake by ? clear stamp set
snowflake die by Sizzix
self adhesive gems

Thursday, December 18, 2014

May Arts Christmas card challenge---didn't win


>>>>I wasn't one of the winners, I guess better luck next time for me.  Congratulations to the winners.<<<<<<

***this post will stick here till 12-18-14. If you have a chance please go to vote (see below) on my cards or any of the others. thank you.  scroll down to see most recent post.***
First wanted to say thank you to Bethney at May Arts ribbons for
accepting me as one of the twelve to participate in the Christmas
card challenge. Go here and follow instructions to vote on our cards, you have till 12/18/14 to vote . We were sent this ribbon that is like seam binding so it is perfect to use on cards with not a lot of bulk added to the card.  If you look to the left you will see my first card which is a twisted easel card with lots of green and brown tone ribbons that worked great for my gingerbread man theme.  the background piece is a take on the bargello technique then I added ribbons to the top tags by threading them through the holes to tie bows.  On the bottom tags I did what I call a ribbon folded bow kinda like ribbon candy.  For my second card (look to the right) again I did an easel card but I used Spellbinders Nestabilities dies for a shape card.  The background piece is the bagello technique and the top ribbon
bow is what I like to call a loopy bow.  All I did was thread a small piece of ribbon in the hole then I looped all the ribbons around my four fingers and next placed the looped ribbons in between the ribbon that was threaded through the hole and tied it off.....separate all the ribbon loops to make a fun floppy loopy bow.  Now if you look at the stamped candy cane there is another type of bow where I did a one hole bow.  Wrap the ribbon around the piece and thread both ends of the ribbon through the one hole and tie a bow!  comes out perfect every time! One last card which is one of my go to type of card ...... a shaker card!  A fun card that is always a wow card and this one is no exception.  First I adhered the ribbons to a piece of cardstock then ran it through my Big Kick with this big Sizzix snowflake for the shaker opening of the card then just finish off the card with saying and you are done.  Hope you stuck it out here for this long post and please go to Ribbons May Arts blog to see mine and all the other cards created with these ribbons and don't forget to leave a comment over there on the cards you liked.  thanks!
enter in following challenge:
1.  CCEE stampers - starring santa
card details:
all images by Mark's Finest Papers a Heinrich Co.
all ribbons by May Arts ribbons

Monday, July 21, 2014

Here's looking at you

I think this is just a fun fish to be staring into a port hole of a ship.  couldn't resist making a gel card with this fish.  Here are instructions I wrote for Speedy TV I wrote a while back.  It's really an easy card to create just takes a little patience and if you know me in person you know I'm not a patient person but I have made several of this type of card. There is a lot going on in this card besides the cheap hair gel in a mini baggie....I made this card look like the fish, who I colored with prisma color pencils, was looking into a ship's port hole....he looks a little surprised at what he is looking at....what do you think he sees?  As you can see this is a wood ship because I used a wood grain embossing folder for the texture and since ships or boats only go out on the water in the summer I thought this is a good summer card.

entering in the following challenges:
1.  Frilly and Funkie challenge - cool water
2.  Simon Monday Challenge blog - mid-summer's challenge
3.  Craft Hoarders Anonymous challenge - who's the boss?
4.  The House that Stamps Built challenge - summer fun
card details:
stamps - Repeat Impressions Contain yourself stamp set
cheap hair gel
mini ziplock baggies
paper punches and spellbinders circle dies
mini brads
sizzix wood grain embossing folder

Wednesday, April 2, 2014

Paper Trail

What is ATB?  it's Artist Trading Blocks and you can see more here .  Sizzix has a couple of
ATB dies out on the market that are by Eileen Hull .  My friend Amy  started a blog for this new craze they started and it looks like fun.  For the past week Amy and Eileen have been traveling through MA., NY and CT. in a Scotty trailer that
Eileen and her husband remodeled into a craft room.  They stopped by the
Papercraft Clubhouse in Westbrook, CT yesterday so I took a ride to check it all out....plus we were all die cut a mini book to take home to alter.  You can see Amy holding a mini book she altered and also her in the Scotty trailer...there is a sign up book in the trailer where visitors can sign.  The sign up book is open to page that Dina Wakely(I think) painted and signed.
oh yeah, check out Norman the gnome who has been traveling along with them.  The gnome is a thing of Amy's that she has been doing for awhile...she purchases a gnome she sees at a store then alters him to fit whatever purpose she needs.  The fun thing this time is she also found a trailer to go along with Norman....perfect for their Paper Trail trip!

Sunday, November 17, 2013

Chilly night Northern Lights

 I saw this Northern Lights technique months ago but thought .... no, not for me.  Well, after seeing it pop up more and more I decided why not jump on the band wagon and try it out...........so I did.......I like it and can't get enough of it.  There is a tutorial over on Splitcoaststampers here that will show you how to create this look.  Here are two cards I made but I did make a dozen Christmas cards with this technique but won't show them, yet so they will be a surprise when I send them.  You use five colors of ink with a black ink for the northern lights which seems like a lot of colors and I thought .... how am I going to fit all those colors but they do work!  even the black over all the colors which really surprised and impressed me.  I do think I will be making more of these cards maybe for my birthday stash, time will tell.
card details:
stamps - Mark's Finest Papers a Heinrich Co. Home Page Chill is in the air stamp set
inks - Ranger Distress ink pads squeezed lemonade, peeled paint, broken china, faded jeans, seedless preserves, black soot - VersaFine black onyx
Sizzix TH alterations on the edge brackets/parentheses die
sponges

Friday, April 5, 2013

Happy Birthday to my Dad

This weekend is my dad's 89th birthday!!!  wow!  he always says he has been living on borrowed time since he hit 60!  but if you look back at his family most of them lived to over 80.  Had fun with this card first I die cut old card because the first car I drove was an old blue chevy station wagon.  Not as old as this car but that's o.k.  I won a drawing from Rogue Redhead Designs and got this fun stamp set with this old man with fun sayings of course that really isn't what my dad looks like but still fun. 
entering in following challenges:
1.  Simon Says Stamp Challenge - happy birthday
2.  Simon Says Stamp and Show - anything goes
3.  Rogue Redhead Designs blog - sentimental focus
card details:
old fashion card Sizzix alterations die
circle dies from Spellbinders Nestabilities
stamps - Rogue Redhead Designs
prisma color pencils

Sunday, March 31, 2013

Happy Easter

Happy Easter everyone!  hope all is well and you get to spend time with your families.  today I have a cute punch bunny card that I saw online and just had to case it but I didn't have all the same punches so had to improvise with the ones I own.  I think he came out cute. 
entering in the following challenges:
1.    Simon Says Stamp Challenge anything goes
2.  Crafty Creations Challenges - #215 Easter
3.  The Corrosive Challenge Blog!! - spring fling: easter, flowers, sunshine....
4.  One Stop Craft Challenge - #222 Easter
card details:
punches - EK Success
embossing folder - Sizzix TH texture fades woodgrain
 

Monday, November 19, 2012

Door bookmark

I had so much fun making this tag/bookmark.  I've seen this design on a few different cards and would give credit if I knew who was the original creator of the cards.  This month I am making a bunch of bookmarks to put into a gift package for my S-I-L who is an avid reader and also gave us shelter during storm sandy recently when we lost power for six days.  I know she will appreciate this type of gift. 

Entering this bookmark in the following challenges:
1.  impression_obsession_news/ - happy fall
2.  Rogue Redhead Designs blog - uncard  (anything but a card)

recipe for bookmark:
stamp - Impression Obsession Rubber Stamps CC034 C-A-C wood grain
tag dies by  Sizzix
punches for wreath by EK Success
ribbons by May Arts
inks by VersaMark sepia
distress inks by Ranger

Tuesday, March 6, 2012

12 Tags of 2012 - March

Here is my entry for Tim Holtz blog 12 Tags of 2012.  This one was fun to make and it's only the second one.  I used the bird from Sizzix alterations birdcage/bird die.  Went into my stash of leftover pattern papers (love when can use scraps) to make the mosaic pieces.  Stamp my foam stamp I made from the actual die and stamped the background with woodgrain stamp.  Added some color with Ranger blending tool and Distress inks.  Saying is from Inky Antics Rubber Stamps . 

Saturday, March 3, 2012

Stamped shirt

Remember the other day I stamped over at my friend's house....well I put my elbow into a little puddle of paint.  I decided to get out my foam stamps I die cut from Sizzix tattered flowers die and stamp on my shirt.  Also used Stampers Anonymous Tim Holtz flourish image with Ranger pearl white paint dabber.  While I was stamping my shirt I left paint finger prints so had to stamp flower over that.  lol!  guess I'm just a messy stamper.  Letting it dry for a few days before I wash it....not sure if the paint dabber paint will hold up in the wash but I'll find out after it's washed. 
Entering in following challenge:
1.   Studio L3 - wearable art

Saturday, February 18, 2012

technique tags

Over on Tim Holtz blog he's doing 12 tag of 2012 instead of christmas from now on so that means doing one tag a month instead of one a day! Yeah!  This makes it easier to participate. 
The fun part of this tag/card is using the honeycomb paper from Inky Antics Rubber Stamps which I really like playing with since this product came on the market.  What was done here was die cut a Sizzix heart from honeycomb paper.  You only use half at a time so you get two honeycomb hearts from one.  Glued heart to grunge paper heart with Tim Holtz tissue paper behind it.  On the tag stamp Stamper's Anon. diamond image with Ranger pearl paint dabber, let dry then with blending tool add three red Ranger distress inks.  buff card to remove any inks from painted diamonds.  cut out x o x from Tim Holtz idea-ology seasonal paper stash and glue to card.  die cut Sizzix alterations brackets/parentheses on the edge out of red glitter paper (found at craft store) and glue to bottom of tag card.  Doing the resist stamping with paint dabbers is one of my favorite go to techniques since I saw it on  Tim Holtz blog . 
Entering this in following challenges:
1.  Tim Holtz blog - 12 tags of 2012  tag #1
2.  Studio L3 - TH style valentine

Monday, February 13, 2012

Valentine scrapbook

By the time you read this post I should be on my way to friend's house for a fun Valentine luncheon.  I wanted to show the little 4 x 6 scrapbook I made for our hostess but since I know she checks out my blog I had to wait till the day to post pics.  I'm not a scrapper so I just thought of this as a mini book that she could add photos and journal about our day.  I stamped pages and also made pockets out of pattern paper, envelope and different Sizzix dies.  The peppermint candy image is by Hot Potatoes Fabric and Wall Stamps as well as the hearts.  I surprised myself and had fun making this mini scrapbook.  I kept it simple so my friend could add her own stamping touches to it if she wanted.  Oh yes, forgot to mention I binded it with my Bind-It-All machine.....which I had to get out of moth balls. LOL!