My stamping adventures

Showing posts with label Unity stamp co.. Show all posts

Monday, January 26, 2026

Take care

 Take care

I'm getting back into the swing of doing Jen Rzasa #altenewchallengelive Tuesday Altenew challenge.  This time the challenge is Frame It. 

supplies used:  Unity stamp co. Floral Tapestry, Waffle Flower co. Take care die set
I decided to do my own take on this Frame It theme. The saying is framed with the black die of the take care words. I believe you can also call this a take on the eclipse technique.  Hopefully Jen will see what I was trying to show with my take on the Frame It theme.

Thanks for stopping by.  Come back soon.


Wednesday, July 30, 2025

Hello Bruce!

 Hello Bruce!

Bruce started life as a beloved pet, but when caring for him became too much, he needed a new home where he could truly thrive. That’s when Unity stamp company stepped in. Now, Bruce is more than a pet—he’s an office legend, basking in his two-story condo, ruling the space with his good vibes, and reminding everyone to pause and appreciate the little things.

I enjoyed coloring Bruce in a variety of colors...green, purple, and blue.  I can't make up my mind which color I prefer Bruce to be.  Can you? Also I'm not sure, but I think, Bruce is a bearded lizard.  let me know in the comments which color you like, and if you think Bruce is a bearded lizard.
Thanks for stopping by.  Come back soon.

Wednesday, July 16, 2025

More Luna Moths

 More Luna Moths

I am enjoying making Luna Moth cards.  For some reason I'm drawn to bug rubber stamps.  I started by stamping this big Luna moth in the center of a full sheet of cardstock, then stamp the moth along the sides of the cardstock.  Next I cut the stamped sheet of cardstock into four panels measuring 3 3/4" x 5".   I got out some of my blending brushes, and just blended whatever color was left on them onto card panels.  Adhered the stamped cards to 4" x 5 1/4" black card panels. Adhered those panels to colored A2 size card bases.

stamps used:  Unity stamp co. Sacred Flight Luna Moth stamp set

For my next set of cards I stamped the Luna moths with different color inks onto a full sheet of white cardstock. 

Repeated the above instructions except this time I didn't do any ink blending of color on the panels.
The other difference is for this second set of four cards I did a couple vertical, and the last two horizontal.
Thank you for stopping by.  Come back again soon.


Monday, June 30, 2025

Luna Moth

 Luna Moth

This is a big Luna Moth that will fit across an A2 (4 1/4" x 5 1/2") card as you can see in pic.  For this purple (yes, purple but in the pic it looks blue) Luna moth I stamped it, blended colors in the image, then fussy cut it out.  There is no die for this moth at this time, but maybe Unity will have one in the future...otherwise I'm ok with fussy cutting it out.  I layered a 4" x 5 1/4" of the Moonborn Flight paper onto a base card.  I didn't have paper to match the color ink I used, so I just blended the same ink onto the base of the card before I adhered the pattern paper.  Next I adhered the fussy cut Luna moth over the pattern paper, added word with mounting tape...added some inexpensive self sticking gems that I got at our local Dollar Tree store.  

stamps/supplies used:  Unity stamp co. Sacred Flight Luna Moth stamp set, Moonborn Flight paper pack

Now for my second card I stamped the Luna moth directly onto a white panel.  Again blended some rose pink ink for the wings plus yellow and brown inks onto the body of the moth.  Then I cut the panel down to 3 3/4" x 5".  I purposely cut off one of the wings of the Luna moth with the idea to make a bookmark with it later.


Next I ripped a piece of the pattern paper and adhered it over the moth.  Stamped word, and punched it out with an old oval paper punch, then mounted it on the panel.  Added some more of those inexpensive gems.  Adhered stamped panel to a black panel then the base card.  Check out the bookmark!  Can you figure out how I did it?  That's right it's the left over piece that was left after I cut down the Luna moth piece.  

Thanks for stopping by.  Come back soon.


Thursday, June 5, 2025

Card swap cards

 Card swap cards

April theme for my local swap card group was card sketch. Yeah, I'm late as usual lately with posting my swap cards.  

stamp/supplies used:  Unity stamp co. Flock talk stamps, SU dsp

I missed our April get together meeting because I was at a weekend crop.

Here is the sketch we used:

I'm not much of a sketch gal but my friends like them so we usually do one or two a year in our group.  
Our May meeting was canceled because half our group had other obligations. 
stamps/supplies used:  MFP Classic car stamp set, SU ribbon-mesh-Knit embossing folder
May theme was General Masculine cards.
I'll post for June soon.

Thanks for stopping by.  Come back soon.

Thursday, May 8, 2025

Lighthouse

 Lighthouse

Thought it would be nice to have a couple lighthouse cards in my

                                    stamps used:  Stampin' Up lighthouse stamp set, Unity dies


stash.  I have mentioned this before ... my oldest son used to like lighthouses.  He had paintings and all in his house.

This card uses the same stamp set but arches dies by Unity stamp company.  


Thanks for stopping by.  Come back soon.


Friday, March 7, 2025

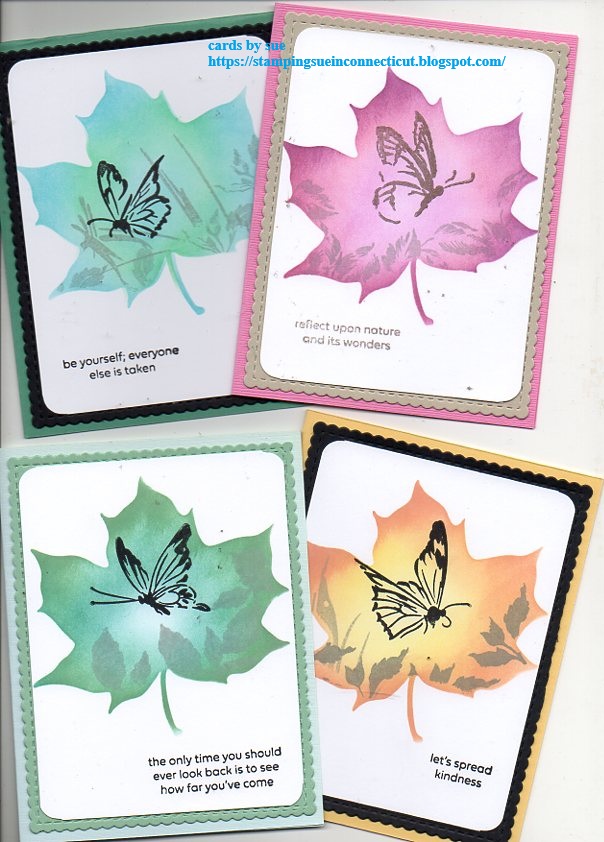
Leaves and butterflies

 Leaves and butterflies

I am having fun with Altenew challenge live.  This is challenge #2.  Need flying insect and leaves on card/project.

supplies used:  Altenew Meadow Reflections stamp set, Remember This stamp set.  Unity leaf stencil

I placed Unity leaf stencil on a white panel, then blended color in it. Then I stamped the leaves from Altenew Remember This stamp set, then butterfly from Altenew Meadow Reflections stamp set. 

The sayings are also from Meadow Reflections stamp set.  I used CP inks to blend colors inside the leaf stencil. 
 
As you can see in the photo I did a set of four cards.  

Thanks for stopping by.  Come back soon.

(not affiliated with any of the above companies)


Friday, February 7, 2025

More Seraphim wings!

 More Seraphim wings!

This butterfly image is still a favorite of mine.  It is so big that you can do so many different style stampings with it.

stamps/supplies used:  Unity stamp co. Seraphim wings stamp set, Waffle Flower A2 postage die

I die cut Waffle flower co. postage die then stamped the big Seraphim wings (butterfly image) on it.  I did some select color blending over the butterfly just to add colors.  Next I stamped some postage style images, and numbers on the postage die.  Layered the finished stamped postage die onto a butterscotch card layer, then onto a black A2 folded card.  You will see more of these faux postage style cards in the future.

Thanks for stopping by.  come back soon.


Monday, December 2, 2024

Stencil Art - Nature splashes

 Stencil Art - Nature splashes

stamps/stencils - Altenew Stencil Art - Nature splashes & sayings

I am a fan of stencils of any kind, and this Stencil Art set does not disappoint.  

This is a set of 6 layering stencils including the last stencil with words. 

stamps, stencils & dies - Altenew Stencil Art set, Unity stamp co. Arches die set

 It also has a leaf die set but I didn't use them on these cards, and bookmarks.  I did the basics for all the above cards, and bookmarks this time around.  Just wanted to get the feel of how all the stencils layered together.  I plan on do more using the leaf dies on more cards, and projects.  FYI I used a variety Catherine Pooler inks.

Thank you for stopping by.  Come back soon.

Tuesday, November 5, 2024

Thank You cards

 Thank you cards

Made a bunch of Thank You cards to have in my stash, and for a couple of people who asked for them.

stamps used: Unity stamp co. flowers, butterfly, lady.  Sayings various companies

Two of the above cards are what I call Faux layer style cards.  That is where you mask off section, blend in some colors, remove mask then stamp image in black. I used my Catherine Pooler inks for blending the colors.  You know, if you follow my blog they are my favorite ink pads.  You can see more of my Faux layer cards in this post from 2020, in this post with a video showing how to do this technique.  The butterfly card is a Split negative card.  Check out how to do this technique in this post with written instructions, and here back in 2016.  To see more of both of these techniques just type in Faux layers, or Split negative in the search bar.

dies used:  Stampin' Up Share a Milkshake stamp/die set

These milkshake, ice-cream cone, and sundae cards are fun, and easy to create.  No stamping required just die cutting of the images.  The backgrounds are, starting with the milkshake card the wax paper pouncing with inks.  The ice-cream card is paper towel pouncing with inks.  The last but not least is the sundae card, which has a shaving cream background.  I usually have a stack of background panels done, so I can make up cards whenever I need.  To see more with the Share a Milkshake stamp/die set look here.  Check out the shaving cream technique look here including a video I did a while ago.  Check out the wax paper technique here with a video.  The paper towel technique is the same as the wax paper.  Remember you can type any technique name in the search bar to see more from me.

Thanks for stopping by.  Come back soon.


Wednesday, October 9, 2024

Fun Slider - pull up card

 Fun Slider - pull up card

stamp/supplies used:  Unity Doodle bird, Stampin' Up DSP, Prisma color pencils

This is a slider or some call it a pull up card ... whatever you call it ... it's FUN, and easy to create.

Slider Pull up card


stamp/supples used: Unity stamp co. Doodle bird, Stampin’ Up (pattern papers) DSP

measurements:

base card: 5 ½” x 8 ½” scored at 4" & 8"

white (inside slider card) cs: 3 ¾” x 5”

outside slider can be any size or shape

mechanism strips – ¾” x 3”

Front DSP (pattern paper) - 3 ¾” x 5 ¼”

Basic instructions:


With ½” fold on left hand side in trimmer, line it up at 1 ½” in trimmer. Cut from 1” to 4 ½”. This creates slit for the slider. Add tear & tape to ½” section.

Add foam tape on one end of mechanism strip. Flip strip over and add tear & tape on end of mechanism strip. Slide strip through slit with tear & tape inside card, foam tape showing through front of card. Punch half circle thumb hole on top of front of card.

Slide strip to bottom of card. Adhere 3 ¾” x 5” (inside white panel) to slider strip with tear & tape on it that will be on the inside of the card. Peel off backing of tear & tape and close card.

Add stamped layer to front of card on the mechanism strip with foam tape. See photo above.

Thanks for stopping by.  Come back soon.


Friday, August 2, 2024

Pop up mechanism cards

Pop up mechanism cards 
     stamps used:  Unity stamp co. Doodle bird, Seraphim wings

These cards are fun!

stamps/supplies used:  Unity stamp co. Doodle bird & Bevy of balloons stencil
Background on the Doodle birds are the balloons layering stencil set.

The side view shows the pop up mechanism.
Pop up mechanism notes/measurements:

Cut 4 1/4" x 5 1/2" card.  Score at 1/2", 1", 1 1/2" on both ends of card.  Cut to make multiple pop ups.  Fold mechanism accordion style.  In this case valley, mountain, and valley on both ends.

Thank you for stopping by.  Come back soon.


Monday, July 22, 2024

Doodle bird pop up

 Doodle bird pop up

stamps/supplies used:  Unity stamp co. Coffee doodle bird, stamp/stencil set Bevy of balloons

Here's a close up of the card closed.
Sample card, not decorated with notes of measurements written inside. 
Side view of card open.
My written out notes for this pop up card.  If you would like more tradition written out tutorial go here to this post.


In case you haven't noticed I'm still having lots of fun with this doodle bird.
Thanks for stopping by.  Come back soon.
***not affiliated with above company just happy customer***


Monday, July 15, 2024

Water Lily

Water Lily

stamps/supplies used:  Altenew Water Lily craft a flower, Unity stamp co. Archies dies

If I'm not mistaken, even though I have been a customer of Altenew for years ... this is my first Craft a Flower die set.  I have lots of stamp/die sets but not Craft a Flower die sets that are just dies ... no stamps.
Basic instructions:
1.  I made a background by scrunching a piece of wax paper ... then tapping into an ink pad ... and pouncing on cardstock.
2.  I die cut the background piece, and a pink cardstock out of arches dies.  Layered onto an A2 (4 1/4" x 5 1/2") base card.  On the top of the base card I corner rounded the corners.
3.  Die cut all the Water Lily dies ... color blended all the dies,  glued die cuts together to form the Water Lily, and the bud on the lily pad. 
4.  Glue the Lily pad, and flowers onto background piece with the wax paper background technique.  
5.  Add die cut hello (which was also color blended), and some enamel dots to finish off the card.
If you go to Altenew stamp company You Tube channel you can see how to put the Water Lily together.

I am entering this card into Altenew challenge here.

Thank you for stopping by.  Come back soon.
***not affiliated with any of the above companies just a happy customer.***


Thursday, July 4, 2024

Happy 4th of July

 Happy 4th of July

stamps dies used:  Gina K designs Hello flowers bundle, Altenew stamp co. paper pack

Just wanted to wish everyone a Happy 4th of July day.  Have a good time with your family and friends.

Here you can see the front of my card, and inside of card.  Happy is from Unity stamp co., and 4 th is from old rubber stamps.


The ice-cream cone is from Stampin' Up.

I don't usually make this holiday cards but thought it would be nice to do ... since I had some free time.

Thanks for stopping by.  Come back soon.

***not affiliated with any of the above companies just happy customer***


Thursday, June 13, 2024

Another accordion fun fold card

 Another accordion fun fold card

There are lots of variations on an accordion fold, and this one is simple but very effective.

stamps/papers/dies used:  Unity stamp co.

I also am using Unity coffee-doodle-doo stamp set again.  I do like this frazzled looking coffee bird, but for me she will always be a tea-totaler to me.

You can see more accordion fun folds here, and here.  To see even more just type accordion fold in search box, and more of my posts will pop up.

I colored her by getting out my blending brushes, and just brushing on some color.  Not even staying in the lines, so to speak.  After that I added more color with my prisma color pencils.
measurements:
base card:  4 1/4" x 5 1/2"
layer on base card:  4" x 5 1/4" pattern paper
accordion fold card:  3 1/4" x 11"  scored at 4" and 8"
layer for front of accordion fold card:  3 1/4" x 4 1/8"
stamped layer:  die cut
layer for inside accordion fold card:  
pattern paper - 3 3/4" x 3"
To assemble the card:
Adhere the bigger section of the accordion fold to base card.  Fold the accordion card flat, and adhere 3 1/4" x 4 1/8" card on the shortest fold.  Next adhere the pattern paper, and stamped card.  Add some self-sticking gems to finish it.  Just keep in mind you can make the accordion fold card a little bigger, or smaller to change up the card.  
Thanks for stopping by.  Come back soon.
***not affiliated with company just happy customer***


Saturday, June 8, 2024

Doodle-Doo Arched

 Doodle-Doo Arched

Today it's all about the arches, and of course Doodle-Doo bird.

stamps/dies used:  Unity coffee-doodle-doo stamp set, arches nesting dies, Bevy of balloons stamp/dies bundle

I like to make different style cards, and this one fits the bill.  I placed the arch die on a folded card just off the folded edge, then ran it thru my die cutting machine.  And there you are a shaped card.  This is a nesting die set so after I colored the bird I cut her out with smaller arch die.  Mounted her on the front of the shaped card.  The background on the base card was done with the stamp/die/stencil set.  Basically I placed down the first stencil and pounced on some white pigment ink through the balloon stencil.  Repeated the white ink for the second stencil layer.  You need to dry the white pigment ink ... you can either let it dry on it's own for hours, or heat it with a heat tool.  I'm impatient so I do the heat tool.  Next I put the second stencil layer back in place to add more ink to the balloons ... but this time I did a color ink over the dried white ink.  The white ink under the colored ink makes the color pop on the kraft cardstock.

Thanks for stopping by.  Come back soon.

***not affiliated with company just happy customer***


Monday, June 3, 2024

Fractured Doodle-Doo

 Fractured Doodle-Doo

Still another fracture card from me to you!

stamp set used:  Unity Coffee-Doodle-Doo stamp set and papers

Now Unity stamp company calls this a coffee bird, but I'm a tea gal ... so for me ... she's a tea drinking bird.  You will be seeing more of this tea drinker soon.

Fracture cards are creative to make, and easy.  I done several of them so I'll just link you up to ones I have done here, and here for you to check out.

Thanks for stopping by.  Come back soon

***not affiliated with company just happy customer***

Friday, May 31, 2024

Balloons on the Diagonal

 Balloons on the Diagonal

This card idea is called Diagonal split cards.  No matter the name it's a fun and creative card.

For this particular card I used all stamps, and supplies from Unity stamp company.

basic instructions:

base card: 5 1/2" x 8 1/2" (folded makes A2 card)

layer: 4 1/4" x 5 1/2"

color cardstock strips: approx. 1" x 6" need two

I'm not much for measuring so I just put card in trimmer, and cut on a diagonal leaving room at the top, and bottom from the corners. The leftover card from the center is not needed for the assembly of the card.  Keep track of which is the top diagonal piece, and which is the bottom piece.  I used Unity balloon and stamp bundle for this card, so the middle layer is 4 1/4" x 5 1/2" card, that I did the stamp/stencil on.  As you can see in the photo the diagonal pieces with thin strip of colored card are layered over the stamped stencil card.  That piece is layered on black die cut small scallop card.  I stamped the big sayings from the same bundle.  I stamped a second stenciled card, so I could fussy cut out balloons to pop up on card.  I also colored white bakers twine with ink for balloon strings.

Thanks for stopping by.  Come back soon.

***not affiliated with company just happy customer***


Saturday, April 13, 2024

New beginnings with Moths

 New beginnings with Moths

This is another technique where you can get four cards from one stamping.  

stamps used:  GinaKdesigns New beginnings stamps/dies by Lisa Hetrick, Unity stamp co. rectangle die set

I call this technique collage stamping.

Instructions:

1.  Stamp various images on 8 1/2" x 11" cardstock.  Just stamp images randomly all over the cardstock.

2.  Cut or die cut 8 1/2" x 11" stamped cardstock into 4 cards.

3.  Layer stamped cards onto black layer, then onto pale orange A2 (4 1/4" x 5 1/2" folded card) card.

4.  Add thinking of you die cut.

See more on this post from 2009, or on this post.  If you type collage stamping in search bar you will find more.

That's it!

Thanks for stopping by.  Come back soon.