My stamping adventures

Showing posts with label 3D cards. Show all posts

Saturday, January 10, 2026

Hello 2026!

 Hello 2026!

Happy New Year everyone!

I took a break from doing my blog, but I'm back!

supplies used:  Altenew Camellia Build a flower, Color pop Hello die

Today I'm getting back in the swing of doing my blog posts, by doing Altenew Tuesday  #Altenewchallengelive with Jen Rzasa.  This week the challenge is Hello 2026, which just means you need to use Hello somewhere on your project.  My first project is a tag ... and if you follow me here on my blog you know I do like to make tags.

I am also an avid cardmaker!  Most of my cards are A2 size, which is 4 1/4" x 5 1/2" (folded).  The background on both my tag, and card are done with Altenew Camellia build a flower.  It's actually a stamp layering flower set, but I just used one of the images, and repeated it on the cream cardstock panel.  Next I die cut the color pop Hello die, which doesn't cut out the word completely.  I put black cardstock behind the cut out Hello to make it stand out more.  Added leaves I already had die cut (I keep a bunch of die cuts in a container for when I need something extra on my project) out with foam mounting tape.  I have used lots of mounting tapes over the years but for the past few years my favorite one is by Altenew.  For the sparkle on the leaves I used stickles glitter glue.  

Thanks for stopping by.  Come back soon.


Friday, July 11, 2025

Terrific Toadstools

 Terrific Toadstools

This stamp and punch is called Terrific Toadstools by Stampin' Up.  Just had a play with this toadstool stamp/punch set...it is easy to stamp and punch out.  The only thing is it only punches out the big, and medium toadstool caps, plus a simple stem.  All the other toadstools and images have to be fussy cut out but I don't mind that so much when they are simple images like these toadstools and such. 
I got out my Autumn colors for these tags and one of the cards.  The other card I did in dark red and pink just for fun.  I saw this color combo on Pinterest.  If you look at the pink toadstool the cap is fussy cut out, and mounted with foam tape.  The brown big toadstool is completely fussy cut out and mounted with foam tape.  I will be making more things with this Terrific toadstool set soon.

Thanks for stopping by.  Come back soon.

Thursday, June 12, 2025

Double accordion gatefold

 Double accordion gatefold

June is all about fun folds in my local swap card group. I do love a good fun fold, and this one does not disappoint. 

                            stamps/supplies used:  Altenew Magnolia die set, SU dsp

The above pic is the card closed.  

                    double accordion gatefold card open (scanned flat), inside saying by Altenew

My old Canon camera doesn't want to play nice right now, so that is why I scanned the card open ... flat.  I learned this card from Stamp from Tami...go here to see a sample.

measurements:

base - 9 1/2" x 5 1/2"  score long side at 1/2" and 2 5/8" on either end.

inside base - 10 5/8" x 3"  score long side at 2 1/8" and 4 1/4" on either end.

layers - (four) 5 3/8" x 2", (four) 2 7/8" x 2", (one) 5 3/8" x 4 1/8"

pattern papers - (four) 5 1/4" x 1 7/8", (four) 2 3/4" x 1 7/8", (one) 5 1/4" x 4

This template is from Stamp with tami

instructions:

1. score the card bases.

2.  cut the layers. 

3.  stamp saying on white layer inside card.

4.  attach layers to card base and inside base.

5.  put glue on tabs on end of base card.  

6.  lay inside layer flay on base card onto tabs with glue.

7.  add die cut magnolia flower to front panel of inside layer.

Thanks for stopping by.  Come back soon.


Monday, December 30, 2024

Accordion Flap card

 Accordion Flap card

stamps/supplies used:  MFP popcorn stamp set, SU DSP

If you follow my blog, and know me ... then you know I love a good fun fold card.  This Accordion flap card is a WINNER!

measurements/instructions:

base card:  11" x 4 1/4"  score at 2 1/2", 3 3/4", 6 3/4" & 8 1/4"

square layers:  4" x 4", 4" x 3 1/2", 4" x 2 1/4"  fold mtn/valley/mtn/valley


DSP layers:  3 3/4" x 3 3/4", 3 3/4" x 3 1/4" & 3 3/4" x 2"

white layers:  3 1/4" x 1 1/2", 3" x 2 3/8"

Adhere all layers together.  Adhere the panels to the scored card base.  BUT only put adhesive on left side of panel.  If you put adhesive on full panel the card will NOT open.  Also keep in mind your layers may differ from mine depending what you stamp.

Thanks for stopping by.  Come back soon.

Monday, December 23, 2024

Diamond easel card

 Diamond easel card

stamp/supplies used:  SU cake stamp set & DSP

This is a different take on the regular easel card called a Diamond easel card.

basic instructions:

base card:  6" x 6" and 6" x 6 1/2" or 12" x 6" score on the long side at 1/2" & 3 1/2"  Mark each end (4" sides) at 3".  Line up the marks and cut into a point on either end. 

side view

front square: 4 1/4" x 4 1/4"

DSP layer:  4" x 4" (2)

white or stamped layer: 3 3/4" x 3 3/4"

rectangle white layer: 5 3/4" x 2 3/4" 

rectangle DSP layer: 5 1/2" x 2 1/2"

closed card

Adhere squares turned so it is diagonal.  Mount the saying with foam mounting so it will hold the diamond up.  This card can be made into any size you want.

Thanks for stopping by.  Come back soon.


Thursday, December 19, 2024

Double diamond cards

 Double diamond card

stamps/supplies used:  SU Lighthouse stamp set & DSP

This is a fun fold card that is fun to create.

Here is a close up card of the double diamond card.
basic instructions:
base card:  4 1/4" x 11" score at 2 1/4", 4 1/2" & 7 3/4" - mtn./valley fold.
side view
DSP (pattern paper):  3 x 4, 2 x 4 & 1 x 4
base squares: 3" x 3"
white squares:  2 3/4" x 2 3/4"

I will be making more of these fun folds soon.
Thanks for stopping by.  Come back soon.


Thursday, November 14, 2024

Poinsettia

 Poinsettia

One of my holiday designs for this year is all about the flower Poinsettia.

stamps/dies used:  Spellbinders Christmas Bird Poinsettia, Altenew stamp co. all the sayings & embossing folder

This card came together pretty quickly because all the wonderful die set from Spellbinders co.  For these cards I die cut colored cardstocks, so there was no coloring.  Embossed white card panel with Altenew organic linen 3D embossing folder.  These embossing folders have been my favorite now for quite a while.  They emboss beautifully with no fussing of wetting cardstock, or anything.  I arranged the poinsettia with all the leaves on a white oval die cut, then layered onto a black oval die cut that is a little bigger.  I do like the way this card came together.

Thanks for stopping by.  Come back again soon.


Thursday, October 17, 2024

Frightful Halloween

 Frightful Halloween

dies used:  Tim Holtz, Stampin' Up

My friends know I like to make Halloween cards so, this year is no different.  

dies used:  Tim Holtz, Stampin' Up

I made a bunch of these cards using TH dies, and SU tree die.  As you can see some of them I sponged color on trees ... others I left white.  Since I made multiples of this design I'm not showing all of them.  I'll start mailing them out probably next week.  Here's a question for you:  Do you know what type of paper is the purple behind the trees?  I'll leave this question up till my next post.

Thanks for stopping by.  Come back soon. Feel free to leave a message and let me know if you like to make Halloween cards.


Sunday, October 13, 2024

More slider pull up cards

 More slider pull up cards

stamps/supplies used:  Altenew stamp co. Jelly fish and saying

Instructions and measurements can be found on this post. 

Here is a look at the inside of this jelly fish card.

Yet a couple more of these slider pull up cards.

stamps used:  Altenew stamp co.

stamps used:  Altenew stamp co. oranges and Stampin' Up birthday sayings
Had fun making these cards.  Now it is time to send them off to family and friends.  Hopefully they will put a smile on their faces.

Thanks for stopping by.  Come back soon.


Wednesday, August 14, 2024

Little note of thanks

 Little note of thanks

I don't do a lot of thank you cards but decided to make one to have on hand. 

This cute bird is a stamp set with a punch.  Didn't have my camera handy so I scanned this card.  The only problem is you can't see the pop up ..... if you go to this post you will other cards with this pop up mechanism, and measurements.

stamps/supplies:  Stampin' up

Here is a look at the pop up mechanism.

Thank you for stopping by.  Come back soon.

Friday, August 2, 2024

Pop up mechanism cards

Pop up mechanism cards 
     stamps used:  Unity stamp co. Doodle bird, Seraphim wings

These cards are fun!

stamps/supplies used:  Unity stamp co. Doodle bird & Bevy of balloons stencil
Background on the Doodle birds are the balloons layering stencil set.

The side view shows the pop up mechanism.
Pop up mechanism notes/measurements:

Cut 4 1/4" x 5 1/2" card.  Score at 1/2", 1", 1 1/2" on both ends of card.  Cut to make multiple pop ups.  Fold mechanism accordion style.  In this case valley, mountain, and valley on both ends.

Thank you for stopping by.  Come back soon.


Monday, July 22, 2024

Doodle bird pop up

 Doodle bird pop up

stamps/supplies used:  Unity stamp co. Coffee doodle bird, stamp/stencil set Bevy of balloons

Here's a close up of the card closed.
Sample card, not decorated with notes of measurements written inside. 
Side view of card open.
My written out notes for this pop up card.  If you would like more tradition written out tutorial go here to this post.


In case you haven't noticed I'm still having lots of fun with this doodle bird.
Thanks for stopping by.  Come back soon.
***not affiliated with above company just happy customer***


Wednesday, June 14, 2023

Angled gatefold cards

 Angled gatefold cards

I do like a good fun fold card, and this is just right. 

stamps used:  Unity stamp co. Naturally beautiful stamp set

measurements:

card base:  11" x 5 1/2"  scored at 3 3/8" on both ends.

two front panels: 3 1/8" x 5 1/4"

inside panel:  5 1/4" x 4"

belly band:  11" x 1"

basic instructions:

create angled gatefold (see template)

Mark 1 3/4" from the top of both ends.  Mark the bottom 1" on both sides.  Cut from the 1" mark to the 1 3/4" mark, then from the 1 3/4" mark to the score line on the top on either side. 

Mark and cut the front panels, and cut at the same marks.
Create the belly band by wrapping the strip around the card.  
Thanks for stopping by.  Come back again soon.


Saturday, June 10, 2023

Diagonal Joy fold cards

 Diagonal Joy fold cards

stamp/dies used:  Stampin' Up

This is a variation of the Joy fold card.  I saw this on Stamp with Tami blog.  

measurements:

base card: 8 1/2" x 5 1/2" score at 4 1/4"

inside mini card: 8" x 3" score at 4"

inside layers: 4" x 5 1/4" & 3 3/4" x 5"

basic instructions:

With a trimmer diagonal cut front of card.  Die cut milkshake glass, ice creams, straw, spoon, and cherry.  Assemble on mini card.  Stamp saying and die cut with circle, mount on mini card with foam mounting tape. Stamp saying inside mini card.  Open card and adhere mini card inside diagonal cut base card.


Repeat above measurements, and instruction to create the ice cream cone card.  Only differences are die cut all the things for ice cream cone, and die cut the saying on front of card with postage stamp style die.

Thanks for stopping by.  Come back again soon.


Tuesday, May 30, 2023

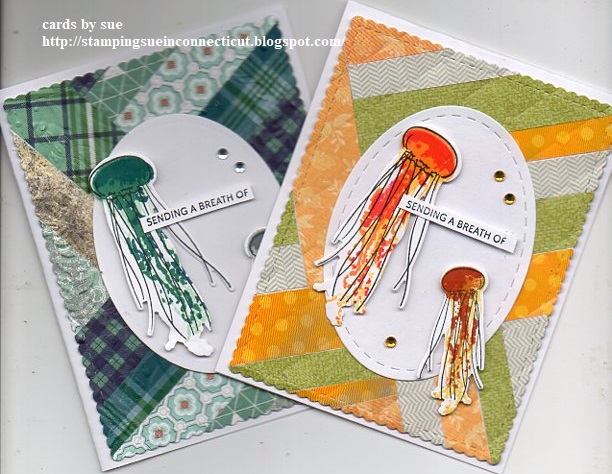
Painted jellyfish

 Painted Jellyfish

stamp/dies used:  Altenew Painted jellyfish stamp/die set

I fell in love with jellyfish, when I visited the Mystic Aquarium a couple of years ago.

basic instructions:

For the jellyfish I used Catherine Pooler inks, which lately are my inks of choice.  This stamp set is a three step stamping technique.  I made a bunch of the jellyfish, so I now have a stash of them for future cards.  The jellyfish were mounted onto a die cut oval, then adhered to a herringbone background card.  The herringbone technique can be seen here in a page from my background sketchbook, which I started years ago.  If you click on the page in the post you will see I first did the herringbone technique back in 2010.  Here is a more recent post showing the herringbone technique.  If you would like to check out more just type herringbone in the search bar.  

Below are a couple more card samples with the painted jellyfish.


Above card has a strip of shaving cream background, which you can get more information on this post if you are interested.
Thanks for stopping by.  Come back again soon.

Monday, May 22, 2023

Big Trellis cards

 BIG Trellis cards

stamps used: SU Painted Poppies, Dragonfly Dreams, Forever Fern

Still making trellis cards! only now I'm making BIG 5"x7" trellis cards!


Vertical and horizontal cards.

basic instructions:

base card: 5"x7" (folded)

Strips can be cut in any size.  Here I did 3/4" strips cut off the front of the card.  You will need two thinner strips for the vertical fence posts.

picture (shown is A2 size card) of trellis cards before decorated.

Line up one of the strips on the washi tape even with the bottom of the card.  Next evenly space the rest of the strips up the card. Add a dot of glue on each of the strips, adhere the thinner two strips to create the fence posts.  Now all there is to do is decorate the card with poppies, and leaves.  Add some self sticking gems for sparkle to finish the card.  The one extra thing I did with my cards is to add a folded paper text weight "card" inside my trellis card.  This made it, so I could stamp/write message inside the card without it showing through the strips. 


If you look close at the photos of the cards, you can see the folded paper card with splats stamped on it.

Thanks for stopping by.  Come back again soon.


Wednesday, May 17, 2023

Milkshake gate fold

 Milkshake gate fold cards

stamps used:  SU Shake a Milkshake bundle

There are lots of variation on the gate fold card, and this is just one of them.

Measurements:

base card: 4 1/4" x 11"  score at 2 3/4" and 8 1/4"

DSP (designer series paper/pattern paper): cut 2 at 2 1/2" x 4"

Front layers:  mini scallop and stitched rectangle


Inside layer:  mini scallop (lime milkshake), 

stitched rectangle (chocolate milkshake)

You will be seeing more cards using this stamp/die set in the future.  If you type gate fold in my search box, you will see lots more samples of this style card going back over 10 years.

Thanks for stopping by.  Come back again soon.