My stamping adventures

Showing posts with label card template. Show all posts

Monday, July 22, 2024

Doodle bird pop up

 Doodle bird pop up

stamps/supplies used:  Unity stamp co. Coffee doodle bird, stamp/stencil set Bevy of balloons

Here's a close up of the card closed.
Sample card, not decorated with notes of measurements written inside. 
Side view of card open.
My written out notes for this pop up card.  If you would like more tradition written out tutorial go here to this post.


In case you haven't noticed I'm still having lots of fun with this doodle bird.
Thanks for stopping by.  Come back soon.
***not affiliated with above company just happy customer***


Thursday, March 28, 2024

Wildflower, Yikes!

 Wildflower, Yikes!

Check me out over Blank Page Muse blog today with a pop up, or it can be called a pop out card.


Once you do one of these cards you will be addictive to this card design. 
The wildflower is unique, and quirky along with the fun pattern paper.  Of course, with this quirky flower I just had to use a bright green ink to show it off.
First I wrote up these measurements for the pop up mechanism. Next I drew pictures to go along with my notes.
Measurements/Basic instructions:
1.  On A2 card 4 1/4" x 5 1/2" adhere pattern paper.
2.  die cut out section.  save cut out shape to adhere to pop up mechanism later.
3.  cut strip of cardstock 1 1/2" x 4"  score at 1", 2", 3".  fold on all scores.

4. on folded strip add glue (or favorite adhesive) to one of the sections with glue on the inside of the card at the fold.  see template/notes #2 drawing.  When card is closed you can see the strip through the opening.  Open card and fold the strip in half. see template/notes #3 drawing.  Put glue (or favorite adhesive) above fold of card.  see template/notes #3 drawing.  Close card to attach pop mechanism to card. 

 Next adhere die cut shape you saved from before to the pop up mechanism when card is closed.  Good idea to stamp/decorate the die cut shape before adhering to pop up mechanism.  Finish decorating to complete the card.

stamps/products used:
Blank Page Muse Wildflower, Yikes stamp set by Monique van Dijk
Blank Page Muse Cyan Corsortium paper pack by Pam Bray
I Brake for stamps Harvest Love (saying) stamp set

Thanks for stopping by.  Come back again soon.


Wednesday, August 16, 2023

Dreamer Doll 1

 Dreamer Doll 1

I have an announcement ... I'm happy to tell you I joined the Blank Page Muse (BPM for short) creative design team.  Also included with BPM is their sister site I Brake for Stamps (IBFS for short).

I created a couple of z-fold cards using this artistic style art doll.

Card #1 classic black & white card

Card #2 heat embossed resist card

basic instructions for heat emboss resist card:

1.  stamp and heat emboss image with clear ink and powder.

2. ink blend colors over the embossed images.

3.  buff off images with soft color to make the image pop.

4.  layer card panel onto card.


Both of these cards are Z-fold cards.  Z- fold cards are easy to create with just a couple of scores, then fold.  
Here is a template for a Z-fold card
This template shows the size of the card along with the scoring measurements.  Also shows how to fold the card...first fold is a mountain, and the second is valley fold.

Stamps and products used on these cards:
Blank Page Muse Dreamer Art Doll 1 designed by Pam Bray
Altenew Obsidian black pigment ink
Clear embossing ink and powder
Catherine Pooler inks (for blending)
Blending tools from various companies


***Guess what?  I am a weekly favorites on Splitcoaststampers with this card!  see link below.*** 

Congratulations your card is on the Weekly Favorites HERE. See post 11.
Thanks for stopping by.  Come back again soon.

Monday, May 8, 2023

Everything coming up carrots

Everything coming up carrots

card #1
stamps/dies used:  SU Thanks a Bunch 

For these cards I used up things I had done already, like shaving cream backgrounds, and die cuts.  Yes, I have a baggie full of die cuts ready to be used on my cards.

Card #1 measurements:

A2 card: 4 1/4" x 11" 

pop up strip: folded to create a box

card #2

Card #2 Double pop up measurements:

A2 card: 8 1/2" x 5 1/2"

inside layer: 8 1/4" x 5 1/4"  folded in half. With card folded in half, cut on folded edge to create pop ups.
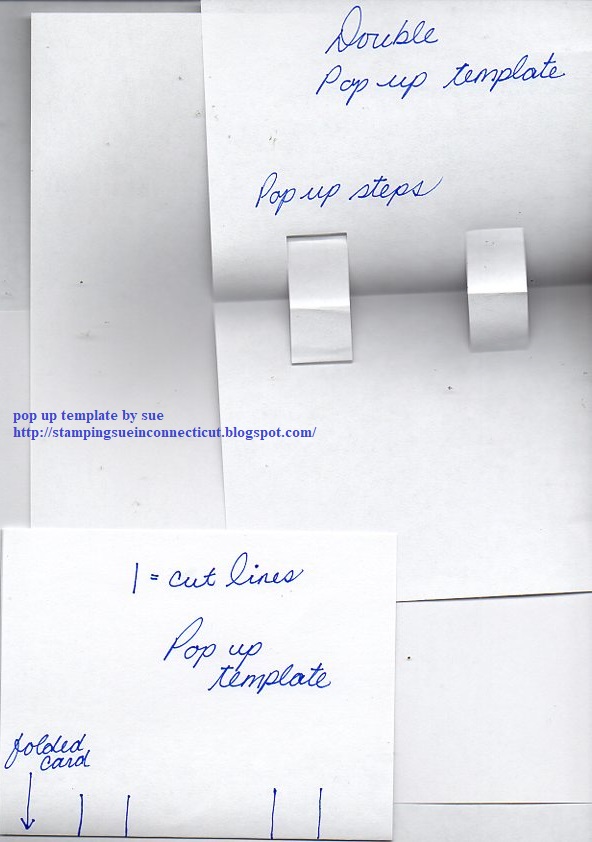

Card #3 Explosion fold measurements:
A2 card: 8 1/2" x 5 1/2"
inside explosion fold: 7" square 


Card #4 Tag pop up card
See measurements for card #2
Check out this pop up post for more pictures and instructions on how to make pop up cards.
Let me know in the comments if you have made pop up or explosion fold cards.
Thanks for stopping by.  Come back again soon.
***not affiliated with above company just happy customer***

Wednesday, September 14, 2022

Floating Panel Cards

 Floating Panel Cards

SU bats paper punch, Sizzix ghost dies.  sayings are all old wood mounted stamps from my stash
This is a new card design for me ... I do like all the layers. I saw this online on Lisa's Stamp Studio you-tube channel.

Measurements:

base card: 4 1/4" x 9 1/2"  score at 1" and 2".  Flip card and score at the other end at 1" and 2".

inside layer:  4" x 5 1/4" (color cardstock)

inside stamped layer:  3 3/4" x 5"

Mechanism:

same color as base card: 3" x 3 1/8"  cut 2.

(accordion fold extension)

score at 1" and 2"  (on the short side)

Panels:

same color as base card: 2 3/4" x 3 3/4" cut 2

same color as base card:  2 1/4" x 3 1/4" cut 2

pattern paper:  2 1/2" x 3 1/2"  cut 2

pattern paper:  2" x 3" cut 2

stamps used:  Ann-ticipations legs, Stampers Anonymous crazy things witches' hat

The legs and witches' hat are colored with prisma color pencils.

Assembly:

If you look at my template you can see all the pieces.  The base card is folded on each end ... valley fold, mountain fold. The accordion fold extension which is the mechanism is accordion folded ... valley, mountain fold.  Glue valley fold to first fold of the base card to create the extension.  Adhere the 2 3/4" x 3 3/4" card inside the fold of the extension mechanism with the card going to the inside of the base card.  Adhere the 2 1/4" x 3 1/4" card on top of the first fold of the extension mechanism.  Again with the card to the inside of the base card.  Repeat on the other end of the base card with the extension mechanism and layering cards.  All that is left is decoration the card.
Thanks for stopping by and come back again soon.


Friday, September 9, 2022

Wiper 2022 card with video

 Wiper 2022 card 

Wiper cards have been around for years!  In fact, I learned this card so long ago at an Art Continuum, way back in 1999 or 2000.  That was long, before I started blogging, not even sure if I was on Facebook then, either.  Please scroll down to see my video or go to my you-tube channel.  

So here is my Wiper 2022 card


Measurements and template:
base card: 8 1/2" x 4 1/4"  score at 5 1/2" and 7" 
or you can score at 1 1/2" and 3" then flip card.
front layer: 2" x 8 1/2"  score at 1 1/2" and 3".
wiper mechanism: 1" x 1 7/8"
wiper template
wiper template open
Pattern paper measurements:
4" x 5 1/4" for inside back panel
cut two 1 1/4" x 1 3/4" for front left layer
cut 1 3/4" x 5 1/4" for long section on front layer
cut 1 1/4" x 2" for top right layer
Window sheet:  1/2" x 2" approximately
Please watch video to assemble wiper card

Here's another Halloween ghost card
Thank you for stopping by.  Please come back again soon.