My stamping adventures

Showing posts with label platform cards. Show all posts

Tuesday, March 14, 2023

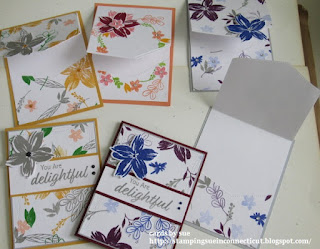
Platform front flap cards

 Platform front flap cards

This is a top fold fun fold card, or at least that is what I like to call it.

stamps used:  SU milkshake stamp bundle

I know I say this all the time, but I'll say it again ... this style card is fun to create!  I say that all the time about fun folds but they are!

Measurements:

base: 11" x 4 1/4"  score at 5 1/2" to make top folded card

cut 1 1/2" from the bottom of the card.

cut 7" from the top of card.

layer: 2 3/8" x 4"

white layer: 2 1/4" x 3 3/4"

The above measurements can be adjusted to make the stamped layer bigger or smaller if you wish.

First I adhere all the pattern paper layers to the cut layers. Next I put a very small piece of repositionable tape on the bottom of the inside of the card.  I lightly place the cut off layer of the card to the inside of the card.  This will hold it in place, while I tape the stamped layer to the top of the outside of the card.  To do this only put adhesive on the top backside edge of the stamped layer.  Then put adhesive on the bottom back of the stamped image, and adhere it to the bottom cut out layer that is on the bottom of the card. Pull the card open, and remove the repositionable tape from the inside of the card.


If you look at the pictures you can see the layers, and the platform style.  It is one of those cards that after you make one you go ... Ah ha!  I get it now.

Thanks for stopping by.  Come back again soon.


Monday, January 16, 2023

More Platform front flap cards

 Platform front flap cards with more

I'm on a little obsession right now, with these platform front flap cards.

stamps used:  Catherine Pooler stamp/die set

Today I'm showcasing more of the cards I call Platform front flap cards, but this time they have die cut outs on the flap.  It's fun to take a card, and then do something else to it.

stamps used:  Catherine Pooler stamp set

This time I took a square die cut, and turned it on the diagonal, or diamond side.

Instruction for these cards can be seen here but I have been making what I call platform cards for years.  Please type in platform cards on my search bar to see more.

Thanks for stopping by.  Come back soon


Thursday, January 5, 2023

Platform flap cards

 Platform flap cards

stamps used:  Stampin' Up

stamps used:  Stampin' Up

This is a variation of a card I called Platform cards, which you can see in this 2018 post, 2019 post, and 2020 post. These are just a few posts, if you would like to see more, type platform in my search box on the side bar.

Basic instructions:

base card (quarter card): 4 1/4" x 5 1/2"

layer: 4" x 5 1/4"

DSP flap layer: 3" x 6"  score at 1/2"

Score so the DSP (designer series paper or any pattern paper) matches up at the bottom of the 4" x 5 1/2" layer. Fold and score the DSP, and adhere 1/2" flap to back of 4" x 5 1/4" layer.  Stamp saying under flap on white layer so it is not visible when card is closed.  Adhere layer with flap to base, add embellishments to finish card.  

Envelope:  adhere same DSP to flap for decoration.

stamps used: Stampin' Up
stamps used:  Owl by Stampin' Up, Puffin by Catherine Pooler stamp/die set

Thanks for stopping by.  Come back soon.

***not affiliated with any of the above companies, just a satisfied customer***


Tuesday, January 18, 2022

Always delightful

 Always Delightful

stamps used:  ginakdesigns Always Delightful stamp/die set

Been having some fun with this stamp and die set by Gina K designs.  I like the different size flowers, and the wonky-ness of the shapes. Is wonky-ness a word?  Well, it is for me. 😊  I did get out my Catherine Pooler   inks, because if you follow my blog you know, they are my favorite ink of late.  

Check out the shape of the top of the card ... I used a border die from SU.  I never thought I would like border dies, but lately I have been using them a lot in my cards, and treasure books. I'll show some of my treasure books in upcoming post.  But first ..... thanks to my friend Holly.  I got a card from her in a swap showing me how to use the border die.    These cards with the border fronts are what I call platform cards.  You can see more samples and details on platform cards here or here.  As always if you type platform cards in search bar more will come up for you to see.

That's it for now.  Thank you for stopping by and, please come back soon.

***not affiliated with any of the above companies just satisfied customer***


Monday, August 31, 2020

Seas the Day

Seas the Day

stamps used:  Stampin' Up and Ranger Dina Wakley (saying inside)

This is what I call a Platform card.
basic instructions:
1.  base card 4 1/4" x 5 1/2"  - this is the platform for the card.
2.  folded card 11" x 3 1/2"  before folded in half.
3.  stamped folded card 
4.  adhere stamped folded card to platform layer.
Platform cards can be made in any size or orientation.  Take a look here to see horizontal version, more platform cards here, and here in this post.

Thank you for stopping by and please come back soon.  all comments are welcomed, I read and reply to all comments.

Tuesday, July 14, 2020

Watercolor to platform cards

stamps used:  Altenew stamps
This is a short and sweet post just to show off a couple of cards.
Got out my set of Altenew watercolors and did some basic watercoloring inside the squares of the Tartan stamp set.  The Altenew flowers were done with the Build a Flower: Anemone stamp set.  I made these cards into what I call Platform cards you can see more here, here, and in this post.  You can also go to the search box in the sidebar and type in platform cards to see more.
Thank you for stopping by.  come back again soon.
***not affiliated with any of above stamp companies just a customer.***

Friday, March 27, 2020

Platform fun fold card

stamps used:  SU Painted poppies
SU DSP painted poppies

I do like to make fun fold cards!  and this one is no exception.  I like to call this style card a platform card because the folded card is on a single layer base card.  To me it looks and feels like a platform but I'm sure there is another name out there that someone else named it...but...for me it will always be a Platform card.

Measurements:
Folded card:  8 1/2 x 3 1/2
tip:  folded card can be any size smaller than the platform.
base or platform:  4 1/4 x 5 1/2
Basically that is all you need to know, anything beyond that is just decorating the card.

Take a look here,  here, and another here.  As you can see I have been creating these style cards for a while.  The first time I remember doing this style card was way back when I was getting together with friends in New Hampshire ... we used to call our group .... Stamp Bash.  Unfortunately we stopped years ago because of life situations.  Cindy this is a shout out to you.  Do you remember this style card?????
That's it for today.  thanks for stopping by.  come back soon.  leave a comment and let me know what you think.  Tell me about a card design you have been making for years.

Tuesday, November 13, 2018

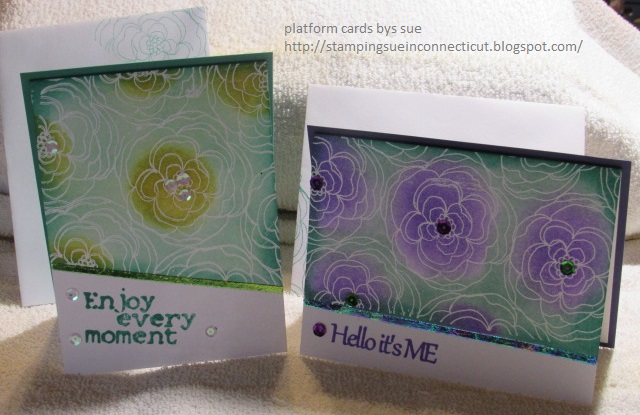
Platform cards

 stamps used:  Unity stamp co.
I call these Platform cards because it is a folded card on a single layer of card which is like a platform for the card.
Measurements:
base platform - 5 1/2" x 4 1/4"
folded card - 8 1/4" x 5 1/4"
That is as simple as it gets!
I did a resist technique for the coloring on all four of these cards.  Stamp and emboss image then blend, stipple or sponge on color.  Buff to reveal the magic of resist.  I added a bit more shine by adhering a strip of double stick tape then pressing on foil.  No heating necessary for foil doing this technique.
Hope you enjoyed this post.  Leave a comment to let me know what you think.  come back again soon. 

Monday, June 25, 2018

watercolor fun

inks used:  distress tumbled glass, salty ocean, wilted violet - VersaFine Clair Nocturne (black)
This started out as a one layer card but knowing me as I do ... I just couldn't leave it that way. Just seemed not finished so I made it into what I call Platform cards.  you can see details for Platform cards here.  
Back to these two cards:
platform base - 4 1/4" x 5 1/2" 
card base - 8" x 5 1/4" folded in half
To create the watercolor background I die cut a circle ... saving the die cut circle for another project.  we will be using the reverse mask.
1.  On a craft sheet press the three colors of distress ink onto it then spritz with water.  
2.  place the reverse mask on the front of the folded card then press into the watered distress inks.
3.  remove mask to see what I like to call a watercolor splat.  allow to air dry or heat with heat tool.
4.  stamp image over watercolor splat with black ink.  
5.  stamp sentiment in the bottom corner of card.
6.  adhere folded card to platform base.
let me know what you think of this watercolor splat technique.  if you try it come back and show me what you create.
come back again soon.  comments always welcomed.

Saturday, June 9, 2018

Platform cards

I call these cards Platform cards because that is what they make me think of .... a card on a platform.  did some basic stamping on the front of the cards.
stamps used:  Stampin' Up
measurements:
base = 4 1/4" x 5 1/2"
folded card = 5 1/4" x 8 1/4"

top folding card:
base = 4 1/4" x 5 1/2"
folded card = 4" x 10 1/2"

Simple and easy card design but very effective.
come back soon.