My stamping adventures

Showing posts with label Unity Stamps. Show all posts

Wednesday, October 26, 2022

Ghoul shaker card

 Ghoul shaker card!

stamps used:  Catherine Pooler Squad Ghouls stamp/die set, Unity stamp set Happy Halloween

It is always fun to bring back old favorites like shaker cards!  The best part is this is a new an improved shaker card, because I used a clear envelope for the shaker bits.  No more using a kraft knife to cut into foam board!  so no more fingers with bandaids from cuts.  Those kraft knives can be sharp.  

The background was blended with a couple of orange ink pads. Next I stamped a couple of the small images from the stamp set to make a background.  Here is a tip that I do:  put a strip of tear and tape on the bottom back of the stamp card to hold it to the clear envelope.  Can you figure out why I did this?  I did this so the shaker bits stay in front of the stamped card.  You just need to slide the card in carefully, so it sticks only to the bottom inside of the clear envelope. Next add shaker bits, then seal up the clear envelope, and adhere it to black layer.  The black layer to an A2 white top folding card, then shake away! I stamped and die cut the ghoul...he is color blended with blue ink, blue gel pen on his spots, white gel pen on his teeth.  And of course, he needs google eyes!

Check out more of my shakers here, mini shaker here, vellum shakers.  To see more just type shakers in the search bar.

This ghoul shaker card is going to my 2 1/2 year old grandson. What do you think ... will he have fun shaking up this card?  I think so.

Thanks for stopping by.  Come back soon.


Saturday, October 22, 2022

Monster envelope flap cards

 Monster envelope flap cards

I am having fun with these envelope flap cards, as you can tell ... since this is my second post with these style cards.

stamps/dies used: Catherine Pooler squad ghouls, Unity stamp co. sayings

The first two cards I'm showing have the envelope flaps adhered to the layer of the card.  This card is a two for one because, you cut the 4" x 4" pattern paper in half diagonally.  There you have two flaps to layer on to card.  I call this card the sealed envelope flap card.


Measurements/Instructions for open envelope card:
back layer card: 4 1/4" x 5 1/2"
folded card: 5 1/4" x 8" - score at 4" to create card
pattern paper: 4" x 4" folded in half diagonally

Adhere diagonally folded pattern paper to the back of the folded card.  Leave the front half of the diagonally folded pattern paper hanging over to create the open style envelope flap card.  If needed trim off end points of the pattern paper that extends beyond the folded card.  Adhere the folded card with envelope flap to back (4 1/4" x 5 1/2") layer to create the card.  Mount ghouls on circle to closed folded card, with foam tape only on the bottom of circle.  The point of the pattern paper flap tucks under the ghouls on the circle to hold the card closed.  Stamp your saying on the inside of the card.  
Thank you for stopping by and come back soon.


Sunday, September 4, 2022

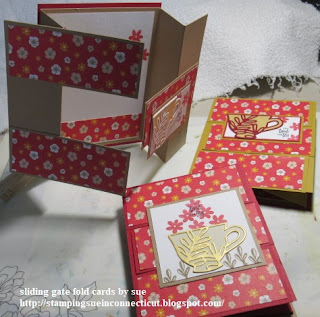
Sliding Gate fold cards

 Sliding Gate fold cards

I have made a lot of gate fold cards, but this one is just too much fun!  

                                                        stamps/dies used:  SU Cup of Tea

stamps used: SU Way to Goat

stamps used:  Unity Harrison Hedgehog stamp set
Measurements:
gate fold card:  5 1/4" x 11"
score at 1 3/4" and 3 1/2", rotate the cardstock 180 degrees and repeat scoring measurements.
cut three strips at 1 3/4" x 4"
cut three strips of pattern paper at 3 3/4" x 1 5/8" (layer over cardstock strips)
layer for inside card:  3 3/4" x 5"
base card: 4 1/4" x 5 1/2"
Stamped image for strip that slides in the middle of the three strips can be anything you want.  You just have to remember, when adhering to middle strip that it does not interfere with the sliding of the strip.  See more gate fold cards here from 2011 to 2022 twisted gate fold card.  To see gate fold cards in between those years, please type gate fold in search box in the side bar.
Thank you for stopping by and come back again soon.


Tuesday, July 19, 2022

Faux Grid cards with video

 Faux Grid cards

This is another fun way to create grid, or Retiform cards.  I wanted to mention, that after I made all my Faux grid cards with the chalks, I sprayed them with a Fixative.  The Fixative just sets the chalks so they don't rub off.  Spray them outside, or in a well ventilated area.

Please, scroll down after you look at the card photos to watch my video.

stamps used:  Unity stamp co. Something Magical, Shine Out of Darkness, Time to Refresh, Sakura

Here is my video that you can watch here or on my you tube channel. 


Feel free to type faux grid in the search section in the side bar to see grid cards I did in the past.
Thank you for stopping by.  Come back again soon.

***not affiliated with above company just happy customer***


Saturday, May 21, 2022

Roll back reveal card

 Roll back reveal card

This is a fun and simple card, so I just had to jump on the band wagon to make a few cards.  I seen this card called Roll back reveal card, Torn effect card, and the Ripped back card, so pick whatever name you want to call it ... and have some fun with it.

stamps used:  Unity stamp co. Sakura stamp set
Above card is made with a BIG, and long Sakura (cherry blossom) stamp from Unity stamp co.  For this card, and the card below, I ink blended a section on a white layer with distress oxide inks.  Yes, I pulled out my distress oxides!  Haven't used them in ages.  For the ripped layer I just gently ripped the layer back, then rolled the ripped strip into a tight cylinder.  I taped the cylinder shape to the card to make it stationery.  Next I taped the ripped layer to the layer I color blended, and stamped.  Layered that to Unity 's rectangle scallop die, and taped that to white folded card.  Stamp the envelope, and you are done.

stamps used:  Altenew stamp co. Meadow Reflections stamp/die set

These two cards above where created the same way as the Sakura card.  Basically the only difference are the layers on the butterfly cards.  They have straight cut layers ... no scallop layer.

I can see myself making more of this design card!

Thanks for stopping by and please come back soon.

Tuesday, January 11, 2022

Happy Anniversary to you

 Happy Anniversary to you

stamps used:  Unity stamp co. I did,I Do, I Will stamp/die, Pop dots

I needed a couple of anniversary cards to send out, for the end of December.  I decided to get out a new big background image, and word die from Unity stamp co.  


 Of course, I got out my CP inks to make lots of colorful backgrounds on that big image. 

The pop dots background image is the perfect size to fit an A2 card ..... the anniversary stamp and die worked great mounted over the top of the background.  

Simple card but effective ... don't you think?  I ended up making a bunch of them to have on hand for a local card swap group. 

Thanks for stopping by.  Come back soon.

***not affiliated with above companies just happy customer***


Wednesday, December 22, 2021

Emboss resist

 Emboss resist

Emboss resist is an old technique but a good one.  I learned it way back when I was working at a stamp store before it closed.

                                                        stamps used:  MFP (out of business) and Unity stamp co.

Basic instructions for emboss resist:

Stamp image with clear embossing ink, sprinkle with either clear or white embossing powder.  Remember to dust cardstock first with embossing buddy pouch to get rid of most of the static.  Heat with embossing tool to melt the embossing powder.  Next is blend or sponge on color.  You can add as much or less color as you like.  Buff off embossed images with soft cloth to make the image pop under the color.  That's about it.

Check out this post from 2009 or here back in 2013 when I was teaching classes.  See more here, and here, if you want to see more just type emboss resist in the search box on my side bar.

Thanks for stopping by and come back again soon.

Saturday, August 21, 2021

Mixed media w/friends #5

 Mixed media w/Friends #5

I have been bad with showing our MMw/F (mixed media w/friends) cards lately.  Below are two MMw/F cards from way back in May 2021.  I will catch up showing more soon.

MMw/F #5 by sue

you can click on pic to enlarge to see supplies

The best part about making these mixed media style projects is you get to use up lots of things in your stash.  For instance, I have had this pad of fabric paper for a year, and I finally used it!  

MMw/F #5 by josette

Here she used Unity stamps and distress inks to distress the edges of the card.  She went the extra mile and made an envelope to fit the card.
Hope you are enjoying seeing our mixed media jumbo playing cards.  Here is where it all started MMw/F #1 post.  If you want to see more you can type mixed media w/friends in the search box in my side bar.
Thanks for stopping by and come back again soon.
***not affiliated with any of the above companies just happy customers***


Wednesday, August 18, 2021

Masculine cards

 Masculine birthday cards

stamps used:  SU-waterfront stamp set, MFP&stamps-happy birthday, Unity stamp co.-Amazing saying, Sunday Int'l-mesh background, Penny Black-tree, SU-clelebrate, MFP&stamps-happy birthday


Like everyone says masculine cards are one of the most difficult cards to create ... or ... is it just me?  Anyway, I need two masculine birthday cards for September, so I figured I better get a head start on making them.

Card #1 (top card) I got out my SU (Stampin' Up) waterfront stamp set, which I haven't used in a while, so I thought it would make good masculine cards.  Made a scene with some of the images in this stamp set ..... I like the way it came out.  I die cut the stamped card with Hero Arts infinity postage die set, then die cut straight layers with another Hero Arts infinity die set.  Layered it all on a black note card (A2 size) to finish it off.

Card #2 (bottom card) I really went old school using wood mounted stamps from back in the day.  The mesh is stamped with a kraft ink, then over stamped with the tree/sayings with black ink.  Simple but effective, I think.

Let me know what you think of my masculine cards in the comments.

Thanks for stopping by and come back again soon.

***not affiliated with above companies just satisfied customer***


Tuesday, August 10, 2021

Gel plate backgrounds and more


Gel Plate backgrounds

stamps/dies used:  Unity stamp co. sayings, IO balloon/feather dies

I'm trying my hand at gel printing ... I've had this 5" x 7" gel plate for a couple of years, I'm sure and have only used it maybe once.  Thought it was time to get it out and try it again.  This time I did an idea that I saw Jennifer McGuire do, where she used die cuts. Continue to scroll down and you will see photos of prints and some cards/tags I created with them.

Basically what you do is add ink/paint whatever you have onto your gel plate.  Next place die cuts on top of the inked gel plate, in my case I was using distress oxide inks.  Place a piece of copy paper or cardstock over the inked plate with the die cuts, and pull a print.  

It's hard to see in photos but I used balloon die cuts on the green background, spider web stamp on blue background and bubble wrap on mixed colored background.  Each print will be different.

Above photo shows card and tag with a print that had feather die cuts.
Here are cards/tags that used balloon die cuts on the prints.


The prints for the above feathers and balloon cards are what I call the ghost prints.  It is the second print where I removed the die cuts, then placed a card over the gel plate, and did a second print.  I really like the way these prints turned out.  Just a faint design on the cards.
Last photo with some of the prints in back of the cards I created.
This post has a lot of photos (I have more but won't bore you with them. teeheeehee) that I hope you enjoyed seeing.  If you have a gel plate that is sitting around collecting dust ..... dust it off and make some prints.  I'd love to see what you do.
Thanks for stopping by and come back soon.


Friday, July 16, 2021

Multi color tulips

 Multi color Tulips

stamps/stencils used:  Unity stamp co.

Here are more tulip cards using Unity Layering Tulip stencils.  This is a three layer stencil that makes beautiful tulips, at least, in my opinion.  This time I used the stencils just as they were intended to make slimline cards.  Here you can see I did two different color tulips just because I could.  After I finished the stenciling, I got out my slimline dies, and die cut all the layers to fit onto the slimline card.  I did resize these slimline cards a little just to show off the image more.  Slimline cards can be just about any size you want, mainly, because you can make envelopes to fit them.  I use my envelope maker to create all kind of sizes of envelopes for my cards.

Thank you for stopping by.  come back again soon.

***not affiliated with above company just a satisfied customer***


Tuesday, July 13, 2021

Yellow Tulips

Yellow Tulips

stamps used:  Unity stamp co.

Playing with Unity's Tulip stamp/layering set to make this simple but, I think effective card.  I have to admit I do like using stamps with matching layering stencils, lately.  I have this set and another set from GinaK designs which is another fun stamp/layering set.  These types of sets are popping up all over with lots of the stamping companies and, I hope they make more.  These sets make cardmaking so easy and, as I said before effective cards.  
Thanks for stopping by.  come back soon
***not affiliated with above company just a satisfied customer***


Sunday, May 30, 2021

Growing in Unity blog hop


I'm happy to announce that I am included in this Growing in Unity (GIU) blog hop because earlier this year I was one of the GIU gals. It is always a pleasure to guest blog for Unity stamp co., they have some of the best deep red rubber stamps.

As it reads in the above picture please visit each blog linked up below and leave a comment for a chance to win one of two Unity filled prize packs.


The above cards using Unity Cuddlebug Butterfly, Moments of Bliss and Time to Refresh stamp sets.  I did the acrylic block technique for the backgrounds on these card, which you can get more details on this technique in this post with a video.


In this second set of cards I used Unity Floral Tapestry big background stamp.  For these cards I did a gelato background technique, that you can see more details in this post with a video.

Here are the blog links for you to visit for your chance to win a prize pack from Unity.

I have totally enjoyed doing my GIU week earlier this week and today's blog hop.

Good luck!

*****CONGRATULATIONS to our latest winners from the GIU hop!!!! Thank you to all that commented on all the blogs.
From Chandhini's Blog: Claire (Mrs H)1 June 2021 at 13:37That background is so striking

From Suzi's Blog: Penny A. said…What a great page. So many different techniques and colors. It looks great.*****

Thank you for stopping by and come back again soon.

Sunday, May 23, 2021

Sketches for May

 Sketches for May

stamps used:  Altenew stamp co. and Sunday International

stamps used:  Sunday International and Unity stamp co.
I'm still doing sketches from Pixel's Maven Retreat blog.  Trying to keep up with going out of my box, because my friends know I'm not a fan of sketches.  Also using things that are already die cut from my stash instead of letting them hang around for years.  
The top card is a blended background with stripes of foil and a big flower in the corner.
The bottom card have two of the gelato backgrounds I did months ago that have been cut in half diagonal. You can see how to do the gelato background here.  The smaller rectangle is also a blended background that has been die cut.  The saying was stamped onto a scrap piece of white cardstock then cut into a banner.

Thanks for stopping by.  come back again soon.
***not affiliated with any of the above companies just a satisfied customer***


Monday, May 10, 2021

Tulip slimline card

 Tulip slimline card

stamp/stencils used: Unity stamp co.

stamp/stencils used:  Unity stamp co.
Here is a new idea for Unity stamp company ..... Matching stamp and stencils.  There are other stamp companies out there that have been doing this but it's a first for Unity stamp company.  

basic instructions:

1.  stamp image.

2.  place stencil over stamped image and sponge on color.

Or

1.  place stencil on cardstock.

2.  sponge color

Simple, right?  Actually it is.  I used the stamp and stencils, there are three layering stencils for this stamp image, for the top slimline card.  For my bottom slimline card I just used the three layering stencils.  Two distinctive looks, don't you think?  I haven't made up my mind which I like better, yet.  

I made slimline cards this time just to show off the full stamp, but I plan on making A2 size cards soon.  Most slimline cards fit into #10 size envelopes, but like all cards they are subject to change.  As stampers we do like to change things up sometimes.

thanks for stopping by.  come back again soon.

***not affiliated with above company just a satisfied customer***


Wednesday, April 28, 2021

Mixed Media w/Friends #2

 Mixed Media w/Friends #2

stamps used:  Art Impressions (bingo lady), unknown (little bingo card)

I had fun with my second MMw/F card because just before I made this card I did virtual Bingo with some friends.....so I thought how appropriate to do a bingo theme for my card.  I used the actual bingo card on my jumbo playing card and the raffle ticket for my background.  The rest just fell into place when I remembered I had the bingo lady stamp and saying.  I rummaged through my stamping drawers and found an old wood mounted little bingo card so had to use it, too.  Unfortunately, the wood mounted bingo card is so old I can't read the company name on the side of the wood.

this card is my friend's MMwF card

Basically what she did was sprayed the background with dylusions lemon zest ink spray.  Other things she used were clear gesso, mini mod checkerboard stencil, Unity Simplicity stamp set and TH small talk saying.

We are having fun doing mixed media techniques on these Jumbo playing cards.  You see more about these cards and our first cards here in this post.

thanks for stopping by.  come back soon.

***not affiliated with any of the above companies just a satisfied customer***


Sunday, April 25, 2021

Still trying out card sketches

 Tulip card sketch

stamps used:  Unity stamp co.

Yes, I'm still trying to get comfortable using a card sketch for a starting point to create a card.  This card sketch is from Pixel Maven's Retreat blog challenge.


For my card I pretty much cased the card sketch except I decided to add a little dimension to my card by running it through an embossing folder.  The embossing folder gave it some extra texture.  I used the new Unity stamp co. tulip stamp and stencil for the main focal image.
Hope you like it and give card sketches a try at some time.
Thanks for stopping by and come back soon.
***not affiliated with any of the above companies just a satisfied customer***


Monday, March 22, 2021

Announcing the winners for GIU drawing!

 CONGRATSULATIONS!!!


Yes, congratulations to:

Time for me to announce the winners from my GIU guest blogging!
Congratulations to:
The Trudio StudioMarch 18, 2021 at 7:08 PM
How fun! I don't own any gelatos, but I sure have a ton of background stamps, and would love to check out gelatos now! I loved them all, especially the dark blue one! How rich and elegant! ~Trudi Adams-Shaffer
and
Karren GraysonMarch 16, 2021 at 7:33 AM
Love this technique, I will have to give it a try. Thank you for posting.

"please email kelli@unitystampco.com to claim your gift credit within 2 weeks". In the subject line have them put "winner from Sue's GIU week".


It was lots of fun guest blogging for GIU this past week. I hope everyone enjoyed it and try out a technique or two!

Thanks for visiting and come back again soon!

Friday, March 19, 2021

GIU day 5 - Perfect Pearls with video

 Perfect Pearls

                     PP technique #1                 
                                          all images by Unity stamp co. Vroom (car background) and Friendship                                                                                                       Blooms

It's my last day as GIU gal for the week.  It has been fun showing off Unity stamps with different techniques that I hope you found interesting.  Just a reminder to comment (with an email to be contacted) so you can be entered into drawing for a $20 gift certificate from Unity stamp co.
Today I played with an old product called Perfect Pearls pigment powders.  They have a binder in them, but I still like to set them with a Fixative that I spray on them outside. There will be a video at the end of this post but you can also go to my you tube channel to watch it, and more videos.


PP technique #1

Basic instructions:
Perfect Pearls technique #1
1.  ink up cardstock with clear embossing ink (any brand should work).
2.  add Perfect Pearls with a brush all over inked card.  tap off excess powder onto craft sheet to use for bonus background shown in video.
bonus backgrounds - watch video to see how this is done.

3.  ink up stamp with clear embossing ink and press into powdered card.  You can repeat stamp your image if you are using a stamp positioner but please remember to clean stamp each time before stamping.
Perfect Pearls technique #2
PP technique #2

1.  ink stamp with clear embossing ink and stamp on dark cardstock. 
2.  add Perfect Pearls to inked image with a soft brush and pouncing technique.
3.  burnish Perfect Pearls into card with soft brush then buff with swifter cloth or any soft cloth.
tip:  both techniques should be set with a spray of Fixative.  spray outside or in a well ventilated area.


You can see more on Perfect Pearls here.  If you want to see more samples using Perfect Pearls I've done, just type Perfect Pearls in the search box on my sidebar.

Thank you for visiting my blog this week and please come back again soon.  Don't forget to comment to be included in drawing for Unity gift certificate.  Please include an email to contact when commenting for the Unity gift certificate.  Winners will be announced soon.


Thursday, March 18, 2021

GIU day 4 - Masking tape stripes

 Masking tape stripes

It's Thursday and my week of guest blogging for Growing In Unity gal week is almost over. I am enjoying showing off all my Unity stamps, and hopefully inspiring you to try one of the background techniques I have shown you.  

Today's technique is using ordinary masking tape and your ink pads!  You will be getting inky with this background technique.

                                                            all images by Unity stamp co.

basic instructions:

1.  rip off a piece of masking tape and press it into an ink pad.  I used dye ink pads ... any brand should work.

2.  press the inked tape onto cardstock, then gently pull the tape off cardstock.

3.  repeat step #2 till you have as many stripes as you like on your card.

4.  stamp image directly over stripes with any black ink of choice.

Tip:  #1. I used white cardstock but it is fun to do this technique on other colors of cardstock ... I would suggest light color cardstocks. 

Tip:  #2.  add extra color with color pencils to image if desired.

You can see more masking tape stripes technique here from the past that I have done.  

Thank you for stopping by and come back tomorrow for another technique.  Also don't forget to comment (with an email to be contacted) to be included in the drawing for a $20 gift certificate from Unity stamp co.