My stamping adventures

Showing posts with label tutorials. Show all posts

Monday, May 8, 2023

Everything coming up carrots

Everything coming up carrots

card #1
stamps/dies used:  SU Thanks a Bunch 

For these cards I used up things I had done already, like shaving cream backgrounds, and die cuts.  Yes, I have a baggie full of die cuts ready to be used on my cards.

Card #1 measurements:

A2 card: 4 1/4" x 11" 

pop up strip: folded to create a box

card #2

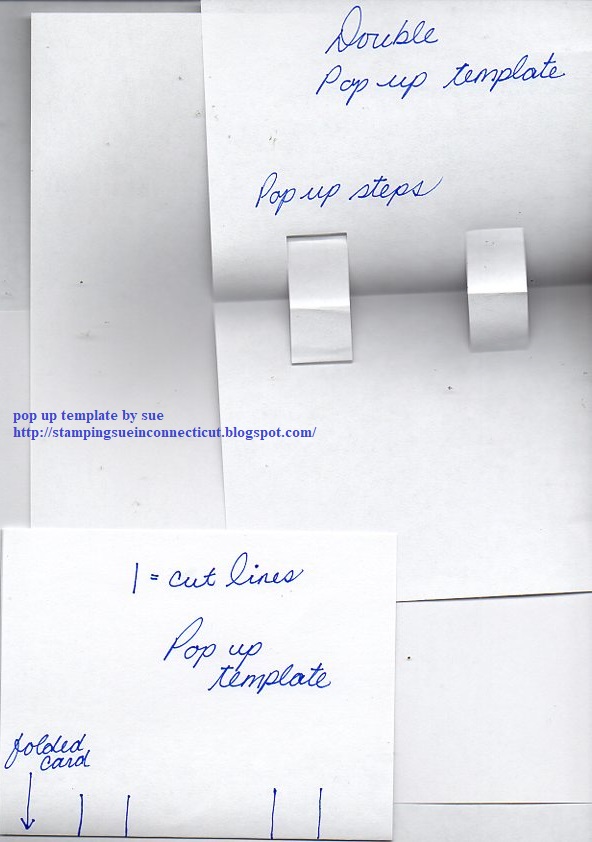
Card #2 Double pop up measurements:

A2 card: 8 1/2" x 5 1/2"

inside layer: 8 1/4" x 5 1/4"  folded in half. With card folded in half, cut on folded edge to create pop ups.


Card #3 Explosion fold measurements:
A2 card: 8 1/2" x 5 1/2"
inside explosion fold: 7" square 


Card #4 Tag pop up card
See measurements for card #2
Check out this pop up post for more pictures and instructions on how to make pop up cards.
Let me know in the comments if you have made pop up or explosion fold cards.
Thanks for stopping by.  Come back again soon.
***not affiliated with above company just happy customer***

Monday, April 3, 2023

Beautiful things change

 Beautiful things change

Unity stamp co. Beautiful things change stamp set, Wonky background

Just a couple of simple cards in this post. 

Landscape card:

Stamped the three trees on a piece of white cardstock.  Cut it down to fit the center of an A2 card base.  Added a couple strips of black cardstock, that adhered above, and below the stamped card.  Before adhering the stamped trees to the base card, I stamped the wonky background image on the top and bottom of card.  For the landscape card the wonky stripes go vertical.  

Vertical card:

Stamp wonky stripes horizonal on the sides of the card.  Stamp tree on white card, that was die cut with Unity rectangle scallop/stitched dies.  Adhere stamped tree to black card that was die cut with same set of rectangle scallop/stitched dies.  Stamp saying on tree card.  Mount stamped tree card to card with foam mounting tape.

Thanks for stopping by.  Come back again soon.


Tuesday, July 27, 2021

Perfect Love faux layers

 Perfect Love

stamps used for card #1:  Blue Knight Perfect Love stamp set

For this card I did what I call Faux Layer technique with springtime colors.  Simple but effective.  See more of my Faux Layers here, here, here, and here but if you type Faux Layers in the search box on my side bar you will find more.  I started doing this technique back in 2012 so there are a lot to see.

card #1 basic instructions:

1.  mask off section on card with post it notes or any masking paper.

2.  blend colors between the masked off post it notes.  for the above card I did the colors in three sections.  when done blending colors the first time, go over it again to smooth out the colors.

3.  remove the post it note masks.  stamp image with black ink on the card leaving some of the image over the blended colors.

4.  stamp and emboss saying with white embossing powder onto black card and layer onto stamped layer.

5.  layer all layers onto base card that has edges colored with same ink used in the faux layer.

card #2

card #2 basic instructions:

1. mask off stripes with post it notes.

2.  blend on color.  first stripe is lime green, second coral and so on till you have as many stripes as you like.

tip:  just a matter of moving the post it notes after each color is blended.

3.  remove post it notes and stamp images with black ink over the stripes.

4.  add ribbon and adhere layers to lime green card base.


Thank you for stopping by.  come back again soon.

Friday, July 23, 2021

Rainy day shakers

 Rainy day shakers


stamps/dies used:  Catherine Pooler stamps/die set
I have been making shakers for years but the fairly new way to make shakers is with vellum.  Here I have two cards make with vellum and one a more traditional using foam mounting tape.  I also went out of my comfort zone by making a 5" x 7" and 4 1/4" x 6 1/2" size cards.  The reason being is because it was the way the vellum pieces I had sized out.  No problem, though, because I can make my own envelopes with my envelope maker to fit them.

basic vellum card instructions:
1.  lightly score the vellum on all four sides approximately 1/4". when done this will form pocket.
2.  tape three sides down to a white card but leave one open in order to fill with sequence and small no hole beads.
3. once filled adhere to folded card.

basic foam mounting tape card instructions:
1.  do all your stamping and die cutting first.
2.  with foam mounting tape create a well or pocket and fill with sequence and no hole beads.
3.  once filled adhere to another piece of cardstock or folded card itself.
You can see more of my shaker cards here with a video, see-thru shakers, mini shakers, 2009 shaker.  You can see more if you type shaker cards in the search box on my side bar.
Thank you for stopping by and come back soon.
***not affiliated with any of the above companies just satisfied customer***


Tuesday, July 20, 2021

Medical Rescue with premiere video

 Medical Rescue

                                 card #1 stamps used:  Blue Knight Medical Rescue stamp set


Got out an old product that has been in my stash for years called Penscore.  It's a blue sponge that can be heated with heat tool, then you press items or even a stamp into it.  If you look at the background strip you can see the result of the pressing of the Penscore.

I have scheduled this video to be a premiere at 1 p.m. est. on Tuesday, July 20, 2021.  Please subscribe to my you tube channel so you will be notified and then you can chat when it goes live.

   Visit my you tube channel to see this video and more.

card #1 basic instructions:

1.  heat Penscore sponge with heat tool to make it soft.  while it is hot quickly press stamp into softened sponge to make impression of the image. ink up Penscore sponge with light blue ink and stamp onto white card.

penscore sponge with image pressed into it.

tip:  this sponge can be used over and over again.  wipe it clean then heated again and the pressed image will disappear so you can do it all over again.

2.  stamp medical rescue person three times on white card with three different blue inks.

3.  layer all stamped images onto blue cards then layer everything onto base card.

card #2

card #2 basic instructions:

1.  repeat step #1 from card #1 to create Penscore background strip.

2.  stamp medical rescue person in black ink on white card.  

3.  die cut medical person twice with oval dies. layer stamped oval dies onto scallop dies.

4.  add red stamped medical symbol that has been fussy cut onto layered medical person.

5.  adhere all layers to base white card.


Thank you for stopping by.  come back again soon.

Friday, June 25, 2021

Medical Rescue

Medical Rescue


Today is my last Friday to guest blog for Blue Knight rubber stamps and it has been a pleasure.  I will be featuring the Medical Rescue stamp set in this post. I would like to thank all Medical Rescue and all Medical personal for your service.

card #1 stamps used:  Blue Knight Medical Rescue stamp set

card #1 basic instructions:

1.  stamp medical emblem randomly with grey ink on white layer.

2.  stamp medical person with black ink and heat emboss.  add color to face and glasses with color pencils.

3.  fussy cut out the medical person and mount to background card with foam mounting tape.

4.  adhere stamped layer with medical person to black layer then to white card.


card #2 basic instructions:

1.  stamp medical person with black ink.

2.  die cut with wonky rectangle die.

3.  adhere die cut layer to red layer and then to white card.

4.  stamp medical emblem with red ink and fussy cut.

5.  mount red medical emblem to card with foam mounting tape.

I hope you have enjoyed what I showed you on these Fridays in June.

Visit Blue Knight blog and

Fans of Blue Knight Rubber Stamps (Facebook group) is HERE
and
Blue Knight Rubber Stamps YouTube Channel is HERE to see more inspiration.
Thank you for stopping by.  come back again soon.


Friday, June 18, 2021

Perfect Love

 Perfect Love


It is Friday in June so I'm here guest blogging for Blue Knight rubber stamps.  Today I would like to share with you a pretty spring image called Perfect Love.

card #1 stamps used:  Blue Knight Perfect Love stamp set

card #1 basic instructions:

1.  stamp images with black ink and allow to dry or speed dry with heat tool.

2.  add color with color pencils.

3.  add clouds with template in a couple of colors.

4.  adhere stamped layer to black layer then add both of those layers to yellow card.


card #2 basic instructions:

1.  stamp and heat emboss image 

2.  add color with watercolors.

3.  add clouds with template in a couple of colors.

4.  adhere stamped layer to black layer then to green card.

Entered challenge at Mix It Up challenge - anything goes/stamping

Visit Blue Knight blog and
Fans of Blue Knight Rubber Stamps (Facebook group) is HERE
and
Blue Knight Rubber Stamps YouTube Channel is HERE to see more inspiration.
Thank you for stopping by.  come back again soon.

Sunday, June 13, 2021

Playing with white ink

 Playing with white ink

stamps used:  Altenew stamp co., Judi-Kins

I am having fun using my white pigment ink for backgrounds, and making oval spots.  All these cards were inspired by Nicole Watt of Pixel Maven's Retreat blog, and you tube videos.  

Top card:

Inked big background with white in then, placed pinkish cardstock layer on stamp.  I place the card to stamp because it is a big wood mounted background stamp.  The saying is curved to fit inside the circle die, and the cupcake is mounted foam mounting tape to give a lift off the card.

Bottom cards:

Horizontal card has white pigment ink on dark blue card.  Oval is made by twisting white pigment ink pad to make the oval shape.  Leaves image is stamped with blue ink and die cut then mounted with foam tape.  The saying is embossed with white ink and powder.

Vertical card has a brown layer.  Repeat all above steps except instead of blue ink use brown ink.

Thank you for stopping by.  come back again soon.

Friday, June 11, 2021

Bald Eagles

 Bald Eagles


Back for another guest blogging for Blue Knight stamp company.  Today I am featuring Bald Eagle and best part of using this stamp set is it reminds me of my father.  One day he asked if I had any eagle stamps because he liked them, and he wanted to learn how to stamp them on his checks.  He said if people could have cute puppies and cats printed on their checks ..... he could have eagles!  So after that every time I saw an eagle stamp I would get it for him.

card #1 stamp used:  Blue Knight Bald Eagle stamp set

card #1 basic instructions:

1.  stamp eagle with black ink and allow to dry. speed dry with heat tool if desired.

2.  add color to eagle with Pebbles pearlescent chalks.

tip:  any chalks can be used

3.  using the same chalks add clouds with template.

4.  take card outside and spray with Fixative to set the chalks.

5.  add stamped layer to black layer then to blue card.

card #2 

card #2 basic instructions:

1.  stamp eagle with black ink.  allow ink to dry or speed dry with heat tool.

2.  add color to eagle with color pencils.

3. create a mask and place mask over eagle image. 

4.  blend color around eagle to highlight him.

5.  remove mask to reveal the eagle and the highlighted color around him.

6.  layer stamped layer onto black layer then on to light aqua card.

Visit Blue Knight blog and
Fans of Blue Knight Rubber Stamps (Facebook group) is HERE
and
Blue Knight Rubber Stamps YouTube Channel is HERE to see more inspiration.
Thank you for stopping by.  come back again soon.


Friday, June 4, 2021

Beach Birds

 Beach Birds


This month, June, I am happy to be guest blogging on Fridays for Blue Knight rubber stamp company.  

stamp used:  Blue Knight Beach Bird stamp

This is a big and beautiful image that almost covers the front of an A2 card.  I stamp Beach Bird with black ink and colored her with color pencils.  Layered the stamped card onto a black layer then onto a light blue card base.

The second card using Beach Bird I stamped it with dark brown ink.  Blended color around the stamped card with two brown distress ink and hickory smoke ink.  This makes for a vintage effect.  The finished stamped card is layered onto a dark brown layer then onto a cream card base card.

Visit Blue Knight blog to see more inspiration and also at

Fans of Blue Knight Rubber Stamps (Facebook group) is HERE
and
Blue Knight Rubber Stamps YouTube Channel is HERE
Thank you for stopping.  come back again soon.


Friday, March 19, 2021

GIU day 5 - Perfect Pearls with video

 Perfect Pearls

                     PP technique #1                 
                                          all images by Unity stamp co. Vroom (car background) and Friendship                                                                                                       Blooms

It's my last day as GIU gal for the week.  It has been fun showing off Unity stamps with different techniques that I hope you found interesting.  Just a reminder to comment (with an email to be contacted) so you can be entered into drawing for a $20 gift certificate from Unity stamp co.
Today I played with an old product called Perfect Pearls pigment powders.  They have a binder in them, but I still like to set them with a Fixative that I spray on them outside. There will be a video at the end of this post but you can also go to my you tube channel to watch it, and more videos.


PP technique #1

Basic instructions:
Perfect Pearls technique #1
1.  ink up cardstock with clear embossing ink (any brand should work).
2.  add Perfect Pearls with a brush all over inked card.  tap off excess powder onto craft sheet to use for bonus background shown in video.
bonus backgrounds - watch video to see how this is done.

3.  ink up stamp with clear embossing ink and press into powdered card.  You can repeat stamp your image if you are using a stamp positioner but please remember to clean stamp each time before stamping.
Perfect Pearls technique #2
PP technique #2

1.  ink stamp with clear embossing ink and stamp on dark cardstock. 
2.  add Perfect Pearls to inked image with a soft brush and pouncing technique.
3.  burnish Perfect Pearls into card with soft brush then buff with swifter cloth or any soft cloth.
tip:  both techniques should be set with a spray of Fixative.  spray outside or in a well ventilated area.


You can see more on Perfect Pearls here.  If you want to see more samples using Perfect Pearls I've done, just type Perfect Pearls in the search box on my sidebar.

Thank you for visiting my blog this week and please come back again soon.  Don't forget to comment to be included in drawing for Unity gift certificate.  Please include an email to contact when commenting for the Unity gift certificate.  Winners will be announced soon.


Tuesday, August 25, 2020

July/August Moon swap


July and August Moon swap

July is Buck Moon
basic instructions:
1.  masked off a circle to create a moon.  blended some gray inks to color the moon.
2.  around the moon I blended blues.
3.  stamped the buck/deer over the moon with black ink.
4.  stamped leaves around the edge with blue and white ink.
For more masking ideas look here, a different style of masking, ripping paper masking, yet, another masking idea.  there are lots of way to masking ... you can type masking in my search bar to see them all ... remember to click next post at the bottom of the post to see more.

 stamps used:  Hot Potatoes, Rubber Moon and Stampin' Up


August Sturgeon Moon
basic instructions:
Grid technique
1.  masked off sections with post it notes.  stippled some color off the edge of the post it note.
2.  after done stippling color I masked off one section at a time and stamped an image inside the section.
For grid ideas look here for faux grid technique with a video, basic grid technique with video.  You can type grid technique in search bar to find more.

stamps used:  Stampin' Up and Rubber moon 

Above are the Sturgeon grid card before I made them into full cards.  As you can see I did them in all different colors.

Thank you for stopping by and come back again soon.  When you watch my videos please give them a thumbs up to show you like them.  comment here on my blog anytime.

Friday, August 7, 2020

bleach stamping with video

 BLEACH STAMPING
(see video below)


stamps used:  Unity stamp co.

Above are bleached card fronts.
Bleaching is an old technique, it's fun to bring back the old and make it new.
Spot or Select bleaching:
1.  stamp open line stamp image.
2.  with a Q-tip paint in bleach.
3.  allow to air dry.


stamps used:  ASITH

Bleach stamping:
1.  create a bleach ink pad:  folded paper towel with sponge under paper towel to hold the bleach.
2.  press solid image stamping into bleach ink pad.
3.  stamp onto cardstock and hold for 10 to 15 seconds.
4.  remove stamp to reveal the bleached image.
5.  leave as straight bleach or color with chalks.

Watch video here in this post or at my you-tube channel.

See more post of mine doing the bleach technique here from 2011, another here more recenthere and this post way back in 2009.  That's enough for now ... if you want to see more you can type bleach in the search bar.
Thank you for watching.  comments always welcomed.  come back again soon.
***not affiliated with any of the above companies just a customer.***

Saturday, May 30, 2020

Crayon resist

CRAYON RESIST
 stamps used:  Unity stamp co.

Crayons have been around for years and so has this technique.  It's fun to bring back an old technique and see what we can do to update it.

Basic instructions:
1.  stamp image with permanent black ink.
2.  get out those old crayons and scribble the crayon inside the open space of the image.
tip 1. the cheaper the better because the cheap ones have more wax. 
tip 2.  use firm pressure so you get a lot of wax on the card.
3.  blend on some color with any dye inks.  you can use any blending tool you prefer even a brayer.
4.  after you have put down all the color you want, then rub off all the waxy crayon.  I had best results using a paper towel ... that's it!
tip 3.  the color crayon you use will give you different looks.  on the top butterfly I used a light pink crayon.  on the bottom butterflies I used yellow and white crayons.  on the top flower I used only a white crayon.  on the bottom flowers I used white and yellow crayons.
Look here and here to see more samples on how I did it back in the day.
Also back in the day I used a white China marker on glossy cardstock.  below is a page from my background sketchbook dated 2008 with those instructions.

thanks for stopping by.  come back again soon.

Friday, April 10, 2020

Bokeh style cards

 stamps used:  SU Bloom by bloom and Dragonfly Dreams

The Bokeh technique is actually from photography but somewhere along the way a stamper decided to conform it to stamping!
Here are a more cards I created with the Bokeh technique for my local card group.

 I have been doing this technique for a while.  You can see a picture from my background sketch book with instructions and samples I did back in 2015.  Below are links to past cards and a post with a video I made a couple of years ago.

You can see more samples I created going back even before 2015, here in this post and more recently in this post with a video .  But if you just type Bokeh in search box you will find more!
thank you for stopping by.  come back soon.