My stamping adventures

Showing posts with label 3D. Show all posts

Monday, July 4, 2022

To Go or Not To Go

 To Go or Not To Go

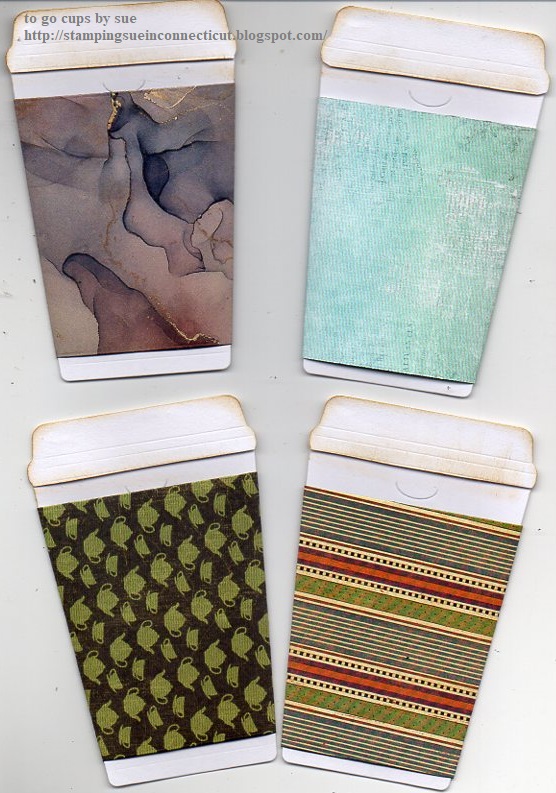
Catherine Pooler To Go cup die set

Happy Fourth Of July!!!  Have a cup on me!  😀
Just thought I would have some fun making some To Go cup gift card holders.  It is fun, and easy to make these to go cups or take out cups, which ever you like to call them.  Catherine Pooler designs makes a two step die set for these To Go cups.  I die cut the top of the cup twice so I could mount the top of the cup ... to make it stand out more.  I used different pattern papers for the cover on the To Go cups.  My favorite is the tea cups and tea pots!  Of course if you know me that is no surprise. 

Which is your favorite?  Let me know in the comments section. 

Thanks for stopping by and come back soon.

***not affiliated with company just happy customer***


Monday, September 28, 2020

Halloween Hidden Messages

 Halloween Hidden Messages

                                                     stamps used (above) - Stampin' Up
                                                    stamps used (above) - your next Stamp co.

This is a fun interactive card with a hidden message inside the card.  Saw this online at Dawn's stamping thoughts blog awhile back.  

Measurements and Instructions:
this card when folded is 5 1/2" x 4"
base card - 5 1/2" x 11 1/4"  score at 4" and 8"
inside card - 5 1/2" x 7"  score at 3 1/2" with 7" across the top.
Turn 5 1/2" x 7" with the 5 1/2" at the top, line up at 5/8" and cut to 5" (on cutting arm).  Flip over and repeat the same on the other side.  Cut off the two skinny strips. See pic below.
Fold all scroe lines on both cards.
When you fold the 5 1/2" x 7" card the bottom will not meet up to the score line ... this is the way it should be.
Cut out section of the bottom inside 5 1/2" x 7" card to create the window for the hidden message to show through.  Use the smaller of the dies to create the window.  When cutting out the window place the die toward the center but closer to the top of the section of the card.  Make a frame to go over the window.
To assemble the hidden message of the card:
1.  match up the score lines of the hidden message card and the base card.
2.  put adhesive only on the top section of the hidden message card...that is the full section.  The bottom of the hidden message card that has the cut out sections should be adhesive free.
3.  adhere the top of the hidden message card to the top inside of the base card.
4.  put adhesive only on the two sides of the bottom of the base card, next to where the cut out sections of the hidden message card is, leaving the bottom of the hidden message card free of adhesive to be able to move up and down to reveal the message.
5.  fold the bottom of the base card up to adhere to the base card.
Now you should be able to open and close the card to reveal the hidden message.

I created a smaller version so I wouldn't have to use a 12 x 12 sheet of cardstock.
stamps used:  Stampin' Up

Smaller version uses 8 1/2" x 11" cardstock.
base card - 5 1/4" x 11"  score at 3 1/4" and 7 1/8"
hidden message inside card - 5 1/4" x 6 3/4"
This card when folded is 5 1/4" x 4"
Fold inside card in half and measure in approximately 1/2" on both sides ... cut away the same way as in the above picture of Inside card template.  all the other instructions are the same.

thank you for stopping by...come back again soon.
***not affiliated with any of above companies just a customer***



Friday, February 28, 2020

See-thru shakers!!!


stamps used:  SU Danelion whishes
Dies used: balloons by Simon says stamps

Having fun making these see-thru shakers and with dies it makes it so easy.  Main thing is to match up the openings which can be done by die cutting all layers at the same time.  The die won't cut thru all four layers but it will cut thru two layers ..... then you just run the third and forth layers through machine one more time.  The die will slip into the indentation on the last two layers.
These cards have a part in which there are loose parts that move when you shake the card.  This is where the name of the card comes from ... Shaker cards.

Basic instructions:
1.  Place two A2 cards together and die cut through Big Kick (or any machine you own).  The top card with cut thru the folded card.  Place the second folded card with the die placed over the indentation of the die and run through the machine again.  Now you have both cards with die cut through them.
2.  Cut one of the folded cards in half.  One is for the back of the inside of the first folded card and the other will go on the back of the folded card when we put the shaker together.
3.  die cut four balloon frames.
Front of the card:
1.  stamp any images you want on the card.
2.  glue one of the balloon frames to the front of the card.
3.  glue a piece of acetate to the inside of the card then glue the inside cut out layer to the back of the inside of the card.
Inside of card:
1.  stamp any images you want inside the card.
2.  glue balloon frame over the die cut opening inside the card.
Back of card:
1.  glue a piece of acetate over the opening.
2.  add mounting tape all around the opening with acetate.  this is going to form the "pouch" for the shaker materials.  make sure all the mounting tape is touching so there are no cracks for shaker materials to fall out. add more mounting tape along the edges.
3.  fill the pouch with shaker materials.
4.  glue another piece of acetate to last piece of die cut card then adhere to back of card.  This will seal the shaker card.
5.  glue another balloon frame to the back of the card.
6.  I drew in balloon strings with a pen.

Here is another see-thru shaker I made and sent out to a friend's husband.

Here is a look at the first see- thru shaker I created.
I saw this idea on Jennifer McGuire's blog.
Thanks for stopping by.  come back again soon.


Saturday, January 18, 2020

Tulip accordion fold card

 stamps used:  Stampin' Up

This is a fun fold card that will make anyone smile who receives it.  This is a vertical pop up but you can turn this card around and make it horizontal, if you like.  My friend Holly turned me onto this design and I plan on making more in the future.

measurements:
two 4 1/4" x 5 1/2" - base panel cards
front layers:
3 1/4" x 4 1/4" - green layer
3 x 4 1/8" - cream stamped layer
10 3/4" x 3" - inside accordion fold
score 10 3/4" x 3 at 1 3/4" and 6 1/2"

I'm thinking of doing a couple of videos ... would this be one you would like to see?  let me know in the comments.
thanks for stopping by.  come back soon.

Wednesday, November 20, 2019

Mini books

products used:  Ranger dylusions by dyan reaveley

Last weekend I took a class at Papercraft Clubhouse  with dyan reaveley making fun mini books.  
These books are full of windows and cut out pages!  
There is no sewing involved with these books just gluing pages together to form them.
Had a lot of fun in class.  If you ever have the chance to take a class with dyan reaveley do it!  It is worth it!  She is fun and very good teacher.  Also in her classes she supplies everything from papers, journals, stamps and whatever you need...it's all included in class.
Thanks for stopping by.  come back soon.  comments welcome.

Wednesday, October 9, 2019

accordion pop up

stamps used:  SU Hey chic

I made this card for swapping in my local card group.  The theme was same stamp set so we all made cards with SU Hey chic stamp set.  Above is mine it is what I call an Accordion pop up.  Unfortunately my camera isn't working right now so I scanned my card so it is hard to see how it pops. 
Here is a look at cards from my swappers:
It is always fun to see where all our minds go to create cards!

Below is a similar card I made back in January of this year.  
You can see card using Unity stamps in post here with instructions.  I just changed the orientation for my Hey chic card.

Tuesday, October 1, 2019

Corner folded bookmarks

stamps used:  MFP & stamps,  Unity stamp co.


Start out with a piece of square paper.  I used pattern papers from different companies.
basic instructions:
1.  Fold bottom corner to meet with top corner this will form a triangle.
2.  Fold right point up to the middle point.
3.  Fold left point up to the middle point.
4.  Unfold both end points back to triangle shape.
5.  Fold one half of middle point down to the bottom edge.
6.  Fold the right point back up to the middle point.
7.  Next tuck the end underneath the fold.
8.  Fold the left point back up to the middle point.
9.  Tuck the end underneath the fold.

See diagram below:

They really are easy to create once you make one and get the idea.
Thanks for stopping by and come back again soon.

Thursday, September 12, 2019

Butterfly shakers with video

stamps used:  Unity stamp co.

Sometimes it is fun to bring back the old and this is one of those things.   Shaker card! You can see in the picture above the front and inside of the card.  Front of the card is what I call collage stamping but the inside is a fun motion stamping.  Motion stamping is easy, you stamp the image once, then without re-inking just stamp second, and third generation to get the feel of motion!
I learned  this type of card too many years ago to remember, in fact, I think it was one of the first movable style of cards I did learn way back when.  Now it is a lot easier to make with all the dies for cutting out the windows instead of those horrible craft knives .... I cut myself all the time with them.  Plus back then we used to make shakers out of foam core boards which were a pain to cut through.  Now we use cardstock with foam mounting tape or even kids' foam sheets.
Below is a video with tips on how to make a shaker card.


go to  my you-tube channel to see more of my videos and please give them a thumbs up if you like them.  Thanks for stopping by and come back again soon.  Let me know in the comments if you go to my you-tube channel and any ideas of other videos you would like to see.

Tuesday, August 27, 2019

Hibiscus celebrate floating frame cards

stamps used:  Altenew stamp co.

Here are some more floating frame cards.  This technique is addictive and it also gives you 2 for 1 cards another words you get a second card out of the left-over piece that is die cut.
Three of these cards are birthday cards with a happy birthday also stamped inside the card.  The first card shown in picture is what I call a note card with the inside blank and a general thinking of you saying on the front of the card.  In this case the saying is a kindness phrase.  If you look at the card on the bottom right of the picture you will see I used an embossing folder for some texture to that card.  You can see more of my floating image cards here and here. 

Basic instructions:
I began by stamping and die-cutting  images from Altenew  Build-A-Flower Hibiscus stamp set.  I arranged them close together on a piece of 4-1/4" x 5-1/2" cardstock. They are not adhered to the cardstock - just laying freely on top of it. Next, carefully lay a piece of Glad Press 'n Seal (available at most grocery stores) over the images to hold them in place. Trim the edges even with the edge of the cardstock. I used a  circle and an oval die to cut out the center. Now it's time to remove the cardstock piece. The Press 'n Seal stays adhered to the die-cuts, you are only removing the cardstock backing. With the die cuts still held in place by the Press 'n Seal add foam mounting tape to the back of all the die cut images. This will make the die-cuts "float" on the finished card. Here's my frame attached to the card front using foam mounting tape.  After you have the frame stuck down, it's time to carefully pull off the Press 'n Seal.  Next I stamped a saying in the center of the frames.
I saw this technique at Jennifer McGuire Ink blog.

Thank you for stopping by.  Please come back soon and leave a comment to let me know what you think or a link for me to see your cards.


Thursday, August 15, 2019

Pendulum card with video

stamps used:  Unity stamp co. Naturally Beautiful stamp set

This is a fun card named Pendulum card by Dawn's Stamping Thoughts blog.  The saying swings back and forth just like a pendulum.  
For details how I made this card watch the videos below or at my you tube channel.  There is a part #1 and part #2 because I had technical difficulties.


hope you enjoyed my videos and please excuse the noise of the fan blowing in the window.  Give my videos a thumbs up if you like them.
Thanks for stopping by and come back again soon.  

Saturday, August 10, 2019

Oranges

stamps used:  Unity stamp co.

Took one stamp set and did three completely different tag/cards.
What I did first was color a piece of white cardstock with a few colors of distress inks.  Only reason I used my distress inks is because they were handy and most of the time that is the reason for all I do.  I stamped the orange image onto the colored cardstock the got out my circle dies to find one about the same size .... next cut out the oranges.  So each orange is a little different in color depending on where it was stamped on the colored cardstock also all the oranges (no matter what size) have Wink of Stella shine on them.  Oh yes, in this stamp set there are full slices and half slices of oranges so you will see each on these cards and tag.

Tag:
1.  adhere a doily on the edge of the tag and cut off any excess.
2.  adhere one of the half oranges onto the doily.
3.  stamp the saying onto a strip of white cardstock with one of the orange distress inks and adhere to tag.
4.  stamp small saying (think positive) around the edge of the tag with same orange ink.  
*wasn't happy with the way that looked so I got out a stencil and add some fun to the tag.*
5.  distressed around the tag with the same ink then tied on ribbon to finish the tag.

Bubble card:
1.  stenciled the bubble on a white card with three distress inks.  Moving the stencil just a little with each color.
2.  layer two of the oranges together onto a black circle then adhered to bubble background.
3.  stamp saying with black ink onto bubbled background under the orange slices.
4.  adhere completely stenciled bubble card to white note card.
5.  add a self sticking gem to the center of the orange slice.

Pendulum card:
*saw this on Dawn's stamping thoughts *
1.  on an orange note card layer a piece of black card then a slightly smaller mustard gold card that was stamped with the half orange with orange ink.
2.  on 3" x 3 1/4" black card punch out window punch (SU paper punch).  The punched out piece is going to be the pendulum for the card.
3.  take the punched out window punch piece and hold it behind the center of the black card with about an inch showing out the top of the card.  punch a small hole then add a small brad through the hole.  now test it to make sure it slides back and forth easily.  you have now created the pendulum.
4.  mount smaller white card that is randomly stamped with half orange image with same orange ink onto the black card with pendulum using pop dots in the four corners.
5.  mount pendulum piece onto layered note card.
6.  adhere full orange slice to pendulum piece.  add self sticking gem to center of orange slice.
7.  on the pendulum sticking out of the pendulum piece on the note card add two small pot dots or a small piece of foam mounting tape to the top of the pendulum.  add the small saying that has been die cut with circles.  The circle saying should now swing back and forth like a pendulum.


Friday, July 19, 2019

Flip flap cards


stamps used:  Unity stamp co.

This is called a flip flap card.  It's been around for awhile and it is making a come back.  I've seen it online again so I decided to make a couple of these card designs.
This basically a flat card that doesn't open like a normal A2 card.  The flap layer is the opening of the card.

Measurements:
base card:  5 1/2" x 4 1/4"
pattern paper:  5 1/4" x 4"
flap layer:  1 3/4" x 4 5/8"   score at 1/2"
circle dies:  different sizes

Instructions:
1.  fold on score line of the flap layer and adhere the folded section to the back of the pattern paper.
2.  adhere the flap layer with the pattern paper to the base card.
3.  adhere the biggest circle die to the flap layer but only adhere half of the circle die.
4.  flip the flap layer up, and with a small piece of re-positional tape, add second circle die of the same size to the back of the circle die on the front of the flap.  Add glue/tape to the back of second circle that is attached with re-positional tape.  Next flip the flap down to position the second circle die to the base card.  The second circle die should now be positioned on the base card and when the flap is closed the circle dies should match.
5.  stamp the white circle dies and adhere to the front and inside circle dies.
You are now done with your Flip Flap card and when you flip the front up you will reveal the message under the front flap.

Hope you enjoyed this Flip Flap card as much as I have and make some of your own.  Thank you for stopping by and come back again soon.

Wednesday, July 10, 2019

Floating image cards

Floating image card

stamps used:  Altenew stamp set

Here are several cards I made with the left over circles from the Floating Frame cards that you can see in this post. for instructions.
Basically after making Floating frame cards you have the circle die cuts all left over .... so ..... why not make them into cards and that is what you see here. 
thank you for stopping by.  come back again soon.

Saturday, July 6, 2019

Floating frames

Floating frame cards

stamps used:  Altenew stamps

I began by stamping and die-cutting  images from Altenew  Build-A-Flower Anemone stamp set.  I arranged them close together on a piece of 4-1/4" x 5-1/2" cardstock. They are not adhered to the cardstock - just laying freely on top of it. Next, carefully lay a piece of Glad Press 'n Seal (available at most grocery stores) over the images to hold them in place. Trim the edges even with the edge of the cardstock. I used a  circle or a rectangle die to cut out the center. Now it's time to remove the white cardstock piece. The Press 'n Seal stays adhered to the die-cuts, you are only removing the cardstock backing. With the die cuts still held in place by the Press 'n Seal add foam mounting tape to the back of all the die cut images. This will make the die-cuts "float" on the finished card. Here's my frame attached to the card front using foam mounting tape.  After you have the frame stuck down, it's time to carefully pull off the Press 'n Seal.  Next I stamped a saying in the center of the frames.
I saw this technique at Jennifer McGuire Ink blog.
 With the leftover center I was able to create a second card using the same method which I will show in another post very soon.  
Thank you for stopping by and come back again soon.

Monday, April 22, 2019

Double gate peek-a-boo card

Here is a double gate peek-a-boo card

card closed - this is the front of the card.
stamps used: Hot Potato and various other stamp co. that have gone out of business.
When you first open the card you see four panels. Two of the panels have circle cut outs to see the saying inside the card.
Here is the card fully open to see all the panels inside the card.  So far I have only made one of these cards but plan on doing more.  This was sent to a friend for her birthday.  This is one of those cards that is a bit time consuming with all the layers and a little heavy so I put extra postage on it when I sent it.  I saw this card on Dawn's Stamping Thoughts blog.
thank you for stopping by and please come back soon.

Sunday, March 31, 2019

Tissue Pocket Card - GIU blog hop

Image may contain: text
(see winners below)

Today is the GIU (Growing In Unity) blog hop for when I was one of the GIU gals back in January of this year.  
Here is the card I am showcasing today ... it's a Tissue Pocket card.  The photo shows the card closed because you can only open it once to reveal the fun surprise inside.
stamps used:  Unity stamp co. Something Magical stamp set

It's not a hard card to make but it does take a little patience because you are working with a one ply tissue to create the pocket.  I saw this card at Maymay Made It blog.
Here is a picture of the preparation to create this card.  
1.  stamp a 3 1/2" x 3 1/2" square card with a saying then mount onto another card that is 3 1/2" x 3 1/2".  
2.  on the back of 3 1/2" sq. stamped card tape 3 strings that will hang with stamped images adhered to all the strings.  This will be clear once you watch the short video at the bottom of this post or at my youtube channel.
3.  get a regular tissue and ply it apart because you are only using one ply of the tissue.

 here is the video:

here is a fun look at some friends opening this Tissue pocket card.


Remember this is a GIU blog hop so please continue to see what the rest of the gals have to show you.  Unity will have a prize drawing at the end of this blog hop so comment on all the blogs you visit to be included in for the prize.
Here is the list:
Kim Marie Monson Leach www.frogoffaith.blogspot.com
Rachel Duong https://findingpeacestamper.home.blog/...Heidi Cope https://heidicopecreations.com/...Shelly McGovern Schmidt https://shellymc2.blogspot.com/...Sue Wisniewski https://stampingsueinconnecticut.blogspot.com/...Pamela J. Duncan https://pamspearls4u.blogspot.com/...Cara Malmrose https://creativechaosbycara.blogspot.com/...Ashley Johnson https://marklandandmain.blogspot.com/...


Thanks for stopping by and come back soon.

JUST TO LET YOU KNOW THE WINNERS HAVE BEEN PICKED
WINNERS ARE:
From Heidi's Blog:
Debra Brock 
March 31, 2019 at 6:22 AM
Beautiful cards! Sunsets and sunrises just never get old! Love them!
From Shelly's Blog:
Lynn McAuley said...
I don't know which one is cuter, Shelly--- the rabbit with it's crown of roses or the tennis shoes!! I love them both. Such fabulous Unity images!!
April 1, 2019 at 7:12 PM

Wednesday, March 27, 2019

HoneyPop card

stamps used:  Inky Antics Bumblebee HoneyPop

This type of 3D card is fun, and easy to create with the clear stamp set for easy placement of the images.  All you need is a sharp pair of scissors to cut out the honeycomb paper to create the pop up piece inside the card.
Thanks for stopping by and comments are always welcome.

Wednesday, February 27, 2019

Wizard mini shakers!

Yes, today I am continuing with some more wizard fun!  Today it's mini shaker cards.

stamps used:  Unity stamp co. Something magical stamp set

This is a shaker and a z-fold card all in one ... plus it is mini size!  perfect for these small images.  
measurements: 
base card - 6" x 4 1/4"
strip - 6" x 3/4"
front layers - 2 3/8" x 3 3/4" and 2 1/8" x 3 5/8"

basic instructions:
For a basic z-fold card you fold the base card in half then in half again.  It will be a mountain fold and valley fold.  For this card the strip is folded the same way and this will be taped to card with the long end to the front panel and the short taped to the inside back.  BUT before taping the strip to card you need to create the shaker part of the card.  
Shaker card - die cut or cut out a section.  tape window sheet to back side of card with opening.  add foam tape to the back of the window sheet to form a closed box so when you add the sequins or beads inside it they will not fall out.  Another words the foam mounting tape should all be touching with no spaces.  remove the backing strips of the foam mounting tape and tape the stamped panel directly to the foam mounting tape to secure all the sequins inside the shaker.  That's it for the shaker card section ... you can go to my you-tube channel to see a video how to make a shaker for a visual tutorial.  
Hope you enjoyed seeing all my wizard creations over the last week.  Thank you for visiting come back again soon.

Friday, February 1, 2019

Snowflake crop 2019

Another Snowflake crop weekend done until next year!
I did a couple of MITI's this year using a new product and new inks to me!
product used: chalk coulture
This product was unique and new to me.  basically you place down a stencil and spread a thin layer of the product, remove the stencil to reveal the end result.  I guess it can be described as a matte finish texture paste that dries fairly quickly.

product used:  Catherine Pooler inks
For these two cards they were embossed first with a big background stamp.  The bird (die cut) card used the inks blended over the black embossed background.  These inks went on smooth and blended beautifully.  The create (die cut) card was embossed with white embossing powder then overstamped with a striped image using the same inks.  
I had fun using both these products and ended up purchasing a few of the ink pads to take home.  
Not affiliated with either of these products just enjoyed working with them.
Thanks for stopping by.  come back again soon.

Friday, January 18, 2019

GIU day 5 - Tunnel card with video

This is my last day of guest blogging for GIU!  It has been a fun week of posting for me and I hope you continue to visit my blog.  I want to say Thank you to Unity Stamp co. for having guest blog this week ... it's great fun and opportunity to show off Unity stamps.
On to my last card for the week ..... Tunnel card
This is another card that has been around for years but, I think has been neglected for too long so I'm bringing it back.  Yes, there will be a video at the end of this post or you can visit my you-tube channel to see this video plus more.
stamps used:  Unity Simply Vintage stamp set by Gina K. Designs
Measurements
base card: A2 note card 5 1/2" x 8 1/2 (unfolded)
inside folded card:  5 1/2" x 8 1/2"  score at 2 1/8", 4 1/4" and 6 3/8"
See in photo inside folded card is folded:  valley, mountain and valley.  The middle is punched out with a paper punch.  Tape each end to the inside of card.  You can see more details in video.
Thank you for stopping by all week to see all my card created with Unity stamps.  Remember to comment to be included in drawing.  Oh yeah, think I forgot to mention I will be drawing two names so that means there will be two grab bags up for grabs. I am closing the drawing for the grab bag at 8 p.m. est. so I can pick the winners. The winners will be announced here on my blog as soon as I get the o.k. from Unity so come back to see who wins.