My stamping adventures

Showing posts with label card swap. Show all posts

Thursday, June 12, 2025

Double accordion gatefold

 Double accordion gatefold

June is all about fun folds in my local swap card group. I do love a good fun fold, and this one does not disappoint. 

                            stamps/supplies used:  Altenew Magnolia die set, SU dsp

The above pic is the card closed.  

                    double accordion gatefold card open (scanned flat), inside saying by Altenew

My old Canon camera doesn't want to play nice right now, so that is why I scanned the card open ... flat.  I learned this card from Stamp from Tami...go here to see a sample.

measurements:

base - 9 1/2" x 5 1/2"  score long side at 1/2" and 2 5/8" on either end.

inside base - 10 5/8" x 3"  score long side at 2 1/8" and 4 1/4" on either end.

layers - (four) 5 3/8" x 2", (four) 2 7/8" x 2", (one) 5 3/8" x 4 1/8"

pattern papers - (four) 5 1/4" x 1 7/8", (four) 2 3/4" x 1 7/8", (one) 5 1/4" x 4

This template is from Stamp with tami

instructions:

1. score the card bases.

2.  cut the layers. 

3.  stamp saying on white layer inside card.

4.  attach layers to card base and inside base.

5.  put glue on tabs on end of base card.  

6.  lay inside layer flay on base card onto tabs with glue.

7.  add die cut magnolia flower to front panel of inside layer.

Thanks for stopping by.  Come back soon.


Wednesday, February 19, 2025

B & W with a pop of color

 B & W with a pop of color

Here's a look at my February card with my local card swapping girls.  

stamps, stencils, supplies used:  GinaK designs Hello layering stencil bundle

The theme for this month, as you can see from the title, is B & W with a pop of color.  My pop of color was yellow.  I got out a stencil bundle I have had from GinaK designs for a couple of years, that has been a favorite of mine.  I know I say a favorite of mine for this set, but as you know we all have lots of favorites.  For me it depends on the mood I'm in.

For this card I used the stencil to do a bunch of the flowers, and leaves.  I had fun with this theme because I did do b & w but I also added in some gray leaves just because I could.  Only one of the flowers are popped up with foam tape ... all the other flowers, and leaves are taped onto the card.  


Here is another one I did with red for the pop of color.  I did this card after I had done all the yellow ones so needless to say the girls got the yellow ones.  

Thanks for stopping by.  come back soon.

Tuesday, February 11, 2025

Flowers

 Flowers

Flowers are on the agenda for this post along with making envelopes.  This my January card for my local card swapping group that meets once a month.  Theme was flowers.

stamps/dies/supplies used:  Altenew Dancing poppies stamp/stencil/die set

What I like about this Altenew set is ... everything!  It has a stamp, coloring stencil, and what I call an all in one die.  I call the die that because it is one big die that cuts out all the flowers at one time.  The coloring stencils makes it easy to do all one color or multiple colors for the multiple poppies.  I mounted the poppies with foam tape onto a kraft card layer, then a light olive card layer.  Layered all the layers onto a 5" x 7" kraft card.  Now if you know me I don't do big cards, but I just couldn't resist making a 5" x 7" card, so I could fit all the poppies, and leaves on a card.  By making a big 5" x 7" card I had to make an envelope to fit the card, so this meant dusting off an old tool.......the envelope maker.  Took me a couple of seconds to remember how to use it ... but after I did ... it was EASY to make the right size envelope.  Don't forget to use those old tools you bought in the past.

Thanks for stopping by.  come back soon.
 

Thursday, January 9, 2025

hey friend

 hey friend

supplies used:  Gina K designs zinna layering stencil set

This is my card for my December 2024 local card club.  I did the 4 Corners technique which I learned from Jennifer McGuire 4 in one card technique.  Here is how I did this technique on this post of mine.  I used Catherine Pooler my favorite ink pads.

Thanks for stopping by.  Come back soon.

Saturday, November 2, 2024

Bird sympathy

 Bird sympathy

stamp/dies/embossing folder used:  Altenew stamp co. birds, embossing folder.  MFP saying

My local card swapping group decided to do sympathy for one of our monthly themes.  The above picture is the first card I did but for my group I simplified the card a little.

stamps/dies/stencils used: Altenew stamp co. bird dies, stencil.  MFP saying

In this picture you can see I switched out the embossing folder for a stencil.  Other than that I used the same ink which is from my favorite company, Catherine Pooler stamp co.  I do like their foam ink pad and all the fun colors...that is not to say other companies don't have very good ink pads, it's just for me it's CP inks lately.  Back to my cards ... I die cut the birds and adhered them to a circle die that I blended some ink on.  Stamped the saying with black ink, and puts a few self sticking gems to finish off the cards.

Thanks for stopping by.  Come back soon.

***not affiliated with any of the above companies just a happy customer*** 


Monday, October 28, 2024

On the Blackboard

 On the Blackboard

stamped used:  Altenew stamp co. Tea for two


This card was done for my local card swap, which we do monthly.  But I'm behind in showing my cards here on my blog.  This was done for the month we did technique as the theme.  Mostly you use black cardstock to represent a blackboard, but I find it fun to change it up and use other color cardstocks for a little different effect. This technique is also called chalkboard technique but whatever you call it ... it is a unique technique. In the above picture you can see I used black, tan, and dark blue cardstocks.
The idea behind this technique is for the image to look as if it has been drawn on a blackboard.  I used black cardstock then stamped the teapot with a clear embossing ink pad, heat emboss it with white embossing powder.  Next smudge on some white pigment ink with a sponge dauber.  I find the sponge dauber works better than blending brushes for this technique.  Then just embellish however you like to finish the card. 
You can see more on this post and if you type blackboard or chalkboard in search bar you can see even more on this technique.
Thanks for stopping by.  Come back soon.


Saturday, August 10, 2024

Card swap cards

 Card swap cards

I am behind in showing my local card swap cards so here are a couple of them from a couple of months past.

The fruit card is what I call collage stamping, or some call it random stamping.  I used old wood mounted stamps, so the companies are out of business now.  It's good to go old school once in a while just to remember how I started in stamping.

stamps used:  various stamp companies 

The cupcake card was done with a sketch design...I know I'm not one to use sketches, but sometimes you just have to go out of your comfort zone.  Sketches are way out of my comfort zone.

stamps used:  Stampin' Up

Thank you for stopping by.  Come back soon.


Tuesday, April 30, 2024

March - music and April - craft squares

 March - music and April - craft squares

  I belong to a local card swapping group, that gets together once a month.  Sometimes we need to skip a month, and that is why I am showing two today.

Theme for March was music.  I went into my wood stamps from way back when for this card.  The main image is a CD or big record, which ever you would like it to be. 

I stamped it a couple of times to get the two colors on it, then stamped some small music notes/saying around it.  All these stamps are from companies that are long around, so no reason to name them.

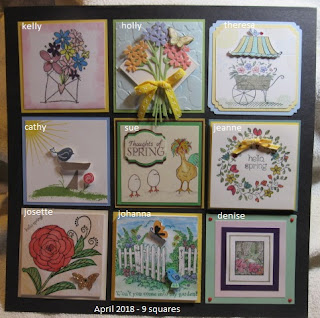
April theme is Crafty squares.  These squares are 3 1/2" so you can fit nine of them together in a frame, that are called Sampler squares.  Again I got out some Hot Potatoes old wood stamps that are longer available.  I have a large selection of stamps in my stash that I can work from ... so why not. 
You can see what I mean here in this post from 2018.  
Here's also another one done that same (2018) year.
Back in 2018 we did this idea a couple of times.
Thanks for stopping by.  Come back soon.


Sunday, October 1, 2023

Same stamp set -Forever Fern

 Same stamp set - Forever Fern

October is same stamp set for my local card swapping ladies.  We decided on SU Forever Fern.


I did what I consider a simple card with a favorite older technique.  This technique is emboss resist.

Basic instructions:

1. Stamp image with clear embossing ink, sprinkle with either clear or white embossing powder.  

Tip:  Remember to dust cardstock first with embossing buddy pouch to get rid of most of the static.  

2. Heat with embossing tool to melt the embossing powder.  

3.  Blend or sponge on color with your favorite tool, and inks. You can add as much or less color as you like.  

4.  Buff off embossed images with soft cloth to make the image pop under the color.

Thanks for stopping by and please come back again soon.

Monday, December 5, 2022

Jelly fish

 Jelly fish

stamps used:  Stampin' Up Whale done stamp set
November is a sketch card for my local card swap group.
This is as close as I have ever got to copying a sketch idea.  Sketches are not my thing ... if you follow me here you know that because... I have mentioned it a few times.  😏😐😀
Thank you for stopping by.  Come back again soon.


Sunday, May 1, 2022

Slimline cards

 Slimline cards

This my May creative crew swap card.  Kept it simple because, to me the whole idea this month was to focus on the slimline card design.

stencil set used:  Unity stamp co. - tulip stamp/layering stencil set

This is an easy layering stencil set to use on a card.  Besides the stencil set I used a sending hugs die, also from the same Unity stamp company.  This company has branched out from rubber stamps to making stencils, and dies lately.

Thanks for stopping by, and please come back soon.

***not affiliated with above company ... just a happy customer.***


Tuesday, January 11, 2022

Happy Anniversary to you

 Happy Anniversary to you

stamps used:  Unity stamp co. I did,I Do, I Will stamp/die, Pop dots

I needed a couple of anniversary cards to send out, for the end of December.  I decided to get out a new big background image, and word die from Unity stamp co.  


 Of course, I got out my CP inks to make lots of colorful backgrounds on that big image. 

The pop dots background image is the perfect size to fit an A2 card ..... the anniversary stamp and die worked great mounted over the top of the background.  

Simple card but effective ... don't you think?  I ended up making a bunch of them to have on hand for a local card swap group. 

Thanks for stopping by.  Come back soon.

***not affiliated with above companies just happy customer***


Monday, June 7, 2021

Sandpipers on the beach

 Sandpipers on the beach

stamps used:  Just For Fun and Dina Wakley 

The theme for my local creative card crew this month (June) is Beach.  Beach theme for this month is appropriate because it has been so hot around here all week, although it is not officially summer till June 21st.  Anyway back to my card and what I did to make this card.

basic instructions:

1.  I cut out masks to lay down on my white card layer to create what I call faux layers.  The faux layers make the illusion of sand, water and sky.  

2.  Lay down the mask and blend color ... blue for sky and water...kraft color ink for the sand then remove the mask.

3.  Stamp over the faux layers with the birds, weeds and saying.

4.  Die cut the stamped layer with wonky rectangles die then layer all the layers onto a kraft card base.

5.  Add a few gems to finish off the card.

Thank you for stopping by.  come back again soon.


Sunday, February 7, 2021

Card swap - all occasions

 All occasions cards
It's February and time for another swap card for my local creative card crew group.  This time the theme is all occasions ... which means everyone picked a holiday or occasions to make a card.  Of course, I picked Halloween!
stamps used:  Stampin' Up

I went through my stash and found this old stamp set that I hadn't used for years, so I thought it would be fun to bring it back to life.  I stamped it with a bright green ink on card, layered it onto bright green card layer.  On separate piece of cardstock I stamped the image again but this time in black ink.  I fussy cut out the mummy and popped him up on the green mummy then layered onto DSP layer.  Took the finished piece and layered onto bright green folded A2 card.  Oh yes, punched out a bat and mounted him on the top corner just for fun.  The Halloween is part of a bigger saying that I punched out with ovals.  
Thanks for stopping by ... come back again soon.

Sunday, October 4, 2020

Arrow fold card

 ARROW FOLD CARDS

I know I say this all the time when it comes to folded cards but this is a FUN fold card! 
Back to my cards, oh yeah take a look at them.  BTW these cards are for my local creative card crew group...the theme is anything goes.
stamps used:  Catherine Pooler stamps/dies

Measurements and instructions:
base card:  5 1/2" x 8 1/2", score at 4 1/4"  turn the card so it is tall when marking.

1.  Mark at 2 1/8" on the left side and right side of the card base.
2.  Mark at 2 3/4" at the bottom center of the card base.
3.  Score the marks then fold.

Pattern paper:  4" x 5"
1.  mark at 2 1/2" at the bottom center.
2.  cut from the 2 1/2" mark to the upper left corner and the upper right corner.  Use all three pieces or just use white layer 4" x 5 1/3" on the inside.

White cs (inside):  4" x 5"
1.  mark at 2 1/2" at the bottom center.
2.  cut from the 2 1/2" mark to the upper left and upper right corner.

Assemble card:
1.  adhere the bigger triangle pattern piece to the front of the card.
2.  adhere the two smaller triangles to the left and right sides of the inside of the card.
3.  adhere the white triangle to the inside of the card.
***instead of cutting and adhering a cut white triangle to the inside of the card ... you can just adhere the full 4" x 5" white cs to the inside of the card then adhere the two smaller pattern paper triangles to the sides.***  I found it easier to just add the 4" x 5" white cs to the inside.***
 
Saw it on Lisa C. you tube channel....isn't you tube, blogs and pinterest great.  You find just about anything out there on the internet.
Here are a couple more cards I created.


Thank you for stopping by.  come back again soon.


Monday, June 8, 2020

Call me stencil cards


stamps used:  Catherine Pooler stamps
stencils used:  dylusions, Stencil Girl

These cards are for my local card swapping group, and the theme was Stencils or Embossing folders.  I decided to use stencils and as you can see I couldn't make up my mind on the stencil to use, so I used a variety of them.  Please click on photo to see it better, because I did the stencil technique on a die cut banner in the same kraft cardstock as the base card.

Basic instructions:
1.  die cut the banner
2.  blend colors on 3/4 of the banner.
3.  place stencil over blended colors.  use the darkest color to blend through the stencil.
4.  adhere banner to base card.
5.  stamp, die cut, and mount telephone on top of banner.
6.  stamp small saying below the banner on base card.

Get out your stencils and just have fun!  

thanks for stopping by.  come back again soon.
***not affiliated with any of the above companies, just a customer.*** 

Thursday, May 7, 2020

Dandelion Wishes

stamps used:  Stampin' Up Dandelion Wishes stamp set, Dragonfly Dreams (bee dies)

Had fun with this stamp set.  We decided for all of us to use the same stamp set and see what happens.  Here are my cards.  I went back and forth with different designs but decided on pretty pink bees flying over the dandelions.  Also though the pink and grey cardstock went well together.  

Below you will see another design I did with this same stamp set.


This is what I call a panel card.  That just means I stamped the images on a white panel then cut it into three separate panels, then layered onto purple layer before adhering it to the final card base.


I also made a few with the All in One card/envelope design.  You can see more All in One card/envelope cards here.  

Thanks for stopping by.  come back again soon.

Friday, March 13, 2020

A cup of thanks


stamps used:  SU Tea Shoppe
Banner dies by Gina Marie Designs
DSP by SU

Green card is what I call a basic card.  Butterscotch card is a step up from a basic card.
Green card:
1.  Die cut green banner then in smaller banner die cut DSP.  Tie ribbon around banners then adhere to cream card.
2.  Stamp and fussy cut tea cup and mount with foam mounting tape to card over banners.

Butterscotch card:
1.  repeat step 1 from green card except use butterscotch colors.
2.  run a separate piece of cream card, through Big Kick (or whatever machine you own) with dotted embossing folder.
3.  adhere embossed piece to cream note card
4.   repeat step 2 from green card but again in butterscotch colors.
5.  stamp image onto cream envelope.

The stepped up version of this card is for my local card swapping group for March.
thanks for stopping by.  come back again soon.


Friday, February 7, 2020

more flurry of fun!

stamps used:  Catherine Pooler stamps build a snowman stamp set

This is such a fun set of stamps and dies to create cards!  I am having lots of fun with it.  Here are a couple more doing just stamping without any dies.  I like to stamp the saying first then with colored ink stamp the hats and things on top of the black stamped saying.  easy peasy!  I did these cards for a local card swap group I belong to.
You can see more cards I did with this stamp set here.  
This is a short but fun (at least I think so) blog post.  Thanks for stopping by .... please come back again soon.

Saturday, January 11, 2020

Mandala shape wreath card

stamps used:  Gina K designs

This stamp set is called Mandala Maker and it is used with Gina K. designs wreath builder stencils.  I created this card for my local card swapping group for the theme of shapes.

With this stencil you can make lots of fun wreath style cards which you can see in these past posts here, here, in this post I used the wreath builder stamps/stencil on a pop up card, in this post I used a stamp set with small images, in this 2018 post you can see I have been making these cards for years.  If you like to see more of my wreath builder cards just type wreath builder cards in the search box.  Hope you like all these cards and give them a go!
Thanks for stopping by and please come back again soon.