My stamping adventures

Showing posts with label Catherine Pooler inks. Show all posts

Sunday, May 31, 2026

Pop of color

 Pop of Color

 This week for Jen Rzasa #altenewchallengelive theme is Pop of Color.  


I had a bit of fun with this challenge because besides the pop of Color I did a spotlight technique.  Haven't done this technique in years!  Used Altenew 3D embossing folder named Daisy bed for these two cards.  The inks are Catherine Pooler ink pads, they are still my favorite right now.  These inks are so bright and beautiful.

Thanks for stopping by.  Come back soon.


Sunday, February 22, 2026

Divide & design

 Divide & Design

Two more cards for Jen Rzasa #altenewchallengelive with the theme Divide & Design.

stencil used:  Altenew Stencil Art:  Aspen sky, Catherine Pooler ink pads
I did the stack, cut & shuffle technique for these two cards.  You can see more of this technique here.  It's a fun way to create more than one card at a time.  I used altenew Stencil Art: Aspen sky, and Catherine Pooler ink pads which are my favorite ink pads.  They have been my favorite ink pads since I discovered them at a crop years ago

Thanks for stopping by.  Come back soon.


Wednesday, March 19, 2025

Altenew Challenge - Bingo

 Altenew Challenge - Bingo

This week for the Altenew challenge with Jen; we are playing Bingo.  I picked the bingo line:  enamel dots - metallic - stencil - ink blending.  With these challenges there are a lot of creative license, another words I am using sparkle gems instead of enamel dots.  

supplies used:  Altenew Stencil Art: nature splashes, metallic cardstock, sparkle metallic gems.  birthday die, and stamped happy (unknown company)

Here's a close up of both the cards ... yes, I did two cards mainly because I needed a couple of birthday cards this week.

This one is done with CP inks in blues, and greens ... I ink blended my favorite colors lately that I use. The sparkle gems on this card are silver ... wish they showed up better in this pic.  The die cut leaves are a beautiful shiny blue metallic.


The pinks, and oranges CP inks, that I ink blended are out of my comfort zone.  I'm not much of a bright color stamper.  The sparkle gems on this card are gold ... but again hard to see in pic.
The die cut leaves in this pink/orange card are a lovely shiny prisma metallic.  I had fun with this challenge.  Look forward to seeing what everyone else does.
Thanks for stopping by.  Come back soon.


Friday, March 7, 2025

Leaves and butterflies

 Leaves and butterflies

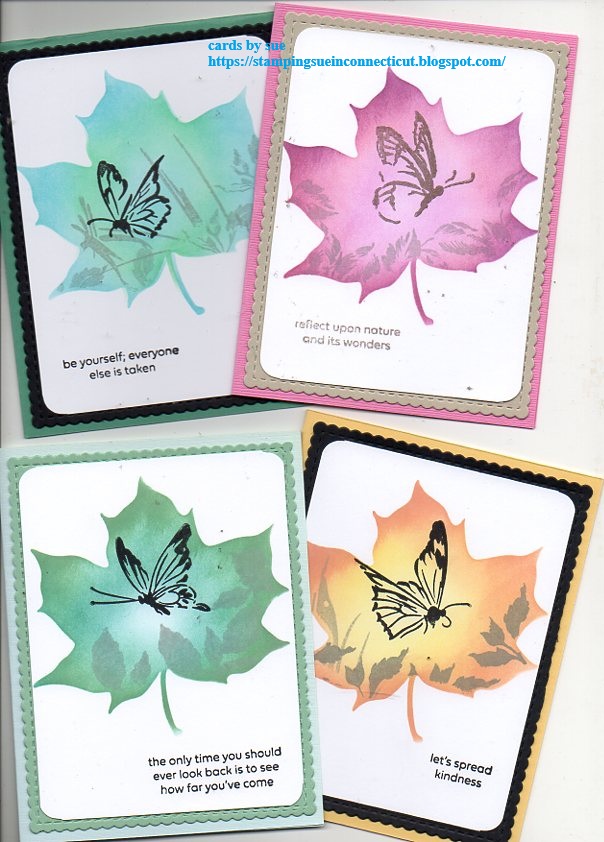
I am having fun with Altenew challenge live.  This is challenge #2.  Need flying insect and leaves on card/project.

supplies used:  Altenew Meadow Reflections stamp set, Remember This stamp set.  Unity leaf stencil

I placed Unity leaf stencil on a white panel, then blended color in it. Then I stamped the leaves from Altenew Remember This stamp set, then butterfly from Altenew Meadow Reflections stamp set. 

The sayings are also from Meadow Reflections stamp set.  I used CP inks to blend colors inside the leaf stencil. 
 
As you can see in the photo I did a set of four cards.  

Thanks for stopping by.  Come back soon.

(not affiliated with any of the above companies)


Wednesday, February 5, 2025

Stencil Art: charming delight

 Stencil Art:  charming delight

This is a stencil set from Altenew stamp co., that is a new monthly subscription. 


But after it is out for subscribers (who get it a lesser price) it is offered to all customers.  Here is a close up look at one of the cards I made with this set. 
stencils/dies used:  Altenew Stencil Art: charming delight & Masonry wall embossing folder.  Unity stamp co. rectangle & arches die sets, Catherine Pooler inks

I am not a subscriber to Altenew co. Stencil Art sets but I do like them, and buy the ones that appeal to me.  Charming delight has six stencils in the set to create this flower spray.  There is a little learning curve for this set but once you get it down ... it's easy to create this beautiful flower spray.

Thanks for stopping by.  come back soon.

Monday, February 3, 2025

Zinnias

 Zinnias

I am still having fun using GinaK  Zinnia stencil set.

stamps/stencils used:  GinaK Zinnia stencil set, Simon Says So Talkative stamp set

I was at Snowflake crop which myself, and several other friends attend in Massachusetts ... that is where I played with this Zinnia stencil to make 8 cards.  The fun thing is I didn't have any sayings with me but my friend, did.  It's a stamp set from Simon Says named So Talkative, that has a lot of wonderful sayings.

Here are a couple more of the cards I did at the crop.

Basically I just placed the zinnia stencil on white card layer.  No specific placing ... just laid it down and added color.  Then I die cut the white layers with whatever dies I had with me.  I used CP inks I brought with me.  

Thanks for stopping by.  come back soon.

Thursday, January 9, 2025

hey friend

 hey friend

supplies used:  Gina K designs zinna layering stencil set

This is my card for my December 2024 local card club.  I did the 4 Corners technique which I learned from Jennifer McGuire 4 in one card technique.  Here is how I did this technique on this post of mine.  I used Catherine Pooler my favorite ink pads.

Thanks for stopping by.  Come back soon.

Monday, December 2, 2024

Stencil Art - Nature splashes

 Stencil Art - Nature splashes

stamps/stencils - Altenew Stencil Art - Nature splashes & sayings

I am a fan of stencils of any kind, and this Stencil Art set does not disappoint.  

This is a set of 6 layering stencils including the last stencil with words. 

stamps, stencils & dies - Altenew Stencil Art set, Unity stamp co. Arches die set

 It also has a leaf die set but I didn't use them on these cards, and bookmarks.  I did the basics for all the above cards, and bookmarks this time around.  Just wanted to get the feel of how all the stencils layered together.  I plan on do more using the leaf dies on more cards, and projects.  FYI I used a variety Catherine Pooler inks.

Thank you for stopping by.  Come back soon.

Tuesday, November 5, 2024

Thank You cards

 Thank you cards

Made a bunch of Thank You cards to have in my stash, and for a couple of people who asked for them.

stamps used: Unity stamp co. flowers, butterfly, lady.  Sayings various companies

Two of the above cards are what I call Faux layer style cards.  That is where you mask off section, blend in some colors, remove mask then stamp image in black. I used my Catherine Pooler inks for blending the colors.  You know, if you follow my blog they are my favorite ink pads.  You can see more of my Faux layer cards in this post from 2020, in this post with a video showing how to do this technique.  The butterfly card is a Split negative card.  Check out how to do this technique in this post with written instructions, and here back in 2016.  To see more of both of these techniques just type in Faux layers, or Split negative in the search bar.

dies used:  Stampin' Up Share a Milkshake stamp/die set

These milkshake, ice-cream cone, and sundae cards are fun, and easy to create.  No stamping required just die cutting of the images.  The backgrounds are, starting with the milkshake card the wax paper pouncing with inks.  The ice-cream card is paper towel pouncing with inks.  The last but not least is the sundae card, which has a shaving cream background.  I usually have a stack of background panels done, so I can make up cards whenever I need.  To see more with the Share a Milkshake stamp/die set look here.  Check out the shaving cream technique look here including a video I did a while ago.  Check out the wax paper technique here with a video.  The paper towel technique is the same as the wax paper.  Remember you can type any technique name in the search bar to see more from me.

Thanks for stopping by.  Come back soon.


Saturday, November 2, 2024

Bird sympathy

 Bird sympathy

stamp/dies/embossing folder used:  Altenew stamp co. birds, embossing folder.  MFP saying

My local card swapping group decided to do sympathy for one of our monthly themes.  The above picture is the first card I did but for my group I simplified the card a little.

stamps/dies/stencils used: Altenew stamp co. bird dies, stencil.  MFP saying

In this picture you can see I switched out the embossing folder for a stencil.  Other than that I used the same ink which is from my favorite company, Catherine Pooler stamp co.  I do like their foam ink pad and all the fun colors...that is not to say other companies don't have very good ink pads, it's just for me it's CP inks lately.  Back to my cards ... I die cut the birds and adhered them to a circle die that I blended some ink on.  Stamped the saying with black ink, and puts a few self sticking gems to finish off the cards.

Thanks for stopping by.  Come back soon.

***not affiliated with any of the above companies just a happy customer*** 


Thursday, October 31, 2024

Happy Halloween!

 Happy Halloween!

It's the last day of October so we all know what that means ... All Hallows Eve or Halloween!  This is the night when all the witches, and goblins come out to play.

stamps & supplies used:  Art Foamies skeleton, TH stencils/dies

I started out making these into 5" x 7" cards but decided to just keep them as big postcards.  There is what I call collage stamping on these two postcards.  Collage stamping is basically stamping over other images or adding a stencil with a lighter color.  You can see more collage stamping in this post with links to other posts.  I used a lot of my Catherine Pooler inks, which if you follow my blog, you know they are my favorite ink pads.

stamps/supplies used:  Art Foamies skeleton, TH stamps, MFP sayings

The company Art Foamies is a small family owned business that makes big foam style stamps.  The owner, Kae Pea is a lovely person who I met in person when I was working at GASS (stamp store that closed there doors years ago) when she taught there in person.  Back then she was with Rubber Moon stamps.  

Thanks for stopping by.  Come back soon.

***not affiliated with any of the above companies just happy customer***


Wednesday, October 2, 2024

Simple cards

 Simple cards

I'm back!  Today I am just starting off with a few, what I call simple cards.

stamps used:  MFP 
I used Catherine Pooler inks, which if you have been following my blog you know are my favorite inks.  At least for the past 5 or 6 years.  

basic instructions:

1.  stamp image about 1 inch from the bottom of the card (4" x 5 1/4") panel with chosen color ink.

2.  add strip of pattern paper (SU paper shown here) on the bottom of stamped card panel.

3.  stamp saying (Altenew) image.


4.  add (Altenew) enamel dots.  These just happen to my favorite choice.

You can make up a set of these cards for little gifts.

Thank you for stopping by.  Come back soon.


Monday, April 15, 2024

3D embossed fun

 3D embossed fun

I do like embossing folders, and 3D embossing folders make deeper impressions.

stamps/embossing folders used:  Altenew stamp co. 3D Decorative Florals embossing folder, Penny Black friend edger die/stamp set
Instructions:
1.  Run 3D embossing folder through Big Kick (or machine of choice) to get impression.
2.  Gently drag ink pad (my choice Catherine Pooler ink pads) across card with embossed image.  
3.  Die cut friend edger and stamp saying.  Adhere to impressed card.
4.  Add layers to A2 (4 1/4" x 5 1/2" folded card) card.
Thanks for stopping by.  Come back soon.

Saturday, March 30, 2024

Postage cards

 Postage cards

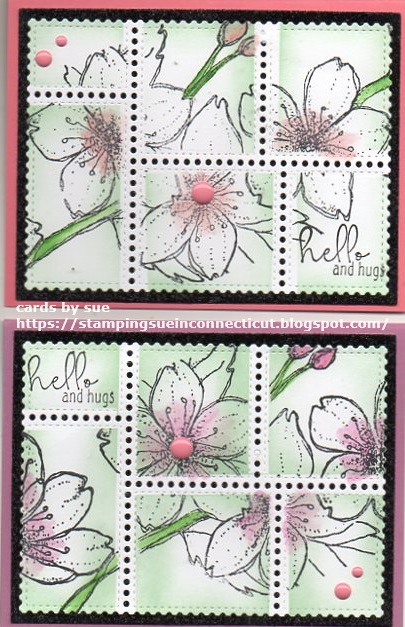
Having a play with Waffle Flower postage die.

stamps used:  Unity stamp co. Sakura stamp set

This is a big stamp so one stamping, and it fills the postage stamp spots. I did masked off the sections with 1/4" strips of post it notes. I colored the flower in with Altenew stamp co. woodless watercolor pencils.  I am really liking them ... think they are going to be my new go to coloring medium.

stamps used:  Altenew stamp co. floral minimalism stamp set

The images in this stamp set filled in the postage stamp spots without any masking.  Used my favorite go to ink from Catherine Pooler stamp co.

Will be adding the Sakura cards to Unity facebook show and tell page.

Thank you for stopping by.  Come back soon.

***not affiliated with the above companies ... just a happy customer***


Sunday, March 24, 2024

More Butterfly split negatives

 More Butterfly split negatives

I tell you, I just can't get enough of this split negative technique.  This Seraphim wings stamp from Unity stamp co. just works so well with this technique.

stamp/supplies used:  Unity Seraphim wings, Catherine Pooler inks

Instructions:

1.  Cut one piece of white cardstock and one piece of colored cardstock the same size. 

2.  Place cardstock in Misti stamping positioner.  Stamp butterfly with color inks on white cardstock.  On colored cardstock use tone on tone color.

3.  Cut each stamped butterfly cards in half or a bit more or less.  You will have two pieces of stamped white card, and colored stamped card.  

4.  Add glue to a scrap piece of cardstock, then glue one of the pieces of cards with butterfly to half of it.  Match up the opposite butterfly to the one that is glued to the scrap piece of cardstock.  You should have a white card, and a colored card together to form the split negative image.

5. Next what I like to do is die cut out the split negative butterfly with a die shape.  In this case I used Unity stamp co. deckle edge rectangles die set.  

6.  Adhere split negative piece to A2 card.

As you can see I cannot stop making this type of card.  Maybe I should find another image.  What do you think?

I will be entering this card into Unity stamp co. challenge


Thank you for stopping by.  Come back soon.


Monday, March 4, 2024

4 Corners

 4 Corners

I call this technique 4 corners.  You might know a better name ... if so please leave a comment, and let me know.

stamps/stencils used: Gina K Designs Zinnia stencil set, Penny Black Friend builder sayings, Catherine Pooler inks

This is a fun technique where you cut a full sheet of 8 1/2 x 11 cardstock into 4 equal pieces. I have lots of pictures to show you today.

Here you can see the Zinnia stencil I used, and the cardstock cut into 4 pieces.
I used my Misti sticky mat to hold the 4 pieces of cardstock in place.  Next place the stencil on the center of all 4 pieces of cardstock.
Color in the stencil.  Once you separate the 4 pieces of cardstock you can see how the images is in the 4 corners ... hence my name for this technique.
Turn the cards so you have section of the cards with no image in the center.  Place the stencil again in the center of the 4 pieces of cardstock, and color.
Turn the 4 pieces of cardstock again, so there is empty section in the center.
Keep repeating the turning of the cardstocks until all sections (corners) of the cards are stenciled. 

If you click on pictures you can see that I numbered them in order of the stenciling.
When all the stenciling is done on all the corners of the cards, you can now add the extras.  I added the leaves to each card afterward. You can also see I used my favorite CP inks.
I die cut the stenciled cards to finish them.  Oh, did I tell you, with this technique you get 4 cards when you are done.
I first saw this technique on Jennifer McGuire you tube channel. It's fun, and as I mentioned you get FOUR cards when you are done!  

Thanks for stopping by.  Come back soon.


Monday, February 12, 2024

Decorative florals

 Decorative florals

Lately, I like to fool around with embossing folders. Here I used one of my favorites from Altenew stamp company, called Decorative Florals 3D embossing folder.

                    stamps/supplies used:  Altenew 3D Decorative florals embossing folder

I ran the 3D embossing folder thru my Big Kick (yes, I still have and use old Big Kick die cutting machine) on white cardstock.  These 3D embossing folders create wonderful pressed out images.  For this one I spot colored with my Catherine Pooler inks.  The little Hi was from an Altenew stamp set I have in my stash. I layered the embossed card onto a black layer, then onto a salmon colored A2 (4 1/4" x 5 1/2") card.  Simple, but I think effective, and unique card.

Thanks for stopping by.  Come back soon.
***not affiliated with any of above companies just satisfied customer***


Monday, December 25, 2023

Pine Forest

 Pine Forest

I would like to wish everyone a Merry Christmas!

Now onto the Pine Forests!  

stamps/supplies used:  Altenew stamp co. Pine Forest embossing folder/stencil set, Catherine Pooler ink pads

I am having so much fun with this embossing folder, and color layering stencil set.  Wish you could see the dimension of the trees from the embossing folder, and then the coloring, that the layering stencils bring to these cards.  For the first card I did a normal green color for the trees, but then I went off the grid with red, purple, and aqua colors. 

With those same off the grid colors I did another card on white card.  On the kraft card the colors are a bit muted, but go to the white card, and WOW those colors really pop!

From cards to tags.  With the tags, I just used the layering stencils to use up the ink left on the blending brushes.  You will be seeing more from this embossing folder/stencil set soon.

Thanks for stopping by.  Come back soon.


Tuesday, December 12, 2023

Layered Dahlia

 Layered Dahlia

I've had this Layered Dahlia stencil for a while, but this is my first attempt at using it.

supplies used: Layered Dahlia stencil by Altenew and saying by Altenew stamp co.

This is a full size stencil ... I mean it fits the front of an A2 card.

I'm using a new scanner so please let me know if the size is acceptable.
I used Catherine Pooler inks for these two cards.  Not sure I like the burgundy and aqua colored one, but I do like the monochromatic blue one.  What do you think?
Thanks for stopping by.  Come back again soon.