My stamping adventures

Showing posts with label masking. Show all posts

Sunday, September 13, 2020

Googly eyes!

Googly eyes!

This is my September card swap card for my local creative card crew group.  The theme was googly eyes!  so I decided to go Halloween with googly eye bats.

stamps used:  Stampin' Up

basic instructions:
1.   Reverse mask a circle to create a bright moon which was colored with yellow and orange inks.
2.  blend gray and black ink around the edges of the card to give it that gloomy Halloween effect.
3.  stamp two bats over the moon.
4.  punch out third bat and adhere to card and glue googly eyes.
5.  stamp cloudy texture image a couple of times with gray ink.
6.  stamp saying in black and add more googly eyes.
7.  layer stamped card to black layer then to yellow card.
If you would like to see more reverse masked, or masking techniques I have done, just type masking techniques in the search bar on the side of my blog.
Thank you for stopping by and come back again soon.  all comments welcomed.

Tuesday, August 25, 2020

July/August Moon swap


July and August Moon swap

July is Buck Moon
basic instructions:
1.  masked off a circle to create a moon.  blended some gray inks to color the moon.
2.  around the moon I blended blues.
3.  stamped the buck/deer over the moon with black ink.
4.  stamped leaves around the edge with blue and white ink.
For more masking ideas look here, a different style of masking, ripping paper masking, yet, another masking idea.  there are lots of way to masking ... you can type masking in my search bar to see them all ... remember to click next post at the bottom of the post to see more.

 stamps used:  Hot Potatoes, Rubber Moon and Stampin' Up


August Sturgeon Moon
basic instructions:
Grid technique
1.  masked off sections with post it notes.  stippled some color off the edge of the post it note.
2.  after done stippling color I masked off one section at a time and stamped an image inside the section.
For grid ideas look here for faux grid technique with a video, basic grid technique with video.  You can type grid technique in search bar to find more.

stamps used:  Stampin' Up and Rubber moon 

Above are the Sturgeon grid card before I made them into full cards.  As you can see I did them in all different colors.

Thank you for stopping by and come back again soon.  When you watch my videos please give them a thumbs up to show you like them.  comment here on my blog anytime.

Monday, May 4, 2020

Get Well - Thinking of you

Stamps used:  MFP butterfly and sayings
Impression Obession Damask Floral
Me & Carrie Lou Queen's Ann flower

I like to make cards and send bunches to family or friends.  These cards are a part of a group that are going to a family member who asked for some cards, and I'm happy to oblige.  I am a die heart stamper!  

For the butterfly cards I got out some old ink pads, that I haven't used for years!  AND they are still juicy and ink up well!  They are called Encore ink pads ... not even sure if they are still made but if they are and you see them ... pick up a few ... they are great metallic colors.
For the two big flowers they were stamped with black ink over a masked blended oval.  To create the blended oval I cut out a piece of masking paper, then laid it on white card.  Blend in the colors in the open section, then remove the masking paper to reveal the blended oval.  Next, I stamped the flower over the blended oval with black ink.

You can see the other cards in the group here in this post.   
Thanks for stopping by.  come back again soon.

Sunday, May 19, 2019

Mask away!

stamps used:  Unity stamp co. 

This is a fun and simple technique but effective!  Saw this done on Unity facebook live with Angela where she brought back an oldie technique .... masking.
Basic instructions:
1.  stamp image with colored ink.
2.  cut out a mask and place over image.
3.  blend a lighter color over masked image with any tool you have available.  ex.: stipple brushes, sponges, blending tool or cosmetic brushes (picket fence or any brand). 
4.  remove mask to reveal the fun!
5.  add saying and any embellishments.
Not sure if you can see in my picture but I added white Nuvo drops and the color from the blended ink bled into the dots .... but I like it!  the dots became tinted by the ink color.

thanks for stopping by.  come back again soon.

Monday, February 20, 2017

Art Journal adventure - text underneath

This is my layout for text underneath.  I did it this way because before I used the masks and added the black paint it was just too busy for me ... but now I like it.  You can still see the stamped words underneath in the masked areas and a little under the black paint to.....that is in person you can see through the black paint.  this week the prompt is all about time so guess I'll think about it a little then jump in!

Saturday, August 20, 2016

seahorses

Seahorses look graceful ... don't know if they are or not but they are unique creatures of the sea.  for this card ... no you're not see double there are two cards but both the same ... I did a reverse mask ... sponge in some colors.  you are asking why those colors ... well ... these colors came to me while I was having dental work done.  at the dentist she gives me "shades" to wear so the over head light isn't so bright ... during the procedure my eyes teared a little and when I looked at the light these are the colors I saw ... purple, orange and yellow so I thought why not make a card so I did a couple of days later.  now back to the card, after sponging the colors I did a little stamping with the same color inks inside the circle.  also stamped the seahorse with black ink inside the circle with the mask in place then removed the mask and stamped more seahorses.  stamped the sea kelp ... added a few crystals for bubbles ... layered stamped piece on lavender note card.
visit Just For Fun Rubber Stamps blog for stamp details and don't forget to enter JFF August beach challenge to win gift certificate.

Saturday, October 17, 2015

Beware of bats

This is another card did in my private class last week.  used a reverse mask for the circle, colored it in with Ranger distress ink because it reacts with water for the spots.  To see how I made our own hand cut banners check out my you tube channel here  or click on tab up above or in left side bar here on my blog.  Please go to Just For Fun Rubber Stamps post for more details and there will be more samples, too.

stamps used:  beware, hanging bat, lg., hanging bat, sm.,


Thursday, October 8, 2015

Fun at class


 Had a small private class the other night and we had lots of fun making a couple of Halloween cards and more.   used Ranger blending tool a lot along with sponges to do colorful backgrounds.  Colored a big orange moon with a reverse mask then dropped water on it for great looking spots on the moon.  You see Ranger distress inks react to water in wonderful ways.  
         

Wednesday, September 23, 2015

MFPStamps Everything Fall Blog Hop day #2

WELCOME TO MFP STAMP SHOP


EVERYTHING FALL BLOG HOP

JOIN US EACH DAY, SEPT. 22-25 FOR AUTUMN TIME FUN. WE'LL HAVE  TUTORIALS AND DT INSPIRATION. THERE WILL BE PRIZES FOR LEAVING COMMENTS ON THE DESIGN TEAM'S BLOGS AND PRIZES FOR TRYING OUR TUTORIALS.  YOU WILL HAVE 2 WEEKS TO ADD YOUR PROJECT to the SEPT 25 POST FOR US TO SEE SO THERE IS NO EXCUSE NOT TO JOIN IN THE FUN. 

Please
Hop along with us!! 

 You could win one of the MFP Stamp Shop FALL STAMP SETS Just comment on the following blogs ( don't forget this one ) each
day for more chances to win! ( You do NOT need to comment on on all the
blogs each day! The names are drawn randomly.) Try one of the tutorials shown during the Hop and add your photo to the Inlinkz at the bottom of the post. The winners will be
announced on Oct. 10, 2015 right here on the MFP Stamp Shop Blog. You can
go back and comment if you missed a day. ( HINT: The more you comment
the more chances you have to win. And comments on the MFP blog count
twice. ) The deadline for commenting and posting pics of your projects is Friday Oct. 9, 2015 at 10:00 PM
EST.

Tutorials
SEPT. 22- MAKING ATC CARDS
SEPT. 24- MAKING FALL DP
This is my last blog hop with MFPStamps as I'm stepping down from their design team after the September hop.  It has been a fun ride!  Now on with the hop.
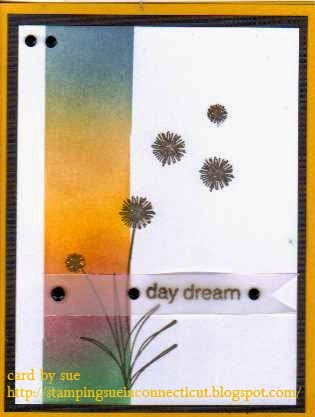
This month I will be showcasing ATC's which are Artist Trading Cards.....miniature works of art.
 
Autumn is Nature's (blue atc) - I sponged a stencil background, stamped the leaves (did some masking), added some silver cord, stamped saying and cut it out with a punch.
Fox - again used a stencil for background, stamped image on vellum and attached with brads.
Happy Fall - used same stencil as on the Fox atc, stamp small pumpkin with cat (masking), stamped saying and cut out with punch, added a couple of self-sticking crystals to finish.
MFPStamps Autumn Glory


Let's get started !!
Here's the Design Team

Lois  
Pam
Enjoy the Hop. Come back each day for more Fall Time fun. We hope to inspire you to start your own Fall projects.  Get to work on the tutorials, show us what you made by Oct. 9 and check back on Oct. 10, 2015 to see if you are a winner. 

Saturday, July 19, 2014

day dream

this is a simple card for me but the more I look at it the more I like it.  sometimes simple is good.  masked off the strip with post-notes then blended distress inks with blending tool.  stamped a dandelion flower image or what my father used to call wish flowers when we were kids.  blow on the flower that went to seed, make a wish and watch your wishes fly off into the sky.  don't know if you can see it in photo but I added stickles to the flowers for some shimmer.  stamp and emboss saying on vellum that I cut into a flag/banner and attach it to card.

enter in the following challenge:
1.  Unity stamp co. challenge - wish with your heart
2.  SweetStamps blog challenge - parchment and anything goes
3.  Love to Scrap! challenge - anything goes
4.  Fashionable stamping challenge - dreaming of summer

card details:
stamps - Unity Stamp co.
inks - Ranger distress
vellum
black self sticking gems
post-it notes


Tuesday, June 24, 2014

summer fun or maybe it was spring

I did a private class back in May with a great bunch of gals making a couple (of what I call easy cards) easy cards and a couple others that take a little more time and effort.  But I know we all had fun!  You see with the bird card we masked off the bird then sponged on some color.  The life is a sea card is a gel card.  You can see tutorial here that I did for Mark's Finest Papers and Stamps .  the
gel card is one of those cards that does take a little more time to create but it
is also a card that will have your friends saying, "how did you do that?" and that is always fun!  The frog card is just so cute and look at all that fringey goodness.  that was done with one of those fringe scissors.  I'll leave here today with a photo showing the fun we had creating these cards.
bird card details:
stamps by Mark's Finest Papers a Heinrich Co. Home Page
inks - Ranger Adirondack dye ink pads
gel card details:
stamps by Rubbernecker
little ziplock baggies found at craft store
spellbinders circle nestabilities
frog card details:
stamps by Mark's Finest Papers a Heinrich Co. Home Page
spellbinders oval and circle nestabilities
fringe scissors
Prisma color pencils

Saturday, April 5, 2014

Frances is coming

Here's a preview look at Frances from Mark's Finest Papers and Stamps which will be available during our blog hop on April 15th.  Frances is in addition to our already Paper Doll series with new clothes to dress up Frances.  I stamped her outfit then masked it and stamped Frances and made a bookmark tag. Did coloring with my favorite medium...Prisma color pencils.   come back during our hop and comment for a chance to win one of the new releases for April.

entering in the following challenge:
1.  Mark's Finest Papers and stamps blog - use vellum
2.  Divas by design - anything goes

Thursday, September 26, 2013

Pigs in the air

 This is just a fun card! don't you think?  to start it's an easel card which we all know is one of my favorite type of cards.  check out the pigs...they are paper pieced with some fall color paisley decorative paper.  I taped a couple of punched out scallop circles to make a template to sponge clouds all over the card.  Have no idea why I put the pig in the circle sun....just did it.  wrapped some ribbon around the card for some interest and stamped the house with the trees masked behind it.  Please go to Simple Salutations #64 challenge and join in the paper piecing challenge if you have time.
card detail:
stamps - MFPaHC primative farm stamp set
ribbon by SU
decorative paper for paper piecing

entering in the following challenges:
1.  Rogue Redhead Designs blog - autumn colors
2.  Simon Wednesday Challenge blog - anything goes
3.  Friends of Speedy TV Challenge 91 – animals
4.  Fashionable Stamping Challenges - autumn colors

Saturday, August 17, 2013

Mask it!

Here is my rendition of TH August tag of course didn't have all the same stamps or products but still had fun creating mine.  technique this month was basically to do masking which is one of my top five to do techniques.  besides masking the theme was travel so since I don't have a plane or such I used the old fashion card.  this car always reminds of a gangsters car....I watch too many old black and white movies. lol! 

entering in following challenge:
1.  TH August tag - masking with travel theme

Wednesday, July 31, 2013

Simple Salutations 56 - Faux Tearing

This week at Simple Salutations I'd like to see what you do with a technique I call Faux Tearing .... you can see my tutorial here .  It's basically a masking technique with post it notes.  I like to say it's a simple technique with a wow factor.  hope you think so, too and play along with us this week at Simple Salutations 56 .  Please check out my fellow design team members On The Fringe - Vickie Yeakley and Live Laugh Scrap with Steph Ackerman .  Remember you can't win unless you play.

Tuesday, July 30, 2013

Faux tearing tutorial

Here is a tutorial I did for Simple Salutations #56 coming up tomorrow 7/31/13 so please check out my tutorial and think about joining our challenge.  This tutorial is being featured on Mark's Finest Papers a Heinrich Co. blog today.

FAUX TEARING TECHNIQUE
A fun technique that uses ordinary post-it notes to create a fun and easy layer.


Supplies:
Post-it notes
Stipple brushes
Stamps – MFPaHC Wealthy Fish
Inks – Ranger Adirondack stonewash, denim & lettuce


Instructions:

1. Rip post-notes and stick to 5 x 3 ¾” cream cardstock.
2. Stipple Adirondack stonewash ink inside the ripped post-it notes…about halfway across.
3. Stipple Adirondack denim inside ripped post-it notes the rest of the way across card.
4. With the ripped post-it notes still in place stamp the fish once with Adirondack denim ink then remove post-notes and stamp the fish one more time.
5. Stamp the bamboo with Adirondack lettuce ink in the middle of the two stamped fish.
6. Stamp saying with same denim ink in the top left corner.
7. Outline the edge of the stamped card with Marvy oriental blue marker then layer onto 5 ¼ “ x 4 cream cardstock.
8. Layer stamped card onto navy blue top fold note card.
9. Stamp bamboo with lettuce ink on inside 5 ¼ “ x 4 cream card then layer inside navy blue top fold card.


Wednesday, July 17, 2013

Simple Salutations #54 - Holiday in July!

It's Wednesday so you know what that means it's time for another challenge over at Speedy TV which is a free place to join in on all MFPaHC challenges.  I'm hosting the challenges for Simple Salutations through September so I hope you will stop by and join in this week here for Simple Salutations #54 if you can.  The theme this week is Holiday Time in Julyyou get to choose whatever holiday you like to create cards for example Christmas, Thanksgiving or Halloween.  I bet my friends thought I would pick Halloween because that is my favorite card making time but I didn't I did Christmas because I happened to have some of those stamps out on my table.....soooooooooo....it was convenient to do but maybe I'll will make a couple of Halloween and throw them out sometime this month.  you never know what the mood will inspire.  Now for my card I did a few technique from the past.  First I punched out a circle and used the negative for a mask, used my stipple brushes to color in the circle.  Remove the mask then stamped the cardinal on the present with black ink over the red circle.  Stamped saying on the top left of the card then looked at the card and it was just too plain for me so I edged with Krylon gold leafing pen but still too plain for me sooooooooooooooo .............. found old wire topped stick tool (never could remember
what it was called---see pic.) and rubbed the Krylon gold leafing pen on it then quickly punched it all over the card.  Layer stamped card onto black card and red note card then punch out two black photo corners to layer on top of all the layers to finish off my card.  enjoy our Holiday Time in July! this week and join in if you are so inclined.
card details:
stamps - MFPaHC Presents stamp set
photo corner paper punch
Krylon gold leafing pen
wire topped stick tool

Tuesday, June 18, 2013

Faux layers tutorial

I'm the featured designer today over on Mark's Finest Papers a Heinrich Co. blog with my tutorial on Faux Layers.  You see it anytime by clicking on icon in my side bar.
This is a fun faux tearing masking technique that is easy and makes a great background.
Stamps:
Mark’s Finest Papers & Stamps, a Heinrich co. – Firefighter stamp set
Supplies:
Masking Magic or post it notes can be used
Double stick tape & foam mounting tape
Ranger blending tool or sponges
Inks:
VersaFine Onyx Black ink pad
Distress ink pads – tattered rose, worn lipstick, festive berries


Instructions:
1.  Cut red cardstock in half lengthwise (4 ¼ “ x 11) to create a top folding card.
2.  Cut black cardstock at 4” x 5 ¼ “.  Tape to front of red top folded card.
3.  On white cardstock  3 ¾ “ x 5” place strips of Masking Magic that is ripped to various sizes.


4.  With blending tool or sponge add first color to masked card stock which in this case is tattered rose.  After tattered rose add worn lipstick and last festive berries.
5.  When card stock is colored to desired likeness remove the strips of Masking Magic to reveal the magic of the faux teared sections.


6.  With VersaFine (or any dye black ink) stamp images on faux layered card.
7.  Tape stamped card to note card.
8.  Stamp saying on piece of white cardstock.  Cut to create a flag shape.  Mount saying flag to card with foam mounting tape.
9.  Here's the completed card.


Friday, May 17, 2013

MFP May blog hop day 4 - Now Showing

***if you are here for Simple Salutaions challenge, please click here ***
May Blog Hop! 
This month's New Stamp Set Releases are
Featured May 14th   Marsh Birds
Featured May 15th   In Tents
Featured May 16th   Space Fun
Featured May 17th   Now Showing
Please hop along with us! You have a chance to win one of the above stamp sets! Just comment on the following blogs (don't forget this one), each day for more chances to win! (You do NOT have to comment on all the blogs each day! The names are drawn randomly!) All four winners will be announced on May 18,2013 on the Mark's Finest Papers blog. You can go back and comment if you missed a day. (HINT: The more you comment, the more chances you have to win and comments on the MFP blog count twice!) The deadline for commenting is 11PM EST on Friday May 17,2013.


The special stamp set we have for you this month is:
"Marsh Silhouettes"


The mini stamp set we have for you this month is
"Lilly of the Valley"                                          


 I want to tell you what technique I will be showcasing for the May blog hop ..... drum roll...pppprumppadumadum....faux layers and masking sections.  sorry don't know the fancy names that have been given to this technique but I'm sure you will know once you see my cards. 
Now showing is full of movie theater related theme images and sayings.
Did the faux layers, mounted the film strip with foam tape and added some twine.  Do like all the red and yellow on these two cards.  My second card is full of yummy buttery popcorn! one of my favorite snack foods.  Hope you can see the dimension in the popcorn and also added diamond glaze for that real butter effect.
Please continue on to Janine's  blog to see what she has in store for you.  Don't forget to leave comments along your journey for a chance to be included in our drawing.  Thank you for joining us this week.
Patty P.
Pam 
Toni 
 Shirley Q 
Marks Finest Papers, a Heinrich Co 

Thursday, May 16, 2013

MFP May blog hop day 3 - Space Fun

May Blog Hop! 
This month's New Stamp Set Releases are
Featured May 14th   Marsh Birds
Featured May 15th   In Tents
Featured May 16th   Space Fun
Featured May 17th   Now Showing

Please hop along with us! You have a chance to win one of the above stamp sets! Just comment on the following blogs (don't forget this one), each day for more chances to win! (You do NOT have to comment on all the blogs each day! The names are drawn randomly!) All four winners will be announced on May 18,2013 on the Mark's Finest Papers blog. You can go back and comment if you missed a day. (HINT: The more you comment, the more chances you have to win and comments on the MFP blog count twice!) The deadline for commenting is 11PM EST on Friday May 17,2013.


The special stamp set we have for you this month is:
"Marsh Silhouettes"


The mini stamp set we have for you this month is
"Lilly of the Valley"                                          


 I want to tell you what technique I will be showcasing for the May blog hop ..... drum roll...pppprumppadumadum....faux layers and masking sections.  sorry don't know the fancy names that have been given to this technique but I'm sure you will know once you see my cards. 
Space Fun is just what it's name says.....FUN!  so let's jump right into outer space to see my cards. 

This card is full of fun starting with the faux masking layers then with the punched out corners and that saying.....is just pure fun!  Now my next card is again doing that same faux masking layer but this time I punched out where the saying goes then taped it to the inside of the card.  I hope you can see all the water spots in the photos because I just love them.
Please continue on to Janine's  blog to see what she has in store for you.  Don't forget to leave comments along your journey for a chance to be included in our drawing.  see you tomorrow.
Patty P.
Lois
Pam 
Toni