My stamping adventures

Showing posts with label fussy cut. Show all posts

Saturday, July 22, 2023

Peony stencil

 Peony Stencil

stencil used:  Hero Arts Artisitic Peony stencil & what's up. SU Happy birthday saying

This is what I call a full line art stencil.  It fits the front of an A2 card.  Basically, I blended different colors through the stencil.  On the card in the center, I blended color through the stencil...cut it out with a deckle die, and layered onto a die cut black card.  Next, I again blended colors through the stencil, then fussy cut out the biggest peony from the stencil.  Mounted the cut out peony onto card.

More cards with the same stencil, and stamped various sayings on the panel with black ink.  Tied ribbon around panel, and layered all onto A2 card.

Thanks for stopping by.  Come back again soon.  Comments always welcomed.


Friday, May 12, 2023

Seashells

 Seashells

Weather is warming up so thinking of the seashore.

used:  SU Seashell 3D EF

This is a simple card for me, because only used minimal supplies.  Also got out cream and kraft cardstock.  I hardly ever use cream cardstock.  Thinking of seashore made me think of sand, soooooo why not use cream cardstock.

First I ran cream cardstock through my Big Kick, with 3D embossing folder.  I do like 3D embossing folders ... they just make cardstock pop.  Here's a tip when using a 3D embossing folder ... give the cardstock a quick spritz of water to soften it a little.  Most of the time, if you do this, the 3D EF will not crack the fibers of the cardstock.  Next edged it a little with light brown ink.  If you noticed there are a couple of cut out shells mounted on the embossed card.  For this all you need to do is run a second cardstock through your machine with the 3D EF.  I had a die cut birthday (not sure of the company for birthday die) die out and glued that to embossed card.  Adhere embossed card to A2 kraft card.  Simple card but effective.  Don't you think?

Thanks for stopping by.  Come back again soon.

***not affiliated with above company just happy customer***


Thursday, May 4, 2023

Seashore

 Seashore

Just wanted to do some mixed media on this card.

stamps/embossing folders/dies used:  SU Sea of Textures stamp/die set, SU Seashell 3D EF, Unity sending hugs die

Started by running seashell 3D embossing folder through my Big Kick (any machine would work) with a white card.  Inked the edge a little with some blue ink, just so it would stand out more.  Had strips of pattern paper, so why not add them.  Die cut the net with vellum ... dotted the vellum piece with glue, and added to card.  Next die cut the octopus with gold cardstock, and mounted him with foam mounting tape to card over vellum net.  The die cut sending hugs was layered onto scrap of vellum, then fussy cut.  Adhered this piece to top folded white A2 card.

Thanks for stopping by.  Come back again soon.  Leave me a comment on what you think.  Do you like mixed media or not?

***not affiliated with above companies just a happy customer***


Wednesday, April 26, 2023

Modern circles

 Modern circles

This Modern circles is a stencil.  

stamps/stencil used:  Altenew Hello and Hugs stamp set, Modern circles stencil

The best thing about this stencil is you can rotate it around to match up the half circles.  

On the close up you can see where I matched up the half circles.  They don't match up totally, but leaves a space between the halves.  I do like the way it looks when matched up.  For these cards I first placed the stencil on a black card, then added gold embossing paste.  Of course, now I had to set the cards aside to dry.  I let them dry overnight, just because I went and did some laundry.  So now the next day I put the stencil back down on the card.  I thought it would be fun to add white, so again I had to let it dry before doing anything else.  Crazy, huh?  Just couldn't leave well enough alone had to do a second ink that needed to dry before continuing.  Anyway ... back to the card ... next I cut down the stenciled piece, layered onto white card just slightly bigger.  Added that piece to another black card about an 1/8" bigger.  Yes, I like layers.  Wrapped the gold sparkle ribbon around the layered piece, then added to top folding A2 card.  Stamped the hugs, and fussy cut that out before adhering to card.

Thanks for stopping by.  Come back again soon.  Leave a comment and let me know what you think.

***not affiliated with above company...just happy customer***


Friday, June 25, 2021

Medical Rescue

Medical Rescue


Today is my last Friday to guest blog for Blue Knight rubber stamps and it has been a pleasure.  I will be featuring the Medical Rescue stamp set in this post. I would like to thank all Medical Rescue and all Medical personal for your service.

card #1 stamps used:  Blue Knight Medical Rescue stamp set

card #1 basic instructions:

1.  stamp medical emblem randomly with grey ink on white layer.

2.  stamp medical person with black ink and heat emboss.  add color to face and glasses with color pencils.

3.  fussy cut out the medical person and mount to background card with foam mounting tape.

4.  adhere stamped layer with medical person to black layer then to white card.


card #2 basic instructions:

1.  stamp medical person with black ink.

2.  die cut with wonky rectangle die.

3.  adhere die cut layer to red layer and then to white card.

4.  stamp medical emblem with red ink and fussy cut.

5.  mount red medical emblem to card with foam mounting tape.

I hope you have enjoyed what I showed you on these Fridays in June.

Visit Blue Knight blog and

Fans of Blue Knight Rubber Stamps (Facebook group) is HERE
and
Blue Knight Rubber Stamps YouTube Channel is HERE to see more inspiration.
Thank you for stopping by.  come back again soon.


Friday, March 13, 2020

A cup of thanks


stamps used:  SU Tea Shoppe
Banner dies by Gina Marie Designs
DSP by SU

Green card is what I call a basic card.  Butterscotch card is a step up from a basic card.
Green card:
1.  Die cut green banner then in smaller banner die cut DSP.  Tie ribbon around banners then adhere to cream card.
2.  Stamp and fussy cut tea cup and mount with foam mounting tape to card over banners.

Butterscotch card:
1.  repeat step 1 from green card except use butterscotch colors.
2.  run a separate piece of cream card, through Big Kick (or whatever machine you own) with dotted embossing folder.
3.  adhere embossed piece to cream note card
4.   repeat step 2 from green card but again in butterscotch colors.
5.  stamp image onto cream envelope.

The stepped up version of this card is for my local card swapping group for March.
thanks for stopping by.  come back again soon.


Tuesday, December 24, 2019

Merry Christmas!

Merry Christmas to all and to all a good night!

 stamps used:  zetti MFT, train SU
Zetti is white card with embossing folder background and cut out snow drifts.  
Train is what I call a faux layer card.  You can see some faux layer cards I made back in 2014 here in this post.  Here is a post that goes back even more ... guess I like doing this technique.
 stamps used:  deer SU
Here with this deer image I did a gate fold card.  Check out this gate fold card here , here what was called a peek-a-boo gate fold card.
 stamps used:  caroling-wonderful-cups Unity stamp co.
Cup card has pattern paper for background drop and the cups are fussy cut and mounted on card.
Caroling snowmen and sleigh are triple time stamping cards.  Triple time and double time stamping cards are a favorite of mine, you can see more triple time stamping here.  How about checking out this post with Twisted triple time stamping.   In this post you will see double time stamping.
 stamps used:  mr.&mrs.Santa cuddlebug Unity stamp co.
Mr. & Mrs. Santa are adorable cuddlebug stamps which if you know me I like and have a bunch of them.  This style card is a double z-fold card.  In this post you can see z-fold card and more fun folds!  
As you can see I like to do lots of designs when I have to make over 30 cards.  Guess that is enough for today.
Merry Christmas! and to all a good night!!!
Thank you for stopping by.  come back again soon.

Friday, October 25, 2019

Summer ATC's

stamps used:  Unity stamp co.

I know summer is over here in Connecticut but we can still celebrate it with our stamps.

Slow down & Enjoy life

This ATC (artist trading card) is simply stamped with pink inks for the flowers and black ink for the saying.

Happy Summer

I ripped some pattern paper with text on it and adhered it to the bottom of the ATC.  The leaf is stamped with green ink on separate piece of white cardstock and fussy cut.  Happy summer was stamped with black ink onto the leaf and then I just doodled the lines above and below the saying for the fun of it.  The leaf is mounted on the ATC with foam mounting tape and it's done.
Sometimes you just want the ATC to be a simple work of art without any inked backgrounds or elaborate embellishments.

Thank you for stopping by.  Come back again soon.

Sunday, July 1, 2018

MIUCB #15 - AG & Mixed media

My first challenge as a design team member of Mix It Up Challenge Blog (MIUCB)
MIUCB #15 - July 2018
AG (anything goes) & mixed media

stamps used:  Brutus/Monroe create a cameo stamp set
stencils used:  dylusions, crafter's workshop
inks:  distress
There is a lot going on in these two cards because it is mixed media and I went to town with different techniques.  The background is a technique called layered backgrounds ..... here is a video showing the technique.  on top of the backgrounds I did a little more mixed media using stencils and embossing paste.  while the embossing paste was still wet I sprinkled glitter on it.  stamped the images and fussy cut then layered onto card and added some stickles for sparkles.  The card with the three heads is on a wobble so when you flick it ... it wobbles and shakes.  
Please join in this challenge over at Mix It Up blog ...  you have the whole month of July to enter.

Wednesday, May 2, 2018

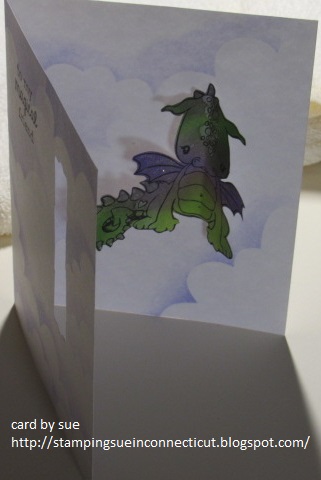
Magical dragon

POP OUT Dragon card


 stamps used:  Unity stamp co.
supplies used:  All Night Media cloud stencil, SU punch, stickles (on wings), Nuvo glitter pen (on tail)
distress inks
Measurements:
base - A2 note card  8 1/2" x 5 1/2"  folded in half to create note card
Directions:
1.  Place stencil on front of note card and sponge color over it to create cloud background.
2.  stamp saying with black ink.
3.  punch hole in front of card with SU punch.  If you don't have a punch you can use a die or go old school with a craft knife and metal ruler.
4.  stamp and color image (dragon) on separate white cardstock and fussy cut it out.
5.  fold image in half.  add a piece of double stick tape to back of piece where it is folded.  
6.  close the card and place the folded image with tape in the punched out section.  this will adhere the image to the inside of the card.
7.  lay the image flat on the front of the card then when you open the card the image ... in this case the dragon will magically be on the inside of the card!
thank you for visiting.  come back again soon.  leave a comment to let me know what you think.

Sunday, March 11, 2018

Caterpillar white out

stamps used:  Unity stamp co.
supplies used:  white pigment ink, white embossing powder, stencil
1.  on colored cardstock place stencil and ink with same color ink.  In this case I used purple and green inks a shade or so lighter than the cardstock.
2. rotate the stencil 180 degrees then ink through it with white pigment ink.  remove stencil and allow to dry.
3.  after stenciled piece is dry cut in any fashion you wish and adhere to note card.
4.  stamp and emboss caterpillar image with white pigment ink and white embossing powder.  
5.  color in the caterpillar with white pigment ink that I squeezed onto my craft mat from re-inker bottle.  add a little water to create a white wash then paint it onto the caterpillar image.
6.  fussy cut the caterpillar and mount onto note card.
7.  white emboss saying onto the note card to finish.

Tuesday, February 13, 2018

Marvelous whale

stamps used:  Unity stamps
Last card with this background technique (in shades of grey) which, you can see more information on my posts here here and here.  Basically I stamped and embossed the bubbles with white pigment ink and white embossing powder.  next I blended distress hickory smoke and black soot inks over the embossed bubbles.  After that I stamped the little cluster of flowers with white pigment ink for more interest on the background then I die cut it out with a circle die.  Adhered the background circle to white note card, stamped and fussy cut the whale then mounted to card.  stamped saying and punched out with a label punch and adhered to note card.  I like this technique!  will be doing it more but next time with colors ... colors soon to come.

Sunday, February 11, 2018

bowl of comfort


stamps used:  Unity stamps

Yet another blended black background with white pigment ink and over stamping.  This one is a get well card with the set of bowls stamped, fussy cut then adhered to note card.  I stamped bowls again and fussy cut the center bowls and mounted them on top of row of bowls.
see more about this technique on my posts here and here.  

Friday, February 9, 2018

beautiful flower

stamps used:  Unity stamps
For this card I made a background that I saw on Jennifer McGuire's post where you stamp an image or big background stamp with white pigment ink and let it dry.  I stamped the big dragonfly with white pigment ink and after it dried overnight I blended on distress black soot ink.  I over stamped the cloud with same white pigment ink (although in photo it looks blue) and flower burst with black ink.  I then die cut the background with circle die and adhered it to white note card.  stamped the stem with black ink on the note card over the circle background then stamped and fussy cut flowers out and adhered to note card.  used a embossing powder puff then stamped saying with white pigment ink then embossed with white embossing powder.
I like the way this card came out.
You can another sample of this technique using embossing ink and powder in this post.  please come back soon to see more with this technique.

Wednesday, February 7, 2018

Hello friend

stamps used:  Unity Stamps
I did a fun technique from Jennifer McGuire's post where you stamp in white ink, let it dry then over stamp with same white pigment ink and/or dye ink.  on my piece I stamped and white embossed the bubbles then blended distress hickory smoke ink ... after that I over stamped the little flower cluster with white pigment ink.  After all that I die cut out a circle cutting off the side and bottom just for fun.  adhered cut out circle shape onto white note card ... stamped mermaid on separate piece of white cardstock and fussy cut her out then mounted to card.  hard to see in photo but I added some shimmer with my shimmer pen then stamped saying with black ink.

Tuesday, November 7, 2017

Art Journal wk #36 Wing It and #37 Trash to treasure

week #36 (left side) Wing It
stamps used:  Joggles bird, MFP wings/sayings
week #37 (right side) Trash to treasure
I have been very bad with sharing my art journal pages from the weekly challenge I am participating in for the year.  So it is time to start playing catch up here.
wk #36 Wing It page
first I stamped the wings with grey ink a few times on the page.  blended some color with distress inks on separate piece of cardstock and over stamp the wings on it.  fussy cut the wings and adhered to the page.  stamped bird on separate piece of cardstock, added some color with blending tool and distress inks.  stamped the bird a second time on some pattern paper and did some paper piecing.  set her (the bird) aside stamped bigger wings on some of the left over cardstock I blended distress ink on to and fussy cut the big wings out and adhered to page.  adhered bird over the big wings.  stamped a couple of the sayings on the page and called it a day for this page.
wk #37 Trash to treasure
Now for this page I did all die cuts I had left over from other projects.  simple but to the point.
I have a small plastic container on my table with left over pieces ... whether they are die cuts, stamped images or whatever....and I have them in front of me so if I need it I have it.

Monday, July 10, 2017

Art journal adventure wk#26 Mystery

stamps used:  Bartholomew's Ink
week #26 theme is Mystery!
whenever I hear the theme mystery ... I go directly to my drawer full of Bart's Ink stamps! Unfortunately, they are no longer in business so can't get new ones but I do own a few.  I am working a small journal so stamping directly is not possible sometimes and this is one of those times so ..... I stamped and did a little watercolor spot coloring on a separate piece of cardstock then fussy cut all the people.  the Baker street was stamped on grey cardstock and the caution was stamped on yellow cardstock.  if it was a bigger page there would be lots more but it was fun to bring these images back to life.