My stamping adventures

Showing posts with label ATC's. Show all posts

Sunday, June 16, 2024

ATC's with masterboard

 ATC's with masterboard

It's been a while since I have done ATC (artist trading card) so why not makes some.

What I did this time around is I created what is called a masterboard.  A masterboard is basically a full 8 1/2" x 11" cardstock stamped with different images.  
Then cut up the masterboard to create the ATC's.  Here is a cutting template for cutting a full 8 1/2" x 11" sheet.
ATC are 3 1/2" x 2 1/2" 
After cutting up the masterboard into ATC's you can add other items for more dimension.  For mine I stamped, and fussy cut the bird to mount onto the ATC.  Also added a strip of pattern paper for a little more interest.  The fun with making a stamped masterboard is you can use all different images...and...they will look great together.
You get 10 ATC's using the cutting template.

stamps/supplies used:
Blank Page Muse 
World map rubber stamp
Vintage postcard rubber stamp
Unicorn dreams clear stamp set by Donna Gray
Cyan paper pad by Pam Bray

Thanks for stopping by.  Come back again soon.


Tuesday, December 31, 2019

Snowman z-fold and ATC

stamps used:  SU

Here is another z-fold card I did with snowman for a fun December birthday cards.
This was a fun card I did quite a few times for 2019.  You can see more by going to my blog and typing in the search box:  z-fold.  Or here in this post  for a closer look.

stamps used:  Unity stamp co.

stamps used:  Unity stamp co.
Here are my last ATC's for 2019.


Hope you have enjoyed all my cards for 2019!  Come back next year which as we all know starts tomorrow but give me a few days to start posting for the new year.
Thank you!

Tuesday, December 10, 2019

November ATC's

Here are my November ATC's 

stamps used:  Unity stamp co.

For my November ATC's I kept them simple.  For the snowman one I stamped snowflakes in the background ... stamped the saying ... partial stamped the snowman on the bottom of the atc.

For the bells ATC's I stamped both the image and the saying with Delicata silver ink ... added a few Nuvo silver drops.

I have been in this Unity ATC's swap for at least a year ... most likely longer but I would have to actually go to my notebook where I keep them to see how long.  I will do that later and let you know.  Thanks for stopping by and please come back again soon.  comments are always welcome.

Thursday, October 31, 2019

Bat/orange slices ATC's


Happy Halloween!!!

stamps used:  Unity stamp co.

I kept these ATC's (artist trading cards) on the simple side ... not a lot of embellishments.

The Bat
Bat was stamped with black pigment ink and embossed with clear embossing powder.  I colored him in with a technique called White washing.  Basically you water down some white pigment re-inker then paint in the image.  Simple as that!

Orange
First layer pattern paper onto ATC.  Stamped the orange image onto different color cardstocks then layer one of the full orange slices onto the ATC.  Cut another orange slice in half and adhere it to the full slice.  Add a self sticking gem to center and some wink of stella, stamp saying and you are done.

Hope you enjoyed my ATC's.  come back again soon.

Friday, October 25, 2019

Summer ATC's

stamps used:  Unity stamp co.

I know summer is over here in Connecticut but we can still celebrate it with our stamps.

Slow down & Enjoy life

This ATC (artist trading card) is simply stamped with pink inks for the flowers and black ink for the saying.

Happy Summer

I ripped some pattern paper with text on it and adhered it to the bottom of the ATC.  The leaf is stamped with green ink on separate piece of white cardstock and fussy cut.  Happy summer was stamped with black ink onto the leaf and then I just doodled the lines above and below the saying for the fun of it.  The leaf is mounted on the ATC with foam mounting tape and it's done.
Sometimes you just want the ATC to be a simple work of art without any inked backgrounds or elaborate embellishments.

Thank you for stopping by.  Come back again soon.

Wednesday, July 24, 2019

ATC's (artist trading cards)

stamps used:  Unity stamp co.
ATC's for June and July swap

For June atc's
 I used the Unity cuddlebug Zebra which I think is adorable.  I stamped her in a dark purple ink but first I inked up a star stencil with a green ink, then overstamped the zebra on top of the stars. The saying is from the same cuddlebug Zebra stamp set which stamped in the same purple ink then fussy cut it out.  Next is just what I call collage stamping, that is where you choose several images ... then stamp with different color inks.  The saying was stamped onto a piece of vellum ... cut out then wrapped around stamped card and glued to the back.  Next I glued the stamped piece with the vellum strip to another piece of card the same size to hide the vellum and even secure it some more.

For July atc's
Background on butterfly atc is what we used to call Polished Stone years ago. 
 Polish stone technique: squeeze out all the AI (alcohol inks) colors onto felt on applicator. Squeeze just one drop of gold mixative onto the same felt on applicator. Mixatives go a long way, you only need one drop. Tap, tap, tap applicator with all the AI on it all over a piece of glossy cardstock. To blend colors add a couple of drops of AI blending solution and repeat the tapping. This will blend the colors and give you that polished stone effect.
Butterfly was stamped and fussy cut then adhered to the card on top of the polished stone background, gold doily and washi tapes.
Again for the next atc I did some more collage stamping ... stamped and embossed the staying over the collage stamping.  Added some Nuvo drops and was done.

Not sure if I ever showed my May atc's so I will just leave a pic below for you to see.  leave any questions in comment section if you want to know what I did.
That's it for this post.  Let me know what you think in the comment section.  Thanks for stopping by and come back soon.

Wednesday, December 19, 2018

Atc's with background videos

stamps used:  Unity stamp co.
I have a baggie of backgrounds that I have completed but not stamped so I decided to pull a couple out to use for these atc's.  This snowman Itty Bitty stamp set is one of the first Unity stamps sets I ever bought years and years ago.  the background on the snowman is the shaving cream technique.  You can look here to see this technique from way back in 2009 or here and here with a video .  The second atc has the Bokeh technique.  Watch video here or this post with a variation of Bokeh technique and here in my background sketchbook .  
Hope you like these two background techniques and the trip back in time with them.
thank you for stopping by and come back soon.

Thursday, November 29, 2018

Christmas stamping has started

stamps used:  Unity stamp co.
Here are my two November ATC's for the swap I have been doing each month.
The ugly sweater has glossy accents on the bulbs and don't you just love that background stamp!  It's one of the new Brutus Monroe backgrounds (spilled paint) made by Unity.  The second ATC is done with the stamp I call Charlie Brown's tree ... not sure what Unity named it.  If anyone knows please leave me a comment.
thanks for stopping by and please come back again soon.
Tuesday, October 23, 2018

Halloween ATC's

stamps used:  Unity stamp co.

For these two ATC's I did alcohol backgrounds which is a simple background but dramatic. 
Oh, did I mention that I used glossy cardstock because to me that really showcases the alcohol ink technique.  One of the ATC I stamped a saying directly over the background.  Second ATC I stamped image then used paper punches and mounted it on the ATC.  
What do you think?
Short but sweet post today.
come back again soon.
***can someone please comment on this post.  I need to know if anyone can comment at all.  
thank you***

Saturday, September 29, 2018

monthly (sept.) ATC

stamps used:  Unity stamp co.
The purple atc is what I call mixed media.
1.  mixed black acrylic paint with chunky silver glitter then dabbed it through a stencil.
2.  mixed gold re-inker with texture paste and spread a thin layer through a stencil.
3.  stamped writing image with black ink then embossed with clear powder.  repeated same with flower image.
4.  blended the atc with distress wilted violet ink.
5.  stamped "smile" onto white cardstock then punched it out and mounted with foam mount tape on atc.
Green atc
1.  laid ordinary string in green and orange paints then dragged on atc.
2.  stamped saying with black ink.
3.  adhered rick-rack ribbon on atc.
4.  added a clear gem.
5.  layered onto green cardstock to complete atc.
hope you enjoyed this short tutorial on how I created these two atc's.
come back again soon.

Thursday, July 12, 2018

mini pocket letters

stamps used:  Unity stamp co.
This is a new idea for me although I have done pocket letters which are a full 9 pocket letter.  The mini is a 9 pocket sheet cut into 3 mini pocket sheets to create 3 mini pocket letters.  They are actually 9 pocket sheet protectors for baseball cards but in the stamping world we call them ATC's (artist trading cards).  For a mini pocket letter you can include two or three ATC's that is your choice, I do it either or myself.  Along with the ATC's you include a little letter of introduction/explanation of what a pocket letter is and a few little trinkets for fun.  try it out and if you do please come back and show me what you have done.
you can watch below a video I did a while ago to show how to create ATC or at my you tube channel.  I did this video a couple of years ago so please take that into consideration....I have gotten better at making videos, I think.  teeheeheeee
thank you for stopping by.  come back again soon.  comments welcome.

Sunday, June 24, 2018

Unity ATC swap

I just joined a Unity ATC swap where we make two designs and send out to the players.  Here are my June ATC's that I sent out earlier this month for the swap.
camera ATC:
background is blended distress oxide inks.  a stencil over the blended ins.  stamped the saying and camera with VersaFine Clair nocturne (black) ink pad then embossed with clear.  worked great!
butterfly ATC:
background is blended with distress oxide inks.  stamped with more oxide inks.  did water drops.  stamped saying on the bottom of ATC.  stamped the butterfly on separate cardstock then die cut and mounted to ATC.
fun little pieces of art.

Saturday, October 3, 2015

Beware of the Spider!

Yes, beware of the spider!  some of them bite I know from experience...although it was years ago that I did get bitten by a spider I've never forgotten.  Oh, well on with this fun penny spinner card!  I got carried away and even made a couple of ATC penny spinners.  These cards are like shakers you just can't stop playing with them!  Please visit Just For Fun Rubber Stamps blog to get all the details on this card plus a video.  This is only my second video, (click on tab at top of blog or left sidebar you-tube to check the other videos-remember to give a thumbs up if you like it.) please let me know what you think.  Also want to give a shout out to my camera man, my hubby who grumbles a little then seems to have fun seeing it when we finish.
 

Tuesday, September 29, 2015

ATC's

 
 ATC's - Artist Trading Cards
Still on a kick making ATC's.  this time I went into my drawer with
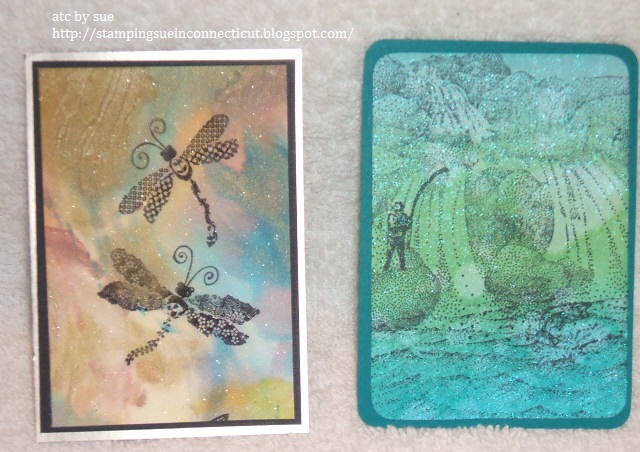
Stampscapes stamps and a couple other different stamp companies.  If I remember the backgrounds are left-over pieces of alcohol backgrounds then stamped images with black ink.
my favorite is the lighthouse atc.  look to the right and you will see some shine if you click on the pic to make it larger.  dragonflies has a piece of Ranger frosted film...it's a really cool way to add a bit of shine..... the frosted film has a sticker back.  the fisherman atc was sprayed with Perfect Pearls mist.  hope you are enjoying my atc's this month.
Here is a write up I did for atc's.
ATC - Artist Trading Cards
by Sue Wisniewski
Think of an ATC as miniature works of art. Just keep in mind that these are trading cards and are for trading/swapping only.
The basics:
You'll need a piece of cardstock or thin cardboard, 2½ by 3½ inches in size for the base of your ATC. It may be in either portrait or landscape orientation, and the corners can be either rounded or unrounded; it's purely a matter of personal preference. It's usual to use cardstock, but other possibilities include fabric, canvas, leather, acetate, metal and cork sheet. You could even use playing cards for the base of your ATC, if they are the right size.
Whatever you use has to be fairly flat; although artist trading cards may include three-dimensional elements like buttons and charms, they should be thin enough to fit in a standard trading card sleeve. It also needs to have a certain stiffness, so you might have to back fabric or canvas, for example, with cardstock.
Backgrounds:
A source for backgrounds is all the designer papers intended for scrapbooking. These can be found in a wide variety of colors and designs to suit every subject. Look out for interesting things like pages from an old book, music and maps. You can cover the whole card with one piece, or with several different pieces torn into strips or any shapes. Many of those who make artist trading cards prefer to create their own backgrounds using paint, color washes, chalks or inks. Brush, sponge, stipple, spray your chosen medium onto the card, and try blending different colors.
My favorite way to create backgrounds or focal points for an ATC is with my rubber stamps. Rubber stamps are very versatile and can be used in many ways to create interesting backgrounds.
Template:

8 ½” x 11” cardstock -
measure 3 ½”, 2 ½” and 2 ½” on the 8 ½” side
turn cardstock measure 3 ½” across
see diagram for cutting. This will create 10 ATC's.


Friday, September 25, 2015

MFPStamps Everything Fall Blog Hop day #4

WELCOME TO MFP STAMP SHOP


EVERYTHING FALL BLOG HOP

JOIN US EACH DAY, SEPT. 22-25 FOR AUTUMN TIME FUN. WE'LL HAVE  TUTORIALS AND DT INSPIRATION. THERE WILL BE PRIZES FOR LEAVING COMMENTS ON THE DESIGN TEAM'S BLOGS AND PRIZES FOR TRYING OUR TUTORIALS.  YOU WILL HAVE 2 WEEKS TO ADD YOUR PROJECT to the SEPT 25 POST FOR US TO SEE SO THERE IS NO EXCUSE NOT TO JOIN IN THE FUN. 

Please
Hop along with us!! 

 You could win one of the MFP Stamp Shop FALL STAMP SETS Just comment on the following blogs ( don't forget this one ) each
day for more chances to win! ( You do NOT need to comment on on all the
blogs each day! The names are drawn randomly.) Try one of the tutorials shown during the Hop and add your photo to the Inlinkz at the bottom of the post. The winners will be
announced on Oct. 10, 2015 right here on the MFP Stamp Shop Blog. You can
go back and comment if you missed a day. ( HINT: The more you comment
the more chances you have to win. And comments on the MFP blog count
twice. ) The deadline for commenting and posting pics of your projects is Friday Oct. 9, 2015 at 10:00 PM
EST.

Tutorials
SEPT. 22- MAKING ATC CARDS
SEPT. 24- MAKING FALL DP
This is my last blog hop with MFPStamps as I'm stepping down from their design team after the September hop.  It has been a fun ride!  Now on with the hop.
This month I will be showcasing ATC's which are Artist Trading Cards.....miniature works of art.
Apple - Bokeh technique, in and out bow, saying stamped in brown ink.
Wishing you a... - Bokeh technique, stamped flower in black ink, saying stamped on vellum.
Welcome Autumn - Bokeh technique, stamped saying and image with black ink.
MFPStamps Fall Apples, Chrysanthemum
Hope you had fun hopping.  It's been my pleasure hopping with you these past years.


Let's get started !!
Here's the Design Team

Lois  
Pam
Enjoy the Hop. Come back each day for more Fall Time fun. We hope to inspire you to start your own Fall projects.  Get to work on the tutorials, show us what you made by Oct. 9 and check back on Oct. 10, 2015 to see if you are a winner. 

Thursday, September 24, 2015

MFPStamps Everything Fall Blog Hop day #3

WELCOME TO MFP STAMP SHOP


EVERYTHING FALL BLOG HOP

JOIN US EACH DAY, SEPT. 22-25 FOR AUTUMN TIME FUN. WE'LL HAVE  TUTORIALS AND DT INSPIRATION. THERE WILL BE PRIZES FOR LEAVING COMMENTS ON THE DESIGN TEAM'S BLOGS AND PRIZES FOR TRYING OUR TUTORIALS.  YOU WILL HAVE 2 WEEKS TO ADD YOUR PROJECT to the SEPT 25 POST FOR US TO SEE SO THERE IS NO EXCUSE NOT TO JOIN IN THE FUN. 

Please
Hop along with us!! 

 You could win one of the MFP Stamp Shop FALL STAMP SETS Just comment on the following blogs ( don't forget this one ) each
day for more chances to win! ( You do NOT need to comment on on all the
blogs each day! The names are drawn randomly.) Try one of the tutorials shown during the Hop and add your photo to the Inlinkz at the bottom of the post. The winners will be
announced on Oct. 10, 2015 right here on the MFP Stamp Shop Blog. You can
go back and comment if you missed a day. ( HINT: The more you comment
the more chances you have to win. And comments on the MFP blog count
twice. ) The deadline for commenting and posting pics of your projects is Friday Oct. 9, 2015 at 10:00 PM
EST.

Tutorials
SEPT. 22- MAKING ATC CARDS
SEPT. 24- MAKING FALL DP
This is my last blog hop with MFPStamps as I'm stepping down from their design team after the September hop.  It has been a fun ride!  Now on with the hop.
This month I will be showcasing ATC's which are Artist Trading Cards.....miniature works of art.


Fall Day - background swiped distress stains, stamped bare trees (with brown ink), saying in black ink.
Autumn Splender - background swiped distress stains, stamped tree with green and brown ink, acorn stamped in brown, added glitter to tree.
Fall Greetings - background swiped distress stains, stamped tree in brown ink, stamped greeting on separate cardstock and hand cut banner shape.
MFPStamps Tree Greetings, Pumpkins and Sunflowers.  enjoy the hop.


Let's get started !!
Here's the Design Team

Lois  
Pam
Enjoy the Hop. Come back each day for more Fall Time fun. We hope to inspire you to start your own Fall projects.  Get to work on the tutorials, show us what you made by Oct. 9 and check back on Oct. 10, 2015 to see if you are a winner. 

Wednesday, September 23, 2015

MFPStamps Everything Fall Blog Hop day #2

WELCOME TO MFP STAMP SHOP


EVERYTHING FALL BLOG HOP

JOIN US EACH DAY, SEPT. 22-25 FOR AUTUMN TIME FUN. WE'LL HAVE  TUTORIALS AND DT INSPIRATION. THERE WILL BE PRIZES FOR LEAVING COMMENTS ON THE DESIGN TEAM'S BLOGS AND PRIZES FOR TRYING OUR TUTORIALS.  YOU WILL HAVE 2 WEEKS TO ADD YOUR PROJECT to the SEPT 25 POST FOR US TO SEE SO THERE IS NO EXCUSE NOT TO JOIN IN THE FUN. 

Please
Hop along with us!! 

 You could win one of the MFP Stamp Shop FALL STAMP SETS Just comment on the following blogs ( don't forget this one ) each
day for more chances to win! ( You do NOT need to comment on on all the
blogs each day! The names are drawn randomly.) Try one of the tutorials shown during the Hop and add your photo to the Inlinkz at the bottom of the post. The winners will be
announced on Oct. 10, 2015 right here on the MFP Stamp Shop Blog. You can
go back and comment if you missed a day. ( HINT: The more you comment
the more chances you have to win. And comments on the MFP blog count
twice. ) The deadline for commenting and posting pics of your projects is Friday Oct. 9, 2015 at 10:00 PM
EST.

Tutorials
SEPT. 22- MAKING ATC CARDS
SEPT. 24- MAKING FALL DP
This is my last blog hop with MFPStamps as I'm stepping down from their design team after the September hop.  It has been a fun ride!  Now on with the hop.
This month I will be showcasing ATC's which are Artist Trading Cards.....miniature works of art.
 
Autumn is Nature's (blue atc) - I sponged a stencil background, stamped the leaves (did some masking), added some silver cord, stamped saying and cut it out with a punch.
Fox - again used a stencil for background, stamped image on vellum and attached with brads.
Happy Fall - used same stencil as on the Fox atc, stamp small pumpkin with cat (masking), stamped saying and cut out with punch, added a couple of self-sticking crystals to finish.
MFPStamps Autumn Glory


Let's get started !!
Here's the Design Team

Lois  
Pam
Enjoy the Hop. Come back each day for more Fall Time fun. We hope to inspire you to start your own Fall projects.  Get to work on the tutorials, show us what you made by Oct. 9 and check back on Oct. 10, 2015 to see if you are a winner. 

Tuesday, September 22, 2015

MFPStamps Everything Fall Blog Hop day #1

WELCOME TO MFP STAMP SHOP


EVERYTHING FALL BLOG HOP

JOIN US EACH DAY, SEPT. 22-25 FOR AUTUMN TIME FUN. WE'LL HAVE  TUTORIALS AND DT INSPIRATION. THERE WILL BE PRIZES FOR LEAVING COMMENTS ON THE DESIGN TEAM'S BLOGS AND PRIZES FOR TRYING OUR TUTORIALS.  YOU WILL HAVE 2 WEEKS TO ADD YOUR PROJECT to the SEPT 25 POST FOR US TO SEE SO THERE IS NO EXCUSE NOT TO JOIN IN THE FUN. 

Please
Hop along with us!! 

 You could win one of the MFP Stamp Shop FALL STAMP SETS Just comment on the following blogs ( don't forget this one ) each
day for more chances to win! ( You do NOT need to comment on on all the
blogs each day! The names are drawn randomly.) Try one of the tutorials shown during the Hop and add your photo to the Inlinkz at the bottom of the post. The winners will be
announced on Oct. 10, 2015 right here on the MFP Stamp Shop Blog. You can
go back and comment if you missed a day. ( HINT: The more you comment
the more chances you have to win. And comments on the MFP blog count
twice. ) The deadline for commenting and posting pics of your projects is Friday Oct. 9, 2015 at 10:00 PM
EST.

Tutorials
SEPT. 22- MAKING ATC CARDS
SEPT. 24- MAKING FALL DP


This is my last blog hop with MFPStamps  as I'm stepping down from their design team after the September hop.  It has been a fun ride!  Now on with the hop.
This month I will be showcasing ATC's  which are Artist Trading Cards.....miniature works of art.  I have a written tutorial for you here today.  MFPstamp sets used:  Crows, Autumn Glory, ATC cards, Calendar. did a short video (go to you tube to give a thumbs up if you like my video. thanks!) how I created ATC.  Enjoy the hop!


ATC - Artist Trading Cards
by Sue Wisniewski
Think of an ATC as miniature works of art. Just keep in mind that these are trading cards and are for trading/swapping only.
The basics:
You'll need a piece of cardstock or thin cardboard, 2½ by 3½ inches in size for the base of your ATC. It may be in either portrait or landscape orientation, and the corners can be either rounded or unrounded; it's purely a matter of personal preference. It's usual to use cardstock, but other possibilities include fabric, canvas, leather, acetate, metal and cork sheet. You could even use playing cards for the base of your ATC, if they are the right size.
Whatever you use has to be fairly flat; although artist trading cards may include three-dimensional elements like buttons and charms, they should be thin enough to fit in a standard trading card sleeve. It also needs to have a certain stiffness, so you might have to back fabric or canvas, for example, with cardstock.
Backgrounds:
A source for backgrounds is all the designer papers intended for scrapbooking. These can be found in a wide variety of colors and designs to suit every subject. Look out for interesting things like pages from an old book, music and maps. You can cover the whole card with one piece, or with several different pieces torn into strips or any shapes. Many of those who make artist trading cards prefer to create their own backgrounds using paint, color washes, chalks or inks. Brush, sponge, stipple, spray your chosen medium onto the card, and try blending different colors.
My favorite way to create backgrounds or focal points for an ATC is with my rubber stamps. Rubber stamps are very versatile and can be used in many ways to create interesting backgrounds.
Template:

8 ½” x 11” cardstock -
measure 3 ½”, 2 ½” and 2 ½” on the 8 ½” side
turn cardstock measure 3 ½” across
see diagram for cutting. This will create 10 ATC's.


Let's get started !!
Here's the Design Team

Lois  
Pam
Enjoy the Hop. Come back each day for more Fall Time fun. We hope to inspire you to start your own Fall projects.  Get to work on the tutorials, show us what you made by Oct. 9 and check back on Oct. 10, 2015 to see if you are a winner. 

Saturday, September 19, 2015

Frankenstein bursting out

This is my first official act for Just For Fun rubber stamps !  We were asked to pick out some stamps, so knowing me I had to include a few Halloween stamps. Had fun making Frankenstein bursting out of my card and I liked the card so much I also made an ATC.  Frankenstein is colored with my favorite medium.....Prisma color pencils.  Please go over to JFF blog to find out more details on my card and ATC.

Wednesday, June 17, 2015

Playing with masking tape

Went to a friend's house to play...yes, a play date just like we were kids!  we played with masking tape,(ordinary masking tape you can get anywhere...Lowe's, even some grocery stores) acrylic paints, stencils and stamps(Hot Potato stamps! haven't used them in years!  what fun!)...Of course! can't play without stamping!  basically we put the tape down onto our craft sheet, painted a base color over the masking tape and let it dry.  After it is dry you just start stamping with the same old acrylic paints in a random fashion all over the masking tape strips you put on craft sheet.  when all is dry you carefully remove one of the masking strips and tape it to a piece of postcard size cardstock or any cardstock for a base.  you can cut it to size when you are all done.  back to technique.....remove another strip of masking tape but you take every other strip and tape it to cardstock base.  you are making a ..... oh, no!  having a brain freeze...what did my friend call it....ABSTRACT effect....yeah brain is back!  or what I like to call the Picasso look.  after all is tape done you cut to whatever size you want...postcard (4" x 6"), ATC, tags then finished decorating or add some more stamping to bring it all together.  clear as mud, right?  check out the pics then you can get the idea.