My stamping adventures

Showing posts with label background sketchbook. Show all posts

Monday, April 17, 2023

Shaving cream backgrounds with video

 Shaving cream backgrounds

Had a lot of fun getting my hands full of ink, and shaving cream. There is a short video I did years ago at the end of this post.

SU stamp sets

Shaving cream backgrounds are easy to create, but can be a bit messy.  


Instructions:

1.  Squirt out some foam (cheap-dollar store shaving cream) shaving cream onto any surface.  I used wax paper ... you could use a plastic coated paper plate, or pallet paper, too.  Level out the shaving cream into a spot big enough for a quarter sheet of cardstock.  At least that is the size I like to work with.

2.  Drop 1 to 3 different colors of dye ink re-inkers onto the shaving cream.  

3.  Use a wooden dowel or toothpick.  Whatever you can use to make swirls into the ink on the shaving cream.

4.  Lay a piece of cardstock on top of the swirled shaving cream.  

5.  Take the cardstock by one corner, and pull it out of the shaving cream.

6.  With an old credit card, or even a piece of cardboard, and scrap off all the excess shaving cream from cardstock.  Next wipe down the cardstock with a sheet of paper towel.  


Viola!!! See the fun background you created!


Hope you try this fun technique, and when you do show me your cards.  

Check out here instructions I wrote up back in 2009 in my background sketchbook, more here.  

Check out this short video I did years ago.


Thanks for stopping by.  Come back again soon.

Monday, December 13, 2021

Herringbone technique

 Herringbone technique

papers used:  Stampin' Up DSP

This is a classic technique I learned years ago, in fact, I have it in my background sketch book.


In my sketch book back in 2010, as you can see I used carpet tape for the base.  That tape is strong!  Now I just use whatever is in front of me ... could be glue, double stick tape or the full sheets of double sided tape.  
To see more samples with this technique look here, here, here, and here.  As you can see, I do like to bring back old techniques to life ... once in a while.
When I make these backgrounds into cards I will post them.  
***sorry won't be able to show cards ... sent out before I photographed them***
Thanks for stopping by and come back again soon.


Wednesday, December 19, 2018

Atc's with background videos

stamps used:  Unity stamp co.
I have a baggie of backgrounds that I have completed but not stamped so I decided to pull a couple out to use for these atc's.  This snowman Itty Bitty stamp set is one of the first Unity stamps sets I ever bought years and years ago.  the background on the snowman is the shaving cream technique.  You can look here to see this technique from way back in 2009 or here and here with a video .  The second atc has the Bokeh technique.  Watch video here or this post with a variation of Bokeh technique and here in my background sketchbook .  
Hope you like these two background techniques and the trip back in time with them.
thank you for stopping by and come back soon.

Friday, May 27, 2016

Herribone technique

Here is another page out of my Background Sketchbook I started years ago but I do reference back to it a lot.  It is fun to see what is old is new again for example I did this Herringbone technique back in 2010 on double sided carpet tape but now-a-days I just use a good permanent glue stick or fill a piece of cardstock with double sided tape or even glue for this technique.  I'll be posting new cards with this technique very soon.

Monday, June 15, 2015

MFP Stamps May card swap

Over on MFPStamps Speedy TV we do card swaps and the last one was in May.  The theme was spring so I stamped our Huge Blooms and saying on a Bokeh background.  You can see my explanation of the Bokeh technique here ...it's a page out of my Background Sketchbook.  If you have the time stop over to Speedy TV and check things out....it's free.

Sunday, May 24, 2015

Background Sketchbook - Acrylic Resist

This is a fun technique that can be done with just about any big background image and a little acrylic paint.

Monday, May 11, 2015

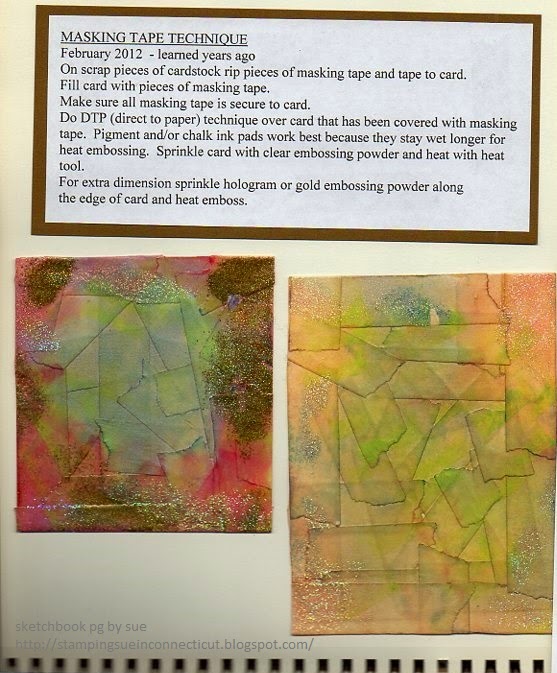
Background Sketchbook - Masking tape

Another oldie but goodie technique .... ordinary masking tape can look like old leather to a piece of old cloth.  add embossing powder for extra texture.

Saturday, April 18, 2015

Background Sketchbook - colorized ribbon

I started coloring ribbon years ago when I didn't have the color ribbon I wanted for my cards.  For the instructions here that I did back in 2011.  I used Ranger distress stains and ink pads but you can do it with just about any ink or paints.  If you use paint you just need to water it down to make it fluid.  Just play with whatever you have and see what colors you come up with for your ribbons.

Monday, April 13, 2015

Background Sketchbook - perfect pearls

The best part about Ranger Perfect Pearls is they have a binding agent in them so you don't have to add anything to them to get them to adhere to your project.....in fact you can just spray some water sprinkle on PP and they will stick!  On this page in my Background Sketchbook is a simple way to add color to a stamped image with PP.  All you have to do is ink up your image with VersaMark ink, stamp it then sprinkle on different colors of PP....with a soft brush you will more or less burnish in the PP colors then with a tissue buff your piece to remove any excess PP left on the cardstock.  easy as that!

Thursday, April 9, 2015

Background Sketchbook - faux barnwood

Another oldie but goodie technique.  It really does look like peeling off paint on wood.  With this technique you can use any color acrylic paint for different type of wood.  Here used brown paint for the background then pink paint on top....used pink because at the time it was handy.  try it out and let me know how yours' comes out.

Thursday, March 26, 2015

Background Sketchbook - bokeh

Have been playing around with the Bokeh technique a lot lately.....when it first came out I didn't think much of it but now I LIKE it!  and there are so many ways to create this technique.  Here in my sketchbook I'm showing two variations with instructions.  I used some old stamps I have in my collection from Lost Coast Designs.  That company can be a little weird but I like them......also have their set of Alice in Wonderland images as you can see on my sketchbook page. See more of my bokeh samples coming March 31st through April 3rd during MFP Stamp Shop blog hop.  please stop by and leave comments on all the design team's blogs for a chance to win a set of stamps.

Thursday, March 12, 2015

back to backgrounds....

Twist away is a technique that I saw many years ago at a stamp store in Florida....it was a three minute demo using inks and stamps to create a fun background.  The thing was she said you could only use one type of ink and one certain stamp!  plus she didn't allow you to take pictures and when she saw someone writing notes she gave them a look to die for!!!  well, this didn't sit with me so I went home and days later I tried to remember what she had done but of course I had to use every ink pad/stamp images I had in my stash.  Lo and behold ..... yes .... other inks and images worked just fine with her one and only technique.  Anyway I gave my findings a name....Twist Away because that is what you did with the stamp...twisted it away on all the inks to create a blurry effect.  Now this page in my Background Sketchbook was done back in 2005 (that's even before I started blogging!) but I saw the demo back in 2003.  After I went home and played with this technique I had so many cards that I decided to send into Scrap&Stamp Arts magazine and they accepted them!  They published it back in October 2003 and made it into a THREE page layout and when you read it I did give credit to stamp store in Florida but unfortunately didn't remember the name of the store which is probably good since I mentioned about using different inks/stamps in my article.  check out other pages from my Background Sketchbook here,  here , here, here, and here.....that's all I could find because they go back so many years.  I think I will bring this technique back to life but it won't be for at least a couple of weeks because right now I'm working Easter cards.....yes....I'm doing Easter cards.  see you next time here in blog land.

Sunday, May 10, 2009

Fused Fibers

Here's another background. This one is called Fused Fibers. Great way to use up all those little bits & pieces of fibers, yarns & ribbons.
Basically what you do is iron fusible web onto a piece of cardstock. Remove the backing. Place all those little bits of yarn, ribbon & fibers onto the cardstock with the fusible web. Once you have it the way you like iron all the fibers to the cardstock. Repeat the process till it is full. Trim excess fibers then add this embellishment to your project.


Stamp It! Create It! Have Fun! stamping sue
check out my classes in sidebar. come join the fun.

Sunday, May 3, 2009

Distressed Scraps background


Distressed scraps background is a fun way to use up scraps of papers that are leftover from any projects.
supplies:
paper scraps - all sizes & colors
any paper glue
white cardstock
white gesso
water, cup, paint brush
scissors
color washes
baby wipes
Instructions:
Glue scraps to cardstock. Leave uncovered sections and overlap some of the scraps. Pour white gesso in cup, add water to thin it out. Paint thinned gesso over the surface of background leaving some areas blank for resist effect. Allow gesso to dry completely. Cut up the background piece into smaller pieces to continue on to color for different backgrounds.
Adding color:
1. Spray on color wash sprays.
2. Rub dye or pigment ink pads directly onto background.
Tip:
Remove color with baby wipe.
Stamp It! Create It! Have Fun! stamping sue
Check out classes I offer in sidebar. Come join the fun!

Thursday, April 2, 2009

Shaving Cream background


Another oldie but goodie when it comes to backgrounds. Here is another page out of my Background Sketchbook.
SHAVING CREAM technique:
supplies:
foam shaving cream - cheap brand works best
dye re-inkers
toothpicks, comb or anything you can use for making design in shaving cream.
Basic instructions:
1. Squirt shaving cream into shallow pan.
2. Spread it out like you were frosting a cake.
3. Put a few drops of re-inker on shaving cream.
4. Move the ink around with toothpick or whatever implement you choose to use.
5. Press cardstock onto shaving cream.
6. Remove & scrap off excess shaving cream to see the design.
7. buff with paper towel.
Check out classes I'm teaching in sidebar. Come join the fun!
Stamp It! Create It! Have Fun! stamping sue

Thursday, February 19, 2009

Background - Shing Stones


Background fun - This background is called Shining Stones. I believe the creator for this technique is Julia Andrus who has a very informative book, Paper Transformed. Here is what I did:
Apply ink with brayer on glossy cardstock. Use waterbrush to add Perfect Pearls after misting colored cardstock with water. Mist a second time with water then move color around by dabbing with a crumbled up piece of paper towel. Allow to dry.
You can stamp directly onto the background paper or use it as a background paper. It's a fun & easy background. Stamp It! Create It! Have fun! stamping sue

Friday, February 13, 2009

Background fun!


Let's talk about backgrounds. Last year I started this notebook thinking I would just keep adding to it whenever I wanted to remember a background I had done. Showing here is the cover of my notebook and a page showing the instructions for playing with fun foam along with samples. Fun Foam is just a fun product found in the kids section of the craft store. Here I cut shapes out of the fun foam then painted it with Gesso. After the gesso dried I painted acrylic paints on it. Allow it all to dry. After dry I collage stamped images all over it with Brilliance Black ink pad but you could use any good permenant ink pad. That's all there is to it.

I'll add another background soon.

Have fun and experiment!