My stamping adventures

Showing posts with label peek-a-boo slot card. Show all posts

Wednesday, June 20, 2018

Rose peek-a-boo slot card

 stamps used:  Stampin' Up
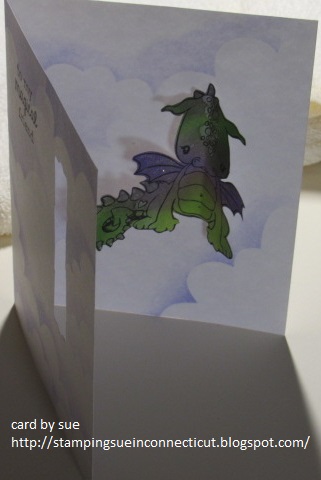
Here is another of the peek-a-boo slot cards.  they are easy to create and fun for the reciprocate to receive.  
For this card I adhered a piece of pattern paper to the front of the card before punching out the slot.  stamp and color the image onto a piece of white cardstock then fussy cut it out.  soft bend the fussy cut out image in half, either add double stick tape or liquid glue to the back of the image where it is softly bent in half.  close the card, place the softly bent image with the tape/glue through the slot to adhere to inside of the card.  if using liquid glue hold it in place for a minute or two for the glue to set.  add saying to card and you are done!
Here is another peek-a-boo slot card and one more peek-a-boo slot card.  
try this fun type of card and show me your cards.
thanks for stopping by.

Saturday, May 12, 2018

Platypus peek-a-boo slot card

Peek-a-boo slot card

 stamp used:  Unity stamp co. Cuddlebug Platypus 
stencil by TH
distress inks

Measurements:
base - A2 note card  8 1/2" x 5 1/2"  folded in half to create note card
Directions:
1.  Place stencil on front of note card and sponge color over it to create splat background.

2.  punch hole in front of card with SU punch.  If you don't have a punch you can use a die or go old school with a craft knife and metal ruler.
3.  stamp and color image (platypus) on separate white cardstock and cut out with die cut circle.
4.  fold image in half.  add a piece of double stick tape to back of piece where it is folded.  
5.  close the card and place the folded image with tape in the punched out section.  this will adhere the image to the inside of the card.
6.  lay the image flat on the front of the card then when you open the card the image ... in this case the platypus will be on the inside of the card!
thank you for visiting.  come back again soon.  leave a comment to let me know what you think.

Wednesday, May 2, 2018

Magical dragon

POP OUT Dragon card


 stamps used:  Unity stamp co.
supplies used:  All Night Media cloud stencil, SU punch, stickles (on wings), Nuvo glitter pen (on tail)
distress inks
Measurements:
base - A2 note card  8 1/2" x 5 1/2"  folded in half to create note card
Directions:
1.  Place stencil on front of note card and sponge color over it to create cloud background.
2.  stamp saying with black ink.
3.  punch hole in front of card with SU punch.  If you don't have a punch you can use a die or go old school with a craft knife and metal ruler.
4.  stamp and color image (dragon) on separate white cardstock and fussy cut it out.
5.  fold image in half.  add a piece of double stick tape to back of piece where it is folded.  
6.  close the card and place the folded image with tape in the punched out section.  this will adhere the image to the inside of the card.
7.  lay the image flat on the front of the card then when you open the card the image ... in this case the dragon will magically be on the inside of the card!
thank you for visiting.  come back again soon.  leave a comment to let me know what you think.