My stamping adventures

Showing posts with label resist technique. Show all posts

Friday, February 21, 2020

Resist it!


stamps used:  Unity stamp co.

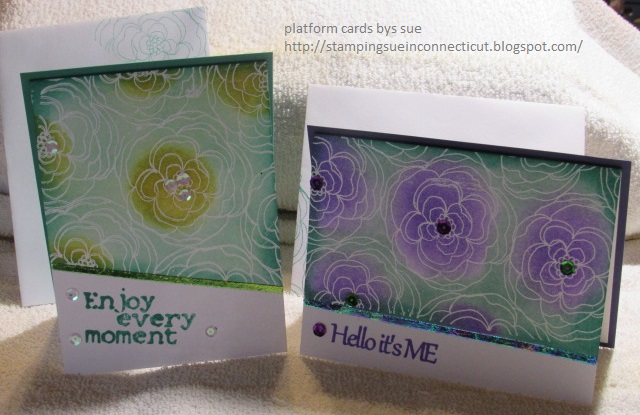
Did some embossed resist technique cards after seeing Whitney from Unity stamp co., made several on a LIVE on Facebook.  It reminded me of an old technique that I used to like a long time ago, so I decided to create some cards.  
The photo on the left are the panels and the photo on the right are the finished cards.  
Basic instructions:
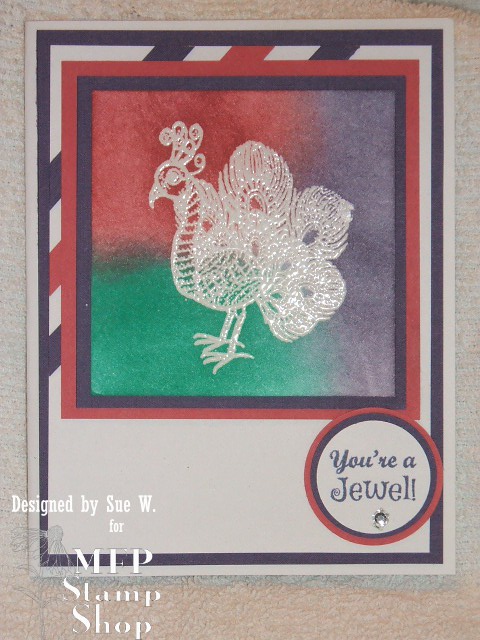
1.  stamp and emboss image with white or clear ink and embossing powder.
2.  blend colors over embossed image with stipple brushes, picket fence brushes or even sponges.
3.  buff the colored cards off with a soft cloth to remove any excess wet ink on the embossed image.  this step helps the image pop.
4.  trim down panel and layer on note card.
5.  stamp and emboss sayings on separate cardstock.  fussy cut or die cut and mount sayings on note cards.
***for these cards I did like Whitney did on her's ... which was add a piece of ripped vellum on the card before mounting the sayings***

Monday, May 27, 2019

More repeat stamping

stamps used:  Unity stamp co.

I forgot how much fun it is to repeat stamp or collage stamping ... whatever name you call it ... TRY IT!  it's fun and addicting!
For these cards I upped my game a little by doing subtle resist technique, heat embossing and over stamping.  
Check out this post for more repeat stamping and links to videos on repeat stamping I have done in years past.

Heat embossing basic instructions:
1.  stamp image with VersaMark ink pad or a pigment ink pad.
2.  sprinkle with embossing powder.
3.  heat set with a heat gun and you are done!

Subtle resist technique:
1.  stamp image on cardstock with VersaMark ink and allow to dry.  You can speed up the drying process with a heat gun.
2.  when images are dry blend on some color.  I used different brands of dye ink pads with a blending tool.
3.  after your piece is all inked then buff with a soft tissue or towel and you are done!

thanks for stopping by and come back again soon.
Happy Memorial Day.  enjoy and be safe.

Monday, February 11, 2019

Resist and sponge it

The title says it all -  first did resist technique then sponged on color.
stamps used:  Unity stamp co. smak kit Truest Life

Let's see first I stamped the big butterfly all over a white card with Colorbox black pigment ink then embossed with clear embossing powder.  Next step I sponged on my new Catherine Pooler inks.  They are a juicy dye ink that blend wonderfully together in fact as good as Ranger distress inks , but that is only my opinion.  You will have to try for yourself to see what you think and when you do please leave me a comment to let me know.  The saying was white embossed onto a piece of black cardstock then adhered to stamped card .... then layered onto a black note card.  An old technique but a good one.  
thanks for stopping by and please do return soon.

Friday, February 8, 2019

Resisting

An old technique with a twist.

stamps used:  Unity stamp co. smak kit Truest Life (sept. 2017), thinking of you from Sentiment kit ...every single day (june 2018)

First I stamped the big butterfly randomly on white card then heat embossed with white embossing powder.  Now the next step was an accident ... you see all I wanted to do was over stamp the filmstrip and swirl with dye ink BUT I used some new (to me) Catherine Pooler ink pads.....which were very juicy.  So in turn when I tried to wipe the dye ink off the embossed butterflies it smeared on my card so I went with it!  What I mean to say is I took the baby wipe I was using to wipe off the embossed images and "smeared" it all over the card and got this lightly blended out color.  So there you have it sometimes in stamping there are happy accidents.  The one saying, "see beauty" was a big one so I cut it up and adhered it to my card.  See here for how it was supposed to look.
thanks for stopping by.  come back again soon.

Tuesday, February 5, 2019

Twist on resist

A twist on resist technique.

stamps used:  Unity stamp co. smak stamp set Truest Life Sept. 2017 and ...every single day sentiment set June 2018

Hard to see in photo but I stamped the big butterfly randomly over the card then heat embossed it with white embossing powder.  Next step I over stamped it with the swirl with Catherine Pooler (new to me) dye ink pads.  These ink pads are very juicy so before adding sentiment or layering this piece I needed to allow it to dry ..... but ..... since I'm impatient I heated it a bit with my heat tool.  All was good so layered onto black card then onto a white note card.
I did this technique at a crop recently for a MITI ... I've done the resist technique where you do the embossing then stipple color over it but don't think I just stamped over it so, it was fun to do a new twist on an old technique.
thank you for stopping by.  come back again soon.

Tuesday, November 13, 2018

Platform cards

 stamps used:  Unity stamp co.
I call these Platform cards because it is a folded card on a single layer of card which is like a platform for the card.
Measurements:
base platform - 5 1/2" x 4 1/4"
folded card - 8 1/4" x 5 1/4"
That is as simple as it gets!
I did a resist technique for the coloring on all four of these cards.  Stamp and emboss image then blend, stipple or sponge on color.  Buff to reveal the magic of resist.  I added a bit more shine by adhering a strip of double stick tape then pressing on foil.  No heating necessary for foil doing this technique.
Hope you enjoyed this post.  Leave a comment to let me know what you think.  come back again soon. 

Sunday, October 22, 2017

Go West

stamps used:  MFP, SU
Used an old technique here called resist.  stamp and emboss image with white embossing powder.  let it cool.  sponge ink over and around the image.  buff the image to make it pop.  stamp saying with black ink over sponge ink.  

Saturday, August 5, 2017

A bunch of cards

stamps used:  Stampin' Up
I went to a local class to check out the in colors for Stampin' Up.  It was fun, mainly because I went with a couple of friends and we had fun just being out of the house for a night.  I do like that tulip stamp set ... too bad it is a hostess gift, I think.  it is a nice two step stamp set and believe it or not you only use one color with the two stamps and you get the great shading on the stamped image.  it's the way the actual stamp is made.  I made two cards with the tulip stamp set because the pink card used the pink ribbon stamp set but I wanted to stay positive so my friend who designed the cards let me change the pink card for me.  The sea shell card is my stand by technique ... resist!  resist is always a winner.  for this resist technique we stamped with VersaMark ink ... let it dry ... then brayered all that wonderful color over the images ... buff it to make the shells pop!  think this is my favorite card out of the bunch.  The die cut heart card uses the new fig ink color and beautiful pattern paper.  The resist may be my favorite technique card but the lemon/lime twist color is my favorite color!  and the stamp set we used for the lemon/lime card is so much fun ... check out those scissors and that saying.  that's it for today.  enjoy!  

Wednesday, July 26, 2017

Tag fun

stamps used:  Stampers Anonymous
A couple of tags with lots of bright colors ... and for me that is hard because I'm more the vintage or muted color gal.  I went bright because I was thinking fun birthday tags.  for the background I used lots of distress inks ... regular and oxide then I spritzed a stencil with water ... placed the watered side down on the inked tag ... let it hang out for a minute or two ... then removed to get the faint water resist effect.  next I stamped the ostrich image onto kraft cardstock and colored with my Prisma color pencils as anyone who knows me that is my favorite coloring medium.  I fussy cut the ostrich (don't own the die) and mounted her on the tag with foam mounting tape.  the balloon on the right was stamped onto some backgrounds I had out on my table but the one on the left was colored with Prisma color pencils.  now the balloon I do have the die so I die cut them and again used foam mounting tape to pop them onto the tag.  the string on the left is stamped and die cut but the string on the right is actual string.  I stamped the words from the same stamp set with the ostrich.  Oooops, forgot about the party hat they were also stamped onto the background paper then die cut and taped to the ostrich's head.  these tags will be saved until I need to send out a birthday to one of my friends.

Wednesday, January 4, 2017

Tag on.....in 2017

stamps - Stampers Anonymous
TH washi tape
distress inks
TH paint dabbers
Did a paint resist technique on these two tags...one with black paint and other with white paint. I think the white paint worked best for me because for some reason my black dabber paint just soaked into tag.  the white dabber dried with a bit of texture which worked better for this technique.  dabbed paint onto background images and stamped on tag then allowed them to air dry...I left them for a few hours so I knew they would be fully dried.  got out my blending tool and distress inks to blend color all over tags.  wiped off painted images with damp paper towel to remove any excess paint and make that image pop a little more.  next I stenciled with white paint dabber on tag with black image and the same distress green ink on the white painted image.  over stamped the row of birds with black ink on the one tag but the tag with the black painted background image ... well ... that one didn't need anymore black so left it alone.  added some washi tape for some dimension to break up the stamping...after that I stamped the rainman on separate cardstock....fussy cut....and mounted to tag.  done! except for cleaning stamps...remember to always wash stamps off that you used paint or the paint will dry into the crevasses forever.  thanks for stopping by...leave me a comment and let me know what you think...does it need more or less?

Thursday, September 15, 2016

Resist more

 Two more cards showing this fun resist technique.  Basically you blend, sponge or stipple color onto card...I used white cardstock but I'm sure it would work with cream or any light color cardstock.  after you have all the color you want on card ... let it dry.  Next stamp images with VersaMark ink pad and watch the magic happen.  when those images are dry you can over stamp the same images with Colorbox white pigment ink for contrast...after that step I dusted on some Ranger perfect pearls for more pop!  stamp and emboss a saying and you are done.
all images on these two cards by Just For Fun stamps
inks by Colorbox white pigment ink, VersaMark ink pad and Ranger distress inks


Saturday, August 6, 2016

can you resist the beach?

 Play on words here because I did a resist technique on these two cards.  they look much better in real life.  the same technique except one is just brown ink and the other is three different color inks.  so let's get started with this resist technique:  1.  ink card with whatever color (dye ink pads) or colors you want.  2.  stamp images with VersaMark ink.  allow to dry on it's own or use a heat gun.  3.  over stamp a couple of the images with white pigment ink.  4.  brush on perfect pearls to a couple of the white pigment images.  5.  heat emboss the sentiment and you are done.
visit Just For Fun Rubber Stamps blog for stamp details.  thanks for visiting here and don't forget about JFF August beach challenge ... you need to enter to win.

Tuesday, November 3, 2015

Leaf resist

Yes, back to an old favorite....resist.  started by embossing leaves with white pigment ink and heating white embossing powder on it.  next step is just sponge on colors....went with greens on this card.  after all color is on the card, buff it with soft towel and watch the magic.....the white leaves just seem to pop off the card.  add some ribbon, fussy cut another leaf and mount to card.  layer it to card.  viola!  you are done!
stamps used:  stamptangle elm leaf, stamptangle teardrop ornament

Friday, June 19, 2015

Resist with peacock

Was creating a card for a swap this month and decided to go with an oldie but goodie technique.....resist!  you do the resist technique in many ways but for this time around I did the old favorite of clear embossing and sponging color.  here are a couple of cards I created.

Wednesday, October 30, 2013

Christmas in October

I did a three night stamping class and at the last night we did heat
embossing to make Holiday cards.  I've been stamping for over 15 years so heat embossing is passe but let's face it still impressive.  My students wanted to heat emboss so that is what we did.  The embossing powder was flying
around all night but they all had fun.  Like me my students find it easier to stand while stamping and embossing their cards.  Silver
embossing on blue slate cardstock is impressive even if I do say so myself.  Had to do a embossed resist technique with one of the latest trends washi tape.  Also did a multi color embossing card.....stamp image with VersaMark ink then sprinkle different color embossing powers over the images, heat it and see the magic.  They had fun with all the different color embossing powders.
ornament card details:
stamps - Stamper's Anon.
variety of embossing powders
------------
3 wise men card details:
stamps - Mark's Finest Papers and Stamps! a Heinrich Co. wise men mini stamp set
silver embossing powder - VersaMark ink pad
------------
Happy Holidays resist card details:
stamps - Mark's Finest Papers and Stamps@ a Heinrich Co. Joyous Seasons stamp set
VersaMark ink pad
Adirondack ink pads - butterscotch, terra cotta, mushroom
woodgrain washi tape

Wednesday, September 18, 2013

Simple Salutations 63 - Autumn!

 Simple Salutations challenge is here again.  Decided we should celebrate the coming Autumn season so with that lets stamp leaves, the color of the season or even your favorite sport for the season.  whatever Autumn comes to mind for you!  As you can see for my card I did the colors and leaves with one of my go to techniques.....resist.  In this case I stamped and embossed my leaves VersaMark ink and white embossing powder then added fall colors.  Buffed off the leaves to make them pop after adding the colors.  For my ribbon I did a fun technique I call, "the in and out" knot.  Simple said you punch two holes, thread the ribbon down the holes to the back of the card.  Next criss cross the ribbon ends and thread them to the front of the card....trim and there you have it!  "the in and out" knot!  Please check out my fellow sister blogs......Vickie's and Steph's blogs to see their cards for Autumn! 
card details:
stamps - MFPaHC Autumn Glory stamp set
inks - Ranger distress ink mustard seed, spiced maralade, mowed lawn
VersaMark
Sheer green ribbon

Wednesday, August 21, 2013

Lions, tigers and bears, Oh my!

We are going wild this week at Simple Salutations .  Last week we did simple black and white creations so why not go completely wild this time here at Simple Salutations #59 . Did one of my favorite go to techniques: resist. stamp and emboss with white then sponge over embossed image with whatever colors you want. you can click on my pic to see it bigger.  I used the tiger head and saying from Mark's Finest Papers and Stamps! a Heinrich Co. Big Cats stamp set which also has a pair of great cat's eyes!  Have fun with this challenge this week and please visit my sister team members Vickie's blog and Steph's blog to see how wild they go this week.

Thursday, April 4, 2013

eat your veggies

One of my favorite vegetable is corn on the cob in the summer.  don't you just love biting into that crisp buttered corn on the cob....I do.  Here's a fun little shape card that is full of all the flavor of corn on the cob.  Front of the card is basic resist technique... emboss with white embossing powder then add color with sponges, buff off the embossed images and see it pop. 
Going to give something a try for the first time and that is add this post/card to a SplitCoastStampers challenge...not sure if it will work but going to give it a try.
card details:
all images by Mark's Finest Papers and Stamps! a Heinrich Company corn ears stamp set
all dies are by Spellbinders Nestabilities classic ovals and scallop ovals

Thursday, January 24, 2013

Resist it

Yes, yet one more resist card.  This is a variation on the Joseph's coat I learned years ago when working at a stamp store when Natalie from Magenta (if I remember correctly) came to teach classes.  For the Joseph's coat you brayer colors on glossy cardstock,  stamp and emboss image with clear ink and embossing powder.  Next brayer black ink over the whole card and you are done.  My variations: 
1.  sponged on three different colors all over glossy cardstock.
2.  stamped and embossed the heart image with white ink and white embossing powder.
3.  sponged red ink over the embossed card because was doing a valentine.
4.  buffed images with soft cloth to make the white embossed hearts really pop with color.
5.  stamped large rose image with Ranger archival jet black ink.
6.  make sure the card is dry then stamp and emboss the little love with white ink and white embossing powder.
7.  add a bow.  DONE!
showed my husband and even he liked it! and that is saying something because besides me he is my worst critic.

stamp credits:  MFP Love, love, love stamp set
inks:  Ranger adirondack red pepper, stonewash, butterscotch, lettuce, archival jet black
paper:  glossy cardstock
ribbon:  SU

Friday, January 18, 2013

MFP blog hop - Love, love, love


January Blog Hop!
This month's New Stamp Set Releases are
Fantastic Dogs Featured January 15
No Sour Grapes Featured January 16

In My Den Featured January 17
Love, Love, Love Featured January 18
Had a lot of fun with this stamp set. check out these magents! thank you to my friend for the package of business card size magnets.  stamped one with red ink and the other did blackboard technique.  fun, huh?

Please hop along with us! You have a chance to win one of the above stamp
sets! Just comment on the following blogs (don't forget this one), each
day for more chances to win! (You do NOT have to comment on all the
blogs each day! The names are drawn randomly!) All four winners will be
announced on January 19, 2013 on the Mark's Finest Papers blog. You can go
back and comment if you missed a day. (HINT: The more you comment, the
more chances you have to win and comments on the MFP blog count
twice!) The deadline for commenting is 11PM EST on Friday January 18,2013.


Happy New Year!!! Welcome to the first blog hop of 2013! We are so excited to share the great stamp sets we are releasing this month and the months to come.

https://blogger.googleusercontent.com/img/b/R29vZ2xl/AVvXsEjBzlPvWHUmGIiHDMSkgUnx_HBjsv00Q49W-odA8-QpLKRrg-mqsUnkgALumuFe73ZGjpI1aD3bcQBBtFixvH1hmF3fufVaPfkPhNRBGEPisg31yePJxYVpslv9OlcDkpT1oj6B972ZPjiH/s1600/January+2013+SM+DEBBIE+FINAL.jpg
The special stamp set we have for you this month is:
" OH Baby"
https://blogger.googleusercontent.com/img/b/R29vZ2xl/AVvXsEhWpMUt9xbYA42PxtsDhaivWeSq5iDwtiXu-SNO1-thsuCd3YUmGiKB89VtAt8wuav0vkOEGRoM8lgq4mwkeRfz_8W9RYEvJ-zg47tQwJ9A5mzSV-q27IX5YhAx1q7ikARu7_L6rrp6Kc32/s1600/oh+baby+watermark.jpg
The mini stamp set we have for you this month is "Not So Ugly"
https://blogger.googleusercontent.com/img/b/R29vZ2xl/AVvXsEh0UQEtI0G0uyuqaKyb-yx230UWMAAtWjf9Ss7nk69gZfUuqVDKpn-9IYImwFfQ5jvoh57w4WwiUCinolpWnt6LUB-F20wpp0_45O9rAW2gIbZfJAQplaYZcFtunmAgvChBsMCFIBx5U2zJ/s1600/not+so+ugly+watermark.jpg
Great set of stamps just in time for Valentines. First up a card with a cut out to show off the saying on the inside of the card.
Next a couple of bookmarks, yes still making bookmarks for my S-I-L. Think I might enough to send to her now. Did resist technique on these two bookmarks.
Continue on hop to see more creations from the rest of our design team.