My stamping adventures

Showing posts with label Ranger distress oxide inks. Show all posts

Thursday, August 11, 2022

3D embossed oxide card panels

 3D embossed oxide card panels

                                             Altenew Whimsical bouquet 3D embossing folder

OOOOPS! I posted the blog post with the finished cards here before I posted this blog post with the card panels. So sorry for the confusion of the posts.

Still having fun with these 3D embossing folders!  There are twelve more card fronts for me to make into cards.  

                                            Altenew Decorative Florals 3D embossing folder

Another six card fronts to make into cards.  This time I got out my distress oxide ink pads.  Basically what I did was brayer the oxide inks onto the 3D folder itself.  Then place a piece of white cardstock inside the inked 3D folder, and ran it through my Big Kick.  Just to let you know you can use whatever brand machine you own. When I got tired of braying on the ink ... I just took the ink pad right to the folder!  By the time I'm done playing with these two 3D embossing folders, I will have replenished my supply of birthday, anniversary, and thinking of you cards.  Finished cards to come soon.

Check some more with these 3D embossing folders here and here. 

Thank you for stopping by.  Come back again soon.

***not affiliated with above company just happy customer***


Saturday, February 1, 2020

Vellum card

 stamps used:  Unity stamp co.

Vellum card
stamps used: Unity stamp co Always by your side, every single day
inks: distress oxide broken china, worn lipstick
base card: 7” x 5” fold in half to create card
layers on front of card: 3 x 3 1/2”, 2 3/4” x 3 5/8”, 3 x 2 3/4”
inside layers: 3 1/4” x 3 1/2”, 2 3/4” x 3 1/4”
Technique:
On white layer ink up flower image with oxide worn lipstick and stamp on white card.
Spritz image with water and let the ink bleed out. Allow to dry or use heat tool.
Clean stamp then ink up with oxide broken china and repeat process.
When it is dry over stamp with flower outline image in black ink.
Tape all the layers together and tie ribbon around layers. Adhere to front of vellum card.
Stamp saying and adhere to front of card under flower image piece.
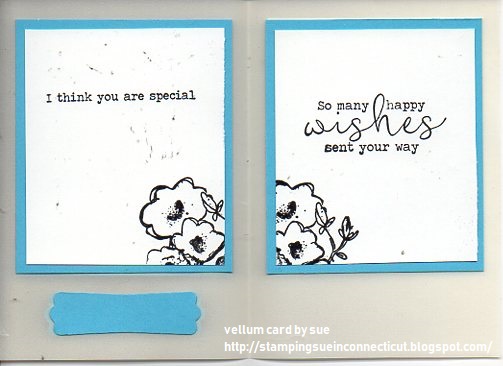
Inside card:
stamp sayings and flower outline on white card.
Tape to light blue card. Tape saying pieces to inside of vellum card to cover the glue from the front of the card.

Sunday, March 17, 2019

Oxidize it!

stamps used:  Unity stamp co. Always by your side stamp set

Oxidized card:
On piece of white cardstock stamp solid flower from Always by your side stamp set with Ranger distress oxide fossilized amber ink. Spray with water and allow the ink to move around. This creates a loose watercolor effect. Allow to dry or use heat tool. Repeat the process with distress walnut stain oxide ink using the same image. When completely dry, over stamp with outline flower image from the same stamp set with waterproof black ink. Stamp the saying image also from the same stamp set with waterproof black ink. Layer onto a piece of black cardstock and splatter some of the same ink onto the stamped piece. Place a little crooked on the brown note card and adhere to card. Add some self stick gems to finish the card.

Thank you for stopping by.  come back again soon and don't forget all comments are welcomed and appreciated.